KP Texan
Marine Engineer
A leaking sink shutoff valve is my latest issue in this nightmare guest bath remodel. The tile guys mentioned that the valve would not turn off when they were tearing out the sinks, but that they would turn off the water and change out the valve for me... sounded fair at the time. A few weeks later, I noticed that this valve was dripping very slowly around the compression nut and that they had used teflon tape on the threads, although it was a new valve! I thought, no biggie, I'll just shut the water off and pull the valve, remove the teflon tape, add some oil to the nut/ferrule and then properly tighten it back down. To make a long story short, the valve still shows some signs of moisture at the compression nut after I did this, and it has been tightened enough to crimp the 1/2" copper pipe (rendering it useless for a new ferrule). Anyway, it looks like after I cut off the bad section of pipe and remove the decorative flange, I will only have 1" of copper pipe at most protruding through the drywall. The way I see it, I've got the following options (in order of preference):
1. Clean up 1" stub of pipe, install new ferrule/nut and use same valve (the tile guys left me the new ferrule and nut since they just reused the old ones on the pipe) - Is 1" of pipe enough length to do this? I notice the brasscraft installation instructions say to fully bottom the pipe out in the valve, but is this necessary?
2. Pull that valve and use a push on valve - I don't really trust the push on valves but maybe it's the best option here?
3. Use a sweat on valve - I feel fairly confident doing this, although it is in fairly close proximity to the drywall. I also know it would be a pain to change once the valve needs to be replaced.
4. Solder a coupling and short piece of pipe on, and use a compression valve again - I kind of like this option, but will a 1" coupling+short stub of pipe stick too far out of the wall? This means the stub out would be then be at least 2.5" out of the wall, before putting the valve on. Plus, I don't think the decorative flange will fit over a coupling anyway.
5. Tear into the wall, and solder in a new stub out, and use compression valve again - Possibly the best permanent option, but I do not relish the though of doing this. I just finished a bunch of drywall work elsewhere in this bathroom, and it's far from my favorite thing to do (plus I'm not great at it). On top of that are the inherent risks of setting something on fire inside the wall.
So there you have it. What would you guys do in this scenario? Sorry for the long winded post, but time is at a premium when the water is shut off to the house and I just want to plan ahead. I can buy the components up front for several different options so I can quickly move on to Plan B if needed.
I can't thank you guys enough for your input!
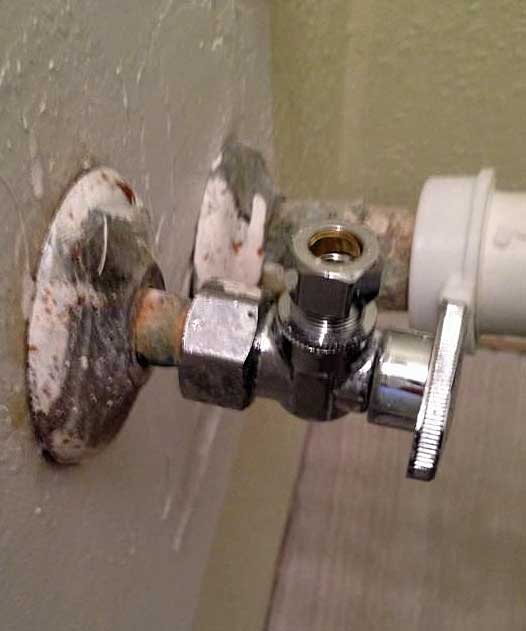
Oh yeah, a photo of the offending valve:
1. Clean up 1" stub of pipe, install new ferrule/nut and use same valve (the tile guys left me the new ferrule and nut since they just reused the old ones on the pipe) - Is 1" of pipe enough length to do this? I notice the brasscraft installation instructions say to fully bottom the pipe out in the valve, but is this necessary?
2. Pull that valve and use a push on valve - I don't really trust the push on valves but maybe it's the best option here?
3. Use a sweat on valve - I feel fairly confident doing this, although it is in fairly close proximity to the drywall. I also know it would be a pain to change once the valve needs to be replaced.
4. Solder a coupling and short piece of pipe on, and use a compression valve again - I kind of like this option, but will a 1" coupling+short stub of pipe stick too far out of the wall? This means the stub out would be then be at least 2.5" out of the wall, before putting the valve on. Plus, I don't think the decorative flange will fit over a coupling anyway.
5. Tear into the wall, and solder in a new stub out, and use compression valve again - Possibly the best permanent option, but I do not relish the though of doing this. I just finished a bunch of drywall work elsewhere in this bathroom, and it's far from my favorite thing to do (plus I'm not great at it). On top of that are the inherent risks of setting something on fire inside the wall.
So there you have it. What would you guys do in this scenario? Sorry for the long winded post, but time is at a premium when the water is shut off to the house and I just want to plan ahead. I can buy the components up front for several different options so I can quickly move on to Plan B if needed.
I can't thank you guys enough for your input!
Oh yeah, a photo of the offending valve: