Kohler K-899-G Undermount Tub Installation: Template(s) 892 899

Users who are viewing this thread

JohnfrWhipple

BATHROOM DESIGN & BUILD
Messages
3,225
Reaction score
102
Points
48
Location
North Vancouver, BC
Kohler K-899-G Undermount Tub: Template 892 & Template 899

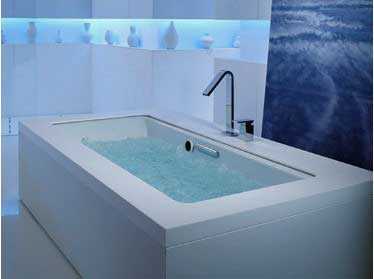
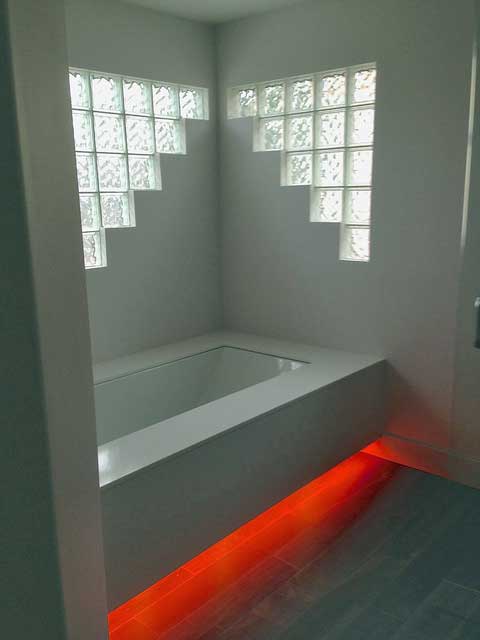
The stone guy comes tomorrow morning at 8:00 to measure for the Kohler Undermount Tub Installation. The design calls for a two sided waterfall edge and a large access panel in the front. The tub deck was framed from common dimensional lumber & plywood. The cast iron tub firmly sat on the homes concrete floor.

I waterproofed the plywood tub deck with some Laticrete Hydro Ban Sheet Membrane and set it tight. This is tied into the master bathroom's steam shower. Left of the tub the stone will make up the seat for the shower and a framless glass shelf will divide the space.


K157 Kit: Includes Kohler undermount Template (892 & 899)

k-892.jpg


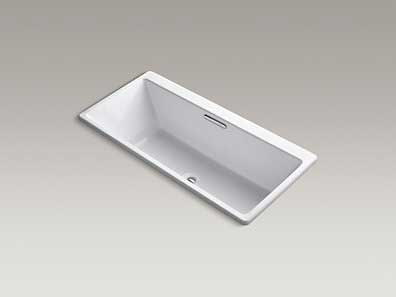
None jetted model shown here (K-892-0)


Drawing: Kohler 1160163-7-A


Template: Kohler 1160163-7-A


Flush Mount Detail (closet line to text)


Recess Mount option (top line on template)


Two issues to deal with. The first is what to do with the slope on the top side of the Kohler Tub. You can see from the two drawings above that the tub has none - but that is not the case. The tub's top deck is graded a hair to the middle. Not flat like the drawings show.

om
 
Last edited by a moderator:

JohnfrWhipple

BATHROOM DESIGN & BUILD
Messages
3,225
Reaction score
102
Points
48
Location
North Vancouver, BC
Kohler K-899-G Undermount Tub Installation:
  • Stone: 3cm Ceasar Stone
  • Waterproofing: Laticrete Hydro Ban Sheet Membrane and Ardex 8+9
  • Design: Waterfall edge (face of tub and shower bench)
Laticrete Hydro Ban Sheet Membrane
This slope will create a slight void that would need to be filled. The framing for the tub deck is also a hair off so the two items together compound the shadow reveal. In this Kohler Image I found online you can see the shadow reveal I'm trying to avoid.

zaa31418.jpg


I purchased some 3/16" White Tile edging and plan on installing it to remove this from the equation. The questions I tried to answer today where which way to install the edging? How to cut it so I can create a smooth bend? Should I install it wrong way up or right side down? There are pros and cons to each. ???
The tile represents the finished stone. The use of the tile edging I think greatly improves the look. I like the slight 3/16" overhang I used in this mock up. I tired a few versions of back cutting the tile edging to make the bend and learned that a very even spaces in slices will be needed to end up with a nice proper radius.

I'm also thinking of making a jig to bend the profiles and hold them perfect while the adhesive sets up.
 
Last edited by a moderator:

JohnfrWhipple

BATHROOM DESIGN & BUILD
Messages
3,225
Reaction score
102
Points
48
Location
North Vancouver, BC
Kohler K-899-G - Bubble Massage Soaker


Kohler 114753-2-CC Installation Guide - Whirlpool and Bath Undermount Kit

Models Listed
  • K-136
  • K-576
  • K-577
  • K-581
  • K-582
  • K-583
  • K-584
  • K-585
  • K-586
  • K-587
  • K-588
  • K-589
  • K-590
  • K-591
  • K-592
No reference on the guide book for the model we have. The K-899-G or the K-982 labelled on the template. Perhaps these models are made elsewhere.

The cover of the Kohler 114753-2-CC Installation Guide shows a notation that if a "M" is present in the model number it comes from Mexico (i.e. K-12345M)

The installation guide is kind of a shit show for lack of better words. It recommends a full bullnose edge to the stone top and like the template shows the stone sitting on a flat surface. The fact is the tub edge is eased and not flat at all. Instructions ask for sealant 2" away from the edge and then sealed where the stone meets the tub. Bracing for the stone is required.

The guide lists a file in the required tool list but makes no reference to when to use it. A jigsaw is listed as well but I'm not sure what use that has with a stone counter top. A router is needed and weights. These tools seam better suited to building a wood template and not installing the tub deck.
 
Last edited by a moderator:

JohnfrWhipple

BATHROOM DESIGN & BUILD
Messages
3,225
Reaction score
102
Points
48
Location
North Vancouver, BC
Kohler K 899 G Prep Work for Stone Installation

Here are some older photo's showing the plywood framing. The expansion zone. And the Laticrete Hydro Ban Sheet Membrane being dry fit.
 
Last edited by a moderator:

JohnfrWhipple

BATHROOM DESIGN & BUILD
Messages
3,225
Reaction score
102
Points
48
Location
North Vancouver, BC
Tub Filler Layout for Kohler K-899-G Undermount Tub
I made ups some templates for the tub filler, handheld and handles for the Kubica Deck Set by Altman's. Each trim plate is 2.4" and I spaced them first on 4" centres and later reduced that to 3.5". The Tub filler centred on the tub's overflow. Set back from the stone face 5 1/2" so that the locking washer miss the tubs Cast Iron lip.

We checked the template and it was wrong. The installer as well did not like the large radius specified on the template. So we set the stone where we want it (edge in line with the radius downturn on tub's edge) and measured ourselves. Installers notes shown below;
 
Last edited by a moderator:

JohnfrWhipple

BATHROOM DESIGN & BUILD
Messages
3,225
Reaction score
102
Points
48
Location
North Vancouver, BC
Kohler Factory Spec'd Radius for corners

Just finished up checking the radius measurements for the inside corners. The template shows the Recess mount design at a 4" Circle. I plotted the custom measurement we planned today and found the radius for this to be the edge of a 3" circle max. Might look nicer with an even tighter radius.

Often coins are used.

A dime corner.

A quarter corner.

What I need is a 3" wide circle.
 
Last edited by a moderator:

JohnfrWhipple

BATHROOM DESIGN & BUILD
Messages
3,225
Reaction score
102
Points
48
Location
North Vancouver, BC
Is the template with a R=4'' or D=8'' ?

Each of 4'' circle means R = 2'' , right ?


Yup.

The stone guy came back because he wanted to double check that. I laughed and said I all ready worked it out at 3" circle or 1.5" Radius.

1 1/4" looked nicer and we agreed to go with that.

Took these calculation photos today. Was not feeling so hot so booked it home early today.


Double Checking Measurements

I drew down the lines based on the Installers notes to double check the marks. Compared that against the template and found that only 1 of five measurements on template was right.

I worked out the Radius at 1.5" but think 1.25" will look better. The template shows a 2" radius and I have no idea why.


Radius 1.5"


Spec'd Radius shows 2"


The most useful notation on the Kohler 1160163-7-A Template is this one shown below. It says When plotting Template Full Size. Make sure horizontal and vertical dimensions match the dimensions labeled on the template. Had I insisted that the template was used the end result would have been less than perfect.


W A R N I N G

When plotting Template Full Size.
Make sure horizontal and vertical dimensions
match the dimensions labeled on the template.

The Kicker is these templates cost money. Another $38-$50. What a waste of cash.

 
Last edited by a moderator:

JohnfrWhipple

BATHROOM DESIGN & BUILD
Messages
3,225
Reaction score
102
Points
48
Location
North Vancouver, BC
Here is the last Undermount Kohler Tub we did. Maybe I could go back and try my tile transition idea out here as well.

whipple-11.jpg


Last edited by a moderator:

JohnfrWhipple

BATHROOM DESIGN & BUILD
Messages
3,225
Reaction score
102
Points
48
Location
North Vancouver, BC
Plumbing Fixtures showed up yesterday. I best pull out the tub kit and make sure a 1 3/8" hole is going to work. I'm not feeling the love from the plumber on this job. Yesterday I checked the overflow kit and it was not tightened.

This tells me that the tub was never tested. Scary. We are about to install stone and then tile.

Love the manual from Kohler on installing stone. They want a low end chaulk used so the stone can be removed easily later and not damage their tub. How does that work with a steam shower build and wall tile lapping down over the stone? Pretty sure the client does not want this.
 
Last edited by a moderator:

JohnfrWhipple

BATHROOM DESIGN & BUILD
Messages
3,225
Reaction score
102
Points
48
Location
North Vancouver, BC
Went back and checked on the Kohler Undermount Tub job in West Vancouver and got some good news and some bad news. Good news is that the stone was installed - bad news they did not use the adhesive and thin-set I requested. I guess three tubes of PL are just as good as what I wanted.....

Not to bitch. But this is what happens when the homeowner assumes the role as GC and the tile guy has no pull. "OK you want the stone set inside the shower with white thins-set." "No problem" Then do what ever the %&^&( you want later..... I wonder how that affects the heat transfer from the seat to the shower bench..... I don't know because I have never let it happen before.

These stone guys show up with no notice to the owner of me.
 
Last edited by a moderator:

Eurob

master tile and stone installer
Messages
824
Reaction score
53
Points
28
Location
Montreal
Website
www.houzz.com
All what it takes is someone coming in and ruin your plans . Air pockets are the worst for heat transfer ..... I would remove the seat section and set it with mortar -- full coverage -- . All the prep work and careful planning screwed up by careless ones . :eek:

That's a huge gap under the slab -- wonder how safe is to stand on the slab without proper coverage and support ( this is not a sink !!! )-- to deal with ............ sealant or some kind of metal edge ? You will have full hands doing the corrections needed .

:eek: Can't believe it , John !!! :eek:
 

JohnfrWhipple

BATHROOM DESIGN & BUILD
Messages
3,225
Reaction score
102
Points
48
Location
North Vancouver, BC
I'm thinking it's time for a soapy thin-set mix and a few hours of ramming it in the gaps.

What pisses me off most this week is the lack of respect other trades have for your work.

I'm not the GC on this job. Not the builder. I'm the tile guy hired direct by the owner. I told the guy white thin-set. I have it on site. He choose to do it his way.

So what do I do? rip out his work? Fix the sheet membrane out of my pocket? Say %^&* it and walk from the job? Nope.
 
Last edited by a moderator:

ShowerDude

Showers
Messages
710
Reaction score
66
Points
28
Location
Minnesota
so its basically blob or dot set with PL in a wet area? extreme wet area....

what effect will the heatwire have on the adhesive? and can that cause a stress fracture?

I guesss any resulting issues will need to fall on tbe stone installer.

can you get something in writing to that effect?
 

JohnfrWhipple

BATHROOM DESIGN & BUILD
Messages
3,225
Reaction score
102
Points
48
Location
North Vancouver, BC
The installer used stripes of PL from what I can see. I'm going to force thin-set under the slab and drive it to the middle of the two panels.

Do the same at the tub from the inside out to the edges.

Pretty sure I can infill everything.

I have tested PL over sheet membranes before and found that they do not melt the products. Not tested it directly with Hydro Ban Sheet Membrane yet but plan a mock up today. If I see any bad effects I'll freak out.

This is not my first rodeo. I worried about it from the get go. I used Ardex 8+9 as an adhesive to set the Hydro Ban Sheet membrane down in both the steam shower seat and tub deck.

So I'm not worried.

I have also designed a huge access panel so we can see later with visual inspections any bad signs.

Fingers crossed.
 

Eurob

master tile and stone installer
Messages
824
Reaction score
53
Points
28
Location
Montreal
Website
www.houzz.com
I am pretty sure it doesn't need much force -- 2 8'' suckers and a vertical and horizontal pull from the edge -- to remove the slab on the shower bench . The PL is only attached to the fleece and it is probably not even 20% coverage .

Removal and reinstall , instead of infill , will probably be easier to accomplish and much better for a well done installation for wet zones areas .

We are only spectators and not involved into the process ....... telling John what he should do ....... :D
 

JohnfrWhipple

BATHROOM DESIGN & BUILD
Messages
3,225
Reaction score
102
Points
48
Location
North Vancouver, BC
The bench top is not coming off by my hand. No way no how.

I told the guy what to use. He used what he wanted too.

I'll do my best to improve the heat but a do over is not in the schedule.....
 

ShowerDude

Showers
Messages
710
Reaction score
66
Points
28
Location
Minnesota
last one to leave the scene of the crime is often the one first to be blamed....

Id pay a pretty penny to have heard your conversation with said PL & slab installer?
 

Eurob

master tile and stone installer
Messages
824
Reaction score
53
Points
28
Location
Montreal
Website
www.houzz.com
Didn't think the hardcore man will let this one slide .........bet the under 50psi standard on the installation of the bench seat combined with the heating feature and shower use is something which needs to be redone before everything is installed around it .

If protection of the client was one of the main reasons which got you involved , the removal and (re)installation of the bench seat is a must . Oh, well ........ !!!
 

JohnfrWhipple

BATHROOM DESIGN & BUILD
Messages
3,225
Reaction score
102
Points
48
Location
North Vancouver, BC
Is this an acceptable seam for Caesar Stone? (Bathtub access panel)

whipple-home-design.jpg


Here is a great access panel cut from Ceasar Stone. I found the image posted on Houzz.com with this comment:

the General contractor had to cutout a side of the Caesar stone to access the plumbing for the bathtub, but this is the seam he left us with. Is this acceptable?

Someone wrote this as a reply answer:

You might want to repost this in the "Design Dilemma" section where more people will read it and more Pros will weigh in on it. It certainly looks unacceptable to me, but I don't know the circumstances. Is this an area that will need access for any future plumbing issues? And if so, does it really make sense to use Caeserstone in that area?

My reply was a little different:

How could that look unacceptable to you? The stone looks like it is set perfect and I would imagine there is less than a 1/16" gap all around the edges.

I see tight corners. This requires hand cutting.

I see that the stone guy used a new piece to make the removable piece as tight as possible. The saw blade that cuts the stone is wider than the gap shown. This means the piece that was cut out was not used as the access panel.

I would say the work shown shows a high level of skill. If that is not acceptable then you should ask them to seal it with epoxy and be prepared to pay and have it redone if you ever want access.

If this is not acceptable then the access should have been left out all together.

I have a job this month where we are doing a long rectangular access panel for a tub. I'm showcasing the work at this link and we plan to embrace the panel - not try and hide it. We will be using some metal accent pieces to create a strong shadow line and negative reveal.

 
Last edited by a moderator:
Top
Hey, wait a minute.

This is awkward, but...

It looks like you're using an ad blocker. We get it, but (1) terrylove.com can't live without ads, and (2) ad blockers can cause issues with videos and comments. If you'd like to support the site, please allow ads.

If any particular ad is your REASON for blocking ads, please let us know. We might be able to do something about it. Thanks.
I've Disabled AdBlock    No Thanks