Garbage Disposal - debris at outlet tee (baffled)

Users who are viewing this thread

K9mlxj

Member
Messages
151
Reaction score
0
Points
16
Location
Bay Area CA
Hi there,

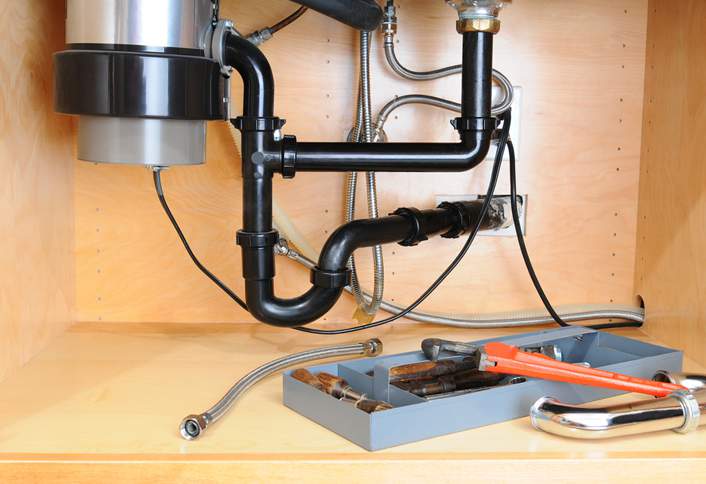
I'm looking at the kitchen sink plumbing and I am seeing debris left at the baffled outlet tee.

I just wonder if there is a way to to allow debris from the disposal to drain better without doing two P-traps.


Couple of questions:
I wonder if adding a disposal elbow would help increase the push of debris to get past the baffled tee better.

Which is a better way to do the P-trap:

Right now the P-trap is side-mounted on the other end.
Would a center-mounted P-trap be better, or worse for better draining?

Would a side-mounted P-trap on the disposal side work better, like this?
http://www.homedepot.com/c/replacing_drain_traps_HT_PG_PL


Thanks.
 

Reach4

Well-Known Member
Messages
38,899
Reaction score
4,436
Points
113
Location
IL
This is the picture you pointed to.
replacing-drain-traps-HT-PG-PL-hero.jpg
 

Terry

The Plumbing Wizard
Staff member
Messages
29,942
Reaction score
3,459
Points
113
Location
Bothell, Washington
Website
terrylove.com
How old is the disposer? I normally replace at 8 years. The blades start to dull out and allow larger chips to escape.
I prefer the tee on either side, not in the middle. Or going with two traps is fine too.
It's cheaper to drop a new disposer in than it is to keep snaking a line filled with large food chips.
 

K9mlxj

Member
Messages
151
Reaction score
0
Points
16
Location
Bay Area CA
I noticed there's gunk near the end of the pipe end connected to the baffled tee and small debris stuck to the gunk and had a built-up there.

I'm going to try side-mounted on the disposal side instead with the elbow like the picture above,

as most debris come from the disposal (really depends on actual usage but I assume people using the kitchen sink will drop food pieces into the disposal).

With side-mounted like the picture, the elbow will be a very short horizontal run, and debris will turn straight down to the P-trap. Also the elbow is not a baffled tee so the passage is not restricted. This will provide a lot less chance of debris built-up at that turn.

If this doesn't help perhaps I'll need to get a new disposal.

It seems the Schedule 40 DWV pipes would perhaps give less problems than the baffled tees on the slip joint pipes since the baffled tees on the slip joint pipes are more restrictive at the turns.


A very minor question:

The drain pipe size is 1 1/2 and the vent pipe above the drain is 1 1/4" galvanized pipe. I can only find this non-shielded 1 1/4 to 1 1/2 coupling.

Is that coupling good enough (unshielded), or there's a shielded coupling available?
 
Last edited:

Reach4

Well-Known Member
Messages
38,899
Reaction score
4,436
Points
113
Location
IL
Post a photo of what you have. You will probably get a suggestion. It is not clear why you would be thinking of a coupling such as what you pointed to.

In an hour, a plumber would have everything done, and it may take you or me much longer.
 
Last edited:

K9mlxj

Member
Messages
151
Reaction score
0
Points
16
Location
Bay Area CA
Here's the existing coupling. Already made a cut on the 1 1/4" galvanized vent pipe. I'll be replacing this section w/ ABS DWV sanitary tee.

IMG_20170530_121624.jpg
 

Reach4

Well-Known Member
Messages
38,899
Reaction score
4,436
Points
113
Location
IL
You will want a 1-1/4 shielded coupling and a separate 1-1/2 shielded coupling (one for each cut). You will want a new sanitary tee in between, and you will want a trap adapter in that santee.

A cutoff wheel cuts faster than a hacksaw. However since you have to cut 1.9 inches, your cutoff wheel would need to be bigger. With a thin 4 inch cutoff wheel on an angle grinder, you could cut part way and finish up with a hacksaw.
 
Last edited:

K9mlxj

Member
Messages
151
Reaction score
0
Points
16
Location
Bay Area CA
I'm not able to find a sanitary tee with size 1 1/4" x 1 1/2" x 1 1/2", or someone can point me to one? Otherwise I'd need a 1 1/4" x 1 1/2" coupling.

To cut thru' the galvanized pipe completely w/o damaging the dry wall on the other side, I'll probably use an oscillating tool -- that's a safer bet (tried circular saw couldn't get thru' the far end of the pipe completely).
 
Last edited:

Reach4

Well-Known Member
Messages
38,899
Reaction score
4,436
Points
113
Location
IL
http://www.supplyhouse.com/Nibco-I098150-1-1-2-x-1-1-4-x-1-1-2-H-x-H-x-H-ABS-Sanitary-Tee-5811RR

I understand that the photo does not match that, considering that the top port on the picture is labeled 1-1/2. I will point out they also have http://www.supplyhouse.com/Nibco-I098100-1-1-2-x-1-1-2-x-1-1-4-H-x-H-x-H-ABS-Sanitary-Tee-5811R with the same photo.

So I am not sure. Keep looking, and don't act just because of my post. I am not a plumber.

The picture is marked up from http://s3.supplyhouse.com/product_files/Nibco - I098100 - Brochure.pdf page 10.
02762 on page 5 of http://www.muellerindustries.com/uploads/pdf/submittals/ABS DWV Fittings for Plumbing and Mechanical Applications.pdf

Maybe you could use a 1.5x1.5x1.5 and a 1.5 and 1.25 bushing. I don't know if that would be per US codes. https://www.homedepot.ca/en/home/p.1-12-x-1-14-in-abs-flush-bushing-spg-x-hub.1000116114.html shows it in Canada. The picture does not match the description. Click Inbox.
 

Attachments

  • img_1.png
    img_1.png
    21.4 KB · Views: 779
Last edited:

K9mlxj

Member
Messages
151
Reaction score
0
Points
16
Location
Bay Area CA
Thx -- I'll need to locate one locally. Couldn't find in big box stores, perhaps need to go to plumbing supply stores to find it.


I finished the cut and removed the existing sanitary tee. I used the demon carbide blade on a sawsaw as that was fast, but I did make a cut to the other side of the wall. I'll have to patch it up -- the cut is under the sink so that won't be too unsightly. I used a oscillating tool to finish up, it was a bit slow. Some uneven edges were left so I went back in with a circular saw with a diamond blade to even out the cut a bit.


Then I see a huge amount of black sludge build-up in the existing drain pipe. Essentially, there is only 1/2 diameter of opening. I used a flat-head screwdriver to remove a good chunk of the sludge but there's likely a good chunk further down in the pipe.

I suppose I can use chemical cleaner after new piping is done afterward to clean up the rest of the sludge? Or it's best to remove the sludge in this pipe as much as possible now.

IMG_20170530_132853.jpg
 

Reach4

Well-Known Member
Messages
38,899
Reaction score
4,436
Points
113
Location
IL
I think you have found the real problem. I really think you should consider getting that drain piping cleaned out while things are apart, rather than waiting. Maybe adding a cleanout to the construction would be good.

Get somebody with a professional machine, rather than trying to use chemicals.
35434-68908ffc639426452a221d7ae83807b0.jpg

If things are accessible below, you might want to change more, including putting a long sweep where the drain changes to horizontal below the floor.


Would a bushing be permitted to reduce the top of a 1-1/2 x 1-1/2 x 1-1/2 sanitary tee to 1-1/4
s-l140.jpg
?
 
Last edited:

K9mlxj

Member
Messages
151
Reaction score
0
Points
16
Location
Bay Area CA
I think you have found the real problem. I really think you should consider getting that drain piping cleaned out while things are apart, rather than waiting. Maybe adding a cleanout to the construction would be good.

Get somebody with a professional machine, rather than trying to use chemicals.
35434-68908ffc639426452a221d7ae83807b0.jpg

If things are accessible below, you might want to change more, including putting a long sweep where the drain changes to horizontal below the floor.


Would a bushing be permitted to reduce the top of a 1-1/2 x 1-1/2 x 1-1/2 sanitary tee to 1-1/4
s-l140.jpg
?

I'm not familiar with code. Perhaps someone would know if this bushing is allowed?


This pipe goes down to a CI hub just above floor, which eventually connects to the main 4" drain pipe in the crawl space straight below. There's no horizontal run from this pipe to the main drain.

The sludge is soft and I've already removed the top 5" of sludge from the pipe with a screwdriver.

From this galvanized pipe end to the main drain it's going to be just 3 1/2" feet long pathway going down.

Would a power auger be sufficient to loosen up the sludge?

power auger pic.jpg
 
Last edited:

Reach4

Well-Known Member
Messages
38,899
Reaction score
4,436
Points
113
Location
IL
Would a power auger be sufficient to loosen up the sludge?
You would have a 3/8 inch diameter head in a 1.5 inch pipe.

The cleaning should continue through the horizontal part of the pipe that follows. Chances are that the initial clogging is down there, and the sludge level has been rising since.
 

K9mlxj

Member
Messages
151
Reaction score
0
Points
16
Location
Bay Area CA
A month ago, all the pipes backed up. Turned out there were tree roots creeping all the way into the main drain.

The local city crew came and pressure-cleaned the main street drain from the house entry cleanout at the driveway. The drain cleared up, but some pipes remained somewhat slow flowing like this one in the kitchen.

I wonder if this is the result of the slow build-up caused by the tree roots overtime that was cleared up by the city. And now I need to clear up some of these several drains (bath, kitchen, laundry) individually inside the house.


Or folks think this is not really related to the tree root problem cleared by the city crew.


BTW, I did find this coupling locally this afternoon, which should work w/ 1 1/4" galvanized pipe.

index.php
 
Last edited by a moderator:

Reach4

Well-Known Member
Messages
38,899
Reaction score
4,436
Points
113
Location
IL
I wonder if this is the result of the slow build-up caused by the tree roots overtime that was cleared up by the city. And now I need to clear up some of these several drains (bath, kitchen, laundry) individually inside the house.
.
I could maybe see that... but then I really don't think that is it....

BTW, I did find this coupling locally this afternoon, which should work w/ 1 1/4" galvanized pipe.
I now understand. You are intending to use one of those to transition 1.5 ABS on the vent pipe from the santee to the existing 1.25 galvanized above your top cut. I think that would work, but would be in technical violation of the rule that just as you don't go smaller on drain lines as the flow progresses, you don't go smaller on the way up with the vent piping. That is not going to bother the air to not have the vent start at 1.25. I don't know how an inspector would react, and might find that to be an acceptable way to handle it.
 

K9mlxj

Member
Messages
151
Reaction score
0
Points
16
Location
Bay Area CA
I could maybe see that... but then I really don't think that is it....


I now understand. You are intending to use one of those to transition 1.5 ABS on the vent pipe from the santee to the existing 1.25 galvanized above your top cut. I think that would work, but would be in technical violation of the rule that just as you don't go smaller on drain lines as the flow progresses, you don't go smaller on the way up with the vent piping. That is not going to bother the air to not have the vent start at 1.25. I don't know how an inspector would react, and might find that to be an acceptable way to handle it.


I was not able to locate a sanitary tee in local stores w/ 1 1/4" on the upper inlet, so I just picked up a regular 1 1/2" sanitary tee instead, and with a short 1 1/2" pipe added the coupling to transition to 1 1/4 vent pipe above.

I'm not sure if practically the inspector will consider this very short 1 1/2 pipe above the sanitary tee transitioning to the 1 1/4" vent above a problem, compared to transitioning from 1 1/2" to 1 1/4" on the top inlet at the sanitary tee. Hopefully not?

Someone familiar with code can provide some idea?

If it's not considered code, then I'd really need to find a sanitary tee size w/ 1 1/4 x 1 1/2 x 1 1/2. Perhaps making some calls to local plumbing stores.

I'm thinking, though, there's no 1 1/4" DWV ABS piping size?

I used a power auger and it went all the way down to the main drain w/o problem. There was some hair but nothing clogging just lots of sludge. After snaking a bit I push in a pressurized water hose and blasted the inside of the drain pipe, and all the black sludge got pushed to the main drain (I was able to see all that from the cleanout in the garage).


That drain line is a lot cleared up now. No slow drain anymore. I installed the new side-mounted drain pipes on the disposal end under the kitchen sink area.

IMG_20170531_060657.jpg

IMG_20170531_060759.jpg


By the way, there is a 22 1/2" turn for the drain coming out from the wall. Is this acceptable?
 
Last edited:
Top
Hey, wait a minute.

This is awkward, but...

It looks like you're using an ad blocker. We get it, but (1) terrylove.com can't live without ads, and (2) ad blockers can cause issues with videos and comments. If you'd like to support the site, please allow ads.

If any particular ad is your REASON for blocking ads, please let us know. We might be able to do something about it. Thanks.
I've Disabled AdBlock    No Thanks