Basement bathroom rough in - pipe routing pictures

Users who are viewing this thread

fusion_ta66

New Member
Messages
8
Reaction score
0
Points
0
Location
MN
Hello,

Looking to rough in a bathroom in my basement. House is in MN and was built in 1995 and already has a bathroom roughed in from the original build (I assume). However, the rough in is out in the open and I want to move it closer to the wall. Here is a picture of the current setup and pipes. (I have kraft paper hanging up to simulate walls).

You can see the existing rough in. It sits toward the center of the room. I want to move it back towards the wall that faces the street.
main.jpg

1024131903.jpg


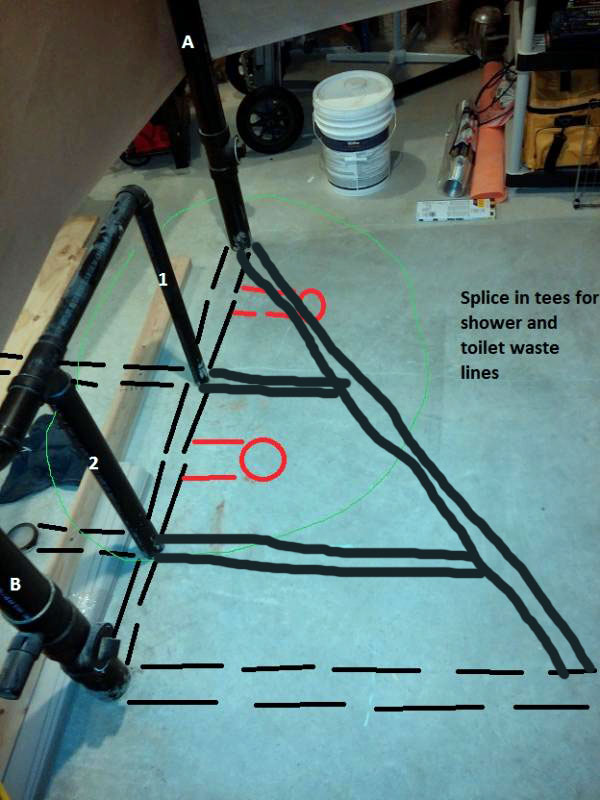
Of course without looking under the slab it will always be an assumption, but would it be a good assumption the way I have drawn the pipes under the slab? I'm assuming they all connect together and then exit the house towards the street.
1024131902.jpg

This is the proposed layout of the bathroom. The room will be approximately 5' by 8'
side.jpg

My plan is to break up the slab (noted by thin green line) and tee into the assumed under slab waste line for both the shower and toilet connections. A new tee will be put in above slab for the sink drain (probably in pipe B where the existing sink drain fitting is)
1024131905.jpg

First question:
What is the strategy when splicing the new toilet and shower drain lines into the under slab waste line? Can I tee in anywhere? Do I have to be spliced a certain way with respect to the vents? Do I need to have a 4-way tee and tee in exactly in where the current vent lines are? (labeled 1 and 2)

Second question:
Can I just cut off and cap the under slab waste lines that are running to the existing rough in shower and toilet?

Third question:
Pipes are all ABS. I was planning to make the new tee connections by cutting the existing pipe and gluing in the new fittings with ABS glue. Is this the proper way to do it?


Thanks for any input,
Joe
 

Tom Sawyer

In the Trades
Messages
3,625
Reaction score
34
Points
48
Location
Maine
Why would you do that? It appears that the entire group was properly roughed so that the vertical pipes are within the wet wall. Moving it is going to mean breaking up most of the floor and a huge hassle getting the clearance to install new fittings.
 

hj

Master Plumber
Messages
33,599
Reaction score
1,037
Points
113
Location
Cave Creek, Arizona
Website
www.terrylove.com
When you say you want to "move it", I "assume" you mean you want to "rotate" it so the fixtures are on the other side of the wall from where they are now. If so, you do not have to "assume" anything about HOW the piping runs, just break the concrete so you can cut the existing tees off and install new ones if the proper direction. You cannot, however, just "splice in tees" to the horizontal pipe. AND, you CANNOT connect the lavatory drain to the 4" line, unless you also install a vent for it, because it is NOT a vent, it is the drain for the upstairs.
 

Reach4

Well-Known Member
Messages
38,749
Reaction score
4,400
Points
113
Location
IL
Which pipes shown are actually working pipes in place and through the basement floor, and which are mock-ups butting up against the basement floor for illustration and planning purposes?
 

Terry

The Plumbing Wizard
Staff member
Messages
29,946
Reaction score
3,460
Points
113
Location
Bothell, Washington
Website
terrylove.com
In my rough's, I would have 45'd over to the far 3" stack.
I would not have had tees on the vertical, but combo on their backs.

You're assuming that the plumber had nothing but time on his hands and liked digging really deep trenches.

fushion_plumb_basement.jpg


In my rough's, I would have 45'd over to the far 3" stack.
 
Last edited:

fusion_ta66

New Member
Messages
8
Reaction score
0
Points
0
Location
MN
Thanks everyone for your comments. All the pipes shown are the pipes that were originally installed for the rough in. I am in the process right now of breaking up the floor so I will have pictures of what's underneath soon.
 

hj

Master Plumber
Messages
33,599
Reaction score
1,037
Points
113
Location
Cave Creek, Arizona
Website
www.terrylove.com
I might have brought the toilet riser BEHIND the lavatory, then angled over to the toilet with a side inlet sanitary tee, the connected the tub to that. Thus, maybe only a single vent needed, depending on distances.
 

fusion_ta66

New Member
Messages
8
Reaction score
0
Points
0
Location
MN
Hi guys, I broke up the floor and this is what I found

1026131613.jpg

1026131613b.jpg

1026131615.jpg

Now the question, how can I run the drain and vent lines for the shower and toilet? Can anyone sketch in a diagram from one of my pictures?

I can pretty much modify the vent tubes any way necessary since they are currently only there to vent the existing rough in which I won't be using.

Thanks
Joe
 

Terry

The Plumbing Wizard
Staff member
Messages
29,946
Reaction score
3,460
Points
113
Location
Bothell, Washington
Website
terrylove.com
You're assuming that the plumber had nothing but time on his hands and liked digging really deep trenches.
Terry

I stand corrected. The plumber did have nothing but time on his hands.
It's too late to sketch tonight. Maybe on Sunday.
 

hj

Master Plumber
Messages
33,599
Reaction score
1,037
Points
113
Location
Cave Creek, Arizona
Website
www.terrylove.com
quote; The plumber did have nothing but time on his hands.

Or at least his apprentice didn't. Cut off the elbow on pipe "1" and install a new one facing the other direction. You didn't expose the toilet connection so we can't tell you what to do about that.
 

fusion_ta66

New Member
Messages
8
Reaction score
0
Points
0
Location
MN
HJ,
Is it necessary to use the pipes from the previous toilet connection or can I use the pipes that are exposed already?
 

Terry

The Plumbing Wizard
Staff member
Messages
29,946
Reaction score
3,460
Points
113
Location
Bothell, Washington
Website
terrylove.com
If you work from the lower 3" line for the toilet, and vent it to the other vent at 42", that would be fine too. Any tee on it's back "horizontal" should be a wye or combo. We no longer can use a santee in that postion.

If you are looking at the stack marked A, that is most likley a waste stack from above. Anything into that line will need it's own vent before tying back in, or at least a vent that ties into the previous vent at 42" from the concrete there.
 

fusion_ta66

New Member
Messages
8
Reaction score
0
Points
0
Location
MN
OK here is a bit more info and my current plan. Feel free to let me know your thoughts.

This is a closer up photo to show how the other line connects with the 3" horizontal pipe

1027131156.jpg

Here a game plan I was thinking of. Take out the vent and line (1) that was running to the previous shower rough in. Cap it off

1.jpg

Then splice in connectors (not sure of the name or if they exist) that will allow connections for both vent lines and drain lines running to the toilet and shower

1b.jpg

1027131234.jpg


Thoughts?

thanks
Joe
 

fusion_ta66

New Member
Messages
8
Reaction score
0
Points
0
Location
MN
For additional information, here is how pipes B and C run up into the ceiling.

I wanted to know exactly what was draining into these pipes. It was fairly easy to tell what pipes are connected to what. I ran water from every waste line in the house. Here are the results

1024132014bbb.jpg

1026131613bbbbb.jpg

Here is the overall layout now for your reference

1027131234.jpg


What, oh drain gods, is your recommendation? :help:


thanks
Joe
 
Top
Hey, wait a minute.

This is awkward, but...

It looks like you're using an ad blocker. We get it, but (1) terrylove.com can't live without ads, and (2) ad blockers can cause issues with videos and comments. If you'd like to support the site, please allow ads.

If any particular ad is your REASON for blocking ads, please let us know. We might be able to do something about it. Thanks.
I've Disabled AdBlock    No Thanks