Adjusting drain for shower

Users who are viewing this thread

greenjp

New Member
Messages
22
Reaction score
2
Points
3
Location
Maryland
Hello everybody,
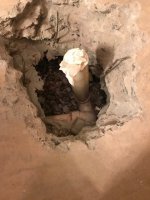
Remodeling a bathroom and have a few questions about the drain. I am replacing an old acrylic/fiberglass pan with a same-sized solid surface pan, upon removal of the old one I found that the drain is 1.5" (strange as the other shower I remodeled in this house had a 2" drain) and slightly off-centered and a tiny bit tilted. Whoever installed it just used the 2" drain gasket and filled up the gaps with caulk. Pretty lame but it did last 21 years without leaking.
Dry fitting the new pan suggests that it would be better if the drain was 1/2" to the left and 1/2" closer to the back wall.
So I think I need to adjust the position slightly, widen the top to 2" so the drain will fit, and maybe do something to get the pipe more vertical.
I can push the pipe into position by hand but am unsure if it's OK to have a strain on it like that. I have seen suggestions to use a pair of 22.5 degree elbows to make a small position change, but I don't think that would address the tilt.
The bottom of the hole here is loose rocks and what I'd call fine sand or even dust. I have not dug down any further or chipped away at any of the concrete.
The new pan (Swanstone) calls for a 6" hole around the drain so I figure once I get the pipe situated I'll fill the hole with concrete accordingly.
Any thoughts on how I should proceed? Thanks,
jeff

IMG_0034.jpg
IMG_0036.jpg
 

Terry

The Plumbing Wizard
Staff member
Messages
29,942
Reaction score
3,459
Points
113
Location
Bothell, Washington
Website
terrylove.com
If I can I often dug the hole out and place the p-trap exactly where I want it. If it's 1.5 and I'm doing a shower over it, a 2.0 x 1.5 reducing coupling to act as a funnel between the trap and the drain. It's only supposed to be for water.
 

wwhitney

In the Trades
Messages
6,567
Reaction score
1,847
Points
113
Location
Berkeley, CA
I can push the pipe into position by hand but am unsure if it's OK to have a strain on it like that. I have seen suggestions to use a pair of 22.5 degree elbows to make a small position change, but I don't think that would address the tilt.
A pair of 22.5 elbows (one or both street, depending) can correct up to 45 degrees of tilt; that would be one extreme of rotating the joint between them so that they make a 45. And if you're plumb already, it will give you a certain amount of offset while staying plumb; that would be the other extreme of rotating the joint between them 180 degrees away from the "45" configuration. In between, you can correct some amount of tilt and get an offset; the amount of offset depends on the tilt correction you need. So you'd have to just try it and see if it gets you where you want.

On the other hand, if you can pull the pipe plumb with hand pressure, you could just pack soil around the riser (as low as possible if you still need to do an offset) to hold it there, and that would be fine.

Once you get plumb and in position, you need to have enough height remaining for the 2" x 1.5" reducing coupling that Terry recommended. That would be one reason to use two street 22.5s if you go that route, the reducing coupling could go straight on the spigot end of the upper street 22.5.

Cheers, Wayne
 
Last edited:

Tuttles Revenge

In the Trades
Messages
4,205
Reaction score
1,460
Points
113
swanstone.png


The 6" hole in the concrete is for the preformed drain in the pan to fit into and have a bit of wiggle room.. I wouldn't recommend any extra concrete around the pipe either.. let it be free to move a bit so you can make a tad bit of adjustment when you go to set that pan.. Swanstone pans are really stout and can bridge that gap you have no problem.. just set the pan in a bit of mortar to make up for any out of levelness in the floor. And advice above is spot on.. adjust for offset with a couple 22s and the slight out of plumb can be corrected by letting the Glue set up while you hold it plumb. Use a 1.5x2 bell reducer to bring the size up .. but remember you need a certain lenght of 2" pipe above that bell end for the pan drain under the level of the concrete floor.
 

greenjp

New Member
Messages
22
Reaction score
2
Points
3
Location
Maryland
Thanks everyone, very helpful. I grabbed a 1.5x2 reducer, a short length of 2" pipe, and a pair of 2" street 22.5s so it sounds like I should just experiment with what gets me closest to plumb in the desired spot. I figure I'll put the reducer at the bottom of the assembly and have it all 2" from there up. Pushing the pipe to the desired location as-is makes it less plumb so I don't think that's an option.

Yes I'm planning to set in mortar per Swan's instructions. The floor is pretty flat but not perfect so I think that'll suffice. Copy on not filling the hole in anymore, or at least not to contact the pipe. I was thinking of making a form to keep it clear all the way down, to support the pan but leave a bit of wiggle for the pipe. But Turtles Revenge it sounds like you're saying that's not necessary.

jeff
 

greenjp

New Member
Messages
22
Reaction score
2
Points
3
Location
Maryland
I did a bit more excavating, found the point where the drain connects to the p-trap about 10" down. After removing a bunch of rocks there's a bit more play now but still resulting in a bit more of an angle than I'm happy with so will proceed with the 22.5s. Do I understand correctly that if I dry fit everything and find the right orientation for all of it, at the time of gluing I could do it quickly and then hold the pipe at the desired position if there's any remaining offset, and the slack in each connection will help make it up?

Follow on question for after the pan is set and it's time to install the drain - is there any harm is putting a layer of something like Wedi joint sealant at the top of the gasket (or maybe underneath it, in the middle, etc?) for a belt and suspenders type approach?

jeff
 

Attachments

  • IMG_0041.jpg
    IMG_0041.jpg
    61.6 KB · Views: 211

Tuttles Revenge

In the Trades
Messages
4,205
Reaction score
1,460
Points
113
having found the P-trap.. you should be able to correct all the alignment issues and for plumb by replacing the trap. The swing of the trap and adding or removing pipe from the trap arm allows for alignment to center in the drain. You have all the options now.
 

greenjp

New Member
Messages
22
Reaction score
2
Points
3
Location
Maryland
Alright I was able to get it lined up nicely using the reducer and pair of 22.5s. I haven't set the piece of 2" pipe for the top yet but I figure this should be pretty easy. Might put the pan in place and install the drain pipe right through the hole to ensure it's perfect.

I did put all the rocks I'd dug out back in. Maybe a bit late but should I have done some sort of leak test? Pretty sure I did the connections correctly and it set up very fast. I will leak test the pan once the drain is installed for sure.

Next question is about the toilet flange. There's currently a PVC flange which I thought I'd replace with stainless while I can. The current one's ID is about 3 3/8" and fits inside the drain pipe. I can get in there with an inside cutter just below the bottom of the flange but then am unsure what sequence of parts I'll need to get the new one in. Also this one isn't screwed to the floor - I assume the new one should be screwed down? If so any tips? I don't have a hammer drill and haven't ever tried drilling concrete, using Tapcons, etc. Not sure what the status of the concrete is around this drain yet.

Or should I leave well enough alone? :D

IMG_0043.jpg
 

wwhitney

In the Trades
Messages
6,567
Reaction score
1,847
Points
113
Location
Berkeley, CA
Next question is about the toilet flange. There's currently a PVC flange which I thought I'd replace with stainless while I can. The current one's ID is about 3 3/8" and fits inside the drain pipe. I can get in there with an inside cutter just below the bottom of the flange but then am unsure what sequence of parts I'll need to get the new one in.
Sounds like the current one is fitting inside a 4" pipe. If you cut it out as described, you'll have two options: (1) find an extra long inside 4" pipe toilet flange or (2) if you can access the outside of the pipe and have 2" of clean straight pipe, glue on a 4" coupling on the outside, then you have a few different options. It's also possible that if you cut out the existing higher up and have just the 4" pipe and inside spigot left, you could separate the inside spigot from the 4" pipe, if it's not glued well.

Also this one isn't screwed to the floor - I assume the new one should be screwed down? If so any tips?
Yes, and the flange should sit just on top of the finish floor. What is the current flange height relative to the concrete, and what finish floor layers are going on top of the concrete?

Cheers, Wayne
 

Reach4

Well-Known Member
Messages
38,905
Reaction score
4,439
Points
113
Location
IL
Next question is about the toilet flange. There's currently a PVC flange which I thought I'd replace with stainless while I can. The current one's ID is about 3 3/8" and fits inside the drain pipe. I can get in there with an inside cutter just below the bottom of the flange but then am unsure what sequence of parts I'll need to get the new one in. Also this one isn't screwed to the floor - I assume the new one should be screwed down? If so any tips? I don't have a hammer drill and haven't ever tried drilling concrete, using Tapcons, etc. Not sure what the status of the concrete is around this drain yet.
I don't know the status of the flange you are describing.

Tapcons are easy. They sell the right drill bit next to, or even bundled with, the the screws. The deal is that you have to drill deeper than the screw will go, and you need to blow out the debris before inserting the screw.

It seems to me that you could reinforce the PVC flange, even though it has not failed, with a repair flange, such as
Sioux Chief 886-MR . It would go over the top before adding screws.
886-mr-3.jpg
https://www.siouxchief.com/products/drainage/residential/closet-flanges/spacer-repair/ringer
It would add a bit to thickness, so you would want to check that aspect. You still might want to replace if there is some problem, in which case you might want to post a photo of what you have.

I think an inside cutter may be harder to use that you expect. My one attempt failed, but the tool was low quality. But even with a good cutter, I still think it could go wrong.
 
Last edited:

greenjp

New Member
Messages
22
Reaction score
2
Points
3
Location
Maryland
The current flange is hovering about 1/4" abovet the concrete. I'll be using a 1/4" thick underlayment (some leftover Laticrete StrataHeat mat) and 5/8" thick cement tiles. So yes it would be ideal to get the current one out and install a new one properly on the new tiles. I'll probably go ahead with cutting the drain pipe right at the bottom of the flange and see what I've got.

Any tips on screwing this thing down? Is a hammer drill necessary or can I make do with a regular drill and the right bit?

jeff
 

greenjp

New Member
Messages
22
Reaction score
2
Points
3
Location
Maryland
Alright turns out my inside cutter isn't a large enough diameter to make this cut easily or cleanly (the toilet flange being inside the pipe means I can only get a portion of the cutting depth). So used the oscillating saw to cut the top off flush with the floor, and here's what I have:
IMG_0045.jpg
IMG_0044.jpg


So the drain pipe is fit tight in the concrete, and what's left of the toilet flange is welded in tight. What's the combo of couplings and parts I'll need to do this? I could get in with the oscillating saw and cut the rest of the flange out, it'll just be sloppy. Or I could try using the inside cutter lower down and angled. Get all that junk out and use a 4" extender? Thanks!

jeff
 

Reach4

Well-Known Member
Messages
38,905
Reaction score
4,439
Points
113
Location
IL
Is that 3.5 inch ID? If so, that would match a "spigot" type flange. But don't go cutting and gluing stuff without checking back. There are considerations -- mainly tail length. And how big of a clearance hole will the you plan for the flooring?

Best to use a digital caliper to make that measurement.

How far down is that diameter maintained?
Sioux Chief 886-PTMS probably does not have enough tail
Canplas 193617SS long-tail 3 inch spigot closet flange probably does, and might need to be cut.
https://www.canplas.com/plumbing/ct_product/193617ss/
Clearly dimension B is in error on that page. Yet you would have to take whatever that dimension actually is into account.
 
Last edited:

wwhitney

In the Trades
Messages
6,567
Reaction score
1,847
Points
113
Location
Berkeley, CA
Alright turns out my inside cutter isn't a large enough diameter to make this cut easily or cleanly (the toilet flange being inside the pipe means I can only get a portion of the cutting depth). So used the oscillating saw to cut the top off flush with the floor
Did you do any inside cuts below the top of slab, and if so do any of the parts shown have partial cuts on them? Because I think anything with a partial inside cut has to come out or not be relied on.

It's hard for me to tell exactly what you have in the picture. Is the lower power of the vertical pipe (say just above the elbow) 4" ID? And then at the top there's a short elevation where there's some remnant of the old inside fit flange still? If so, I think the best way forward is to remove all the remnant flange on the interior, as neatly as possible, and use a new 4" inside fit flange that's long enough to reach the undamaged portion of the 4" pipe.

Standard 4" inside fit flange, and one with an extra long tail piece (judging by the pictures, didn't check the spec sheets):

https://www.supplyhouse.com/Sioux-C...ide-Open-Flange-w-Stainless-Steel-Swivel-Ring
https://www.supplyhouse.com/Raven-PVC436SS-3-x-4-PVC-Closet-Flange-w-Stainless-Steel-Ring

Cheers, Wayne
 

greenjp

New Member
Messages
22
Reaction score
2
Points
3
Location
Maryland
Ok so I did cut a bit into the drain pipe (the one that goes further down underground) with the inside cutter before determining that it wasn't going to come out that way. :oops: Maybe 1/8" deep 1/5th the way around.

I measured more carefully (no calipers but with that ruler in the photo) and the ID of the upper portion of this pipe (what's remaining of the old flange) is 3.5". The apparent ID of the pipe which it is inserted into is 4". The flange extends 1.5" down into the drain from the surface of the floor. The straight part of the 4" pipe extends 8" down below the floor.

As for the opening in the new floor, the last time I had to do a flange replacement and re-tiling I made the opening large enough for the flange, and used one of those PVC spacers between the subfloor and the flange to raise it to the desired height. This seemed easier than tiling in tighter to the hole and then having to drill through the tiles to secure the flange. That an OK plan for this scenario?
 

wwhitney

In the Trades
Messages
6,567
Reaction score
1,847
Points
113
Location
Berkeley, CA
OK, so you want to get down to undamaged 4" pipe and make your connection there. If you cut away all the remnant flange tailpiece (with or without removing the surrounding 4" pipe) you could just use the second tailpiece I linked to in the previous post (manufacturer literature says the tailpiece is 6" long).

Or you could bust up some concrete and remove both the remnant flange tailpiece and the surrounding 4" pipe down to undamaged 4" pipe, put in a 4" coupling, and then either use a 4" spigot closet flange with a long enough tailpiece, or use a piece of 4" pipe and any 4" inside pipe closet flange.

Either way it is easiest to install the closet flange itself after you tile. You can dry fit the flange, figure out where your fasteners are going to be, and make U-notches in your tiles before installation for the necessary fastener clearance. Then after tiling underneath the ring location, glue the flange in place and anchor the ring with concrete screws.

Cheers, Wayne
 

greenjp

New Member
Messages
22
Reaction score
2
Points
3
Location
Maryland
Alright the inside cutter wouldn't do it and the oscillating saw blades weren't the right shape so I ended up using a regular drill to bust this thing apart down to the undamaged section of 4" pipe. Parts of the old pipe are still there but it's clear down to the undamaged section so it looks like I can just use that 6" long Raven flange as you suggest and there'll be plenty of surface area for the connection.

IMG_0048.jpg
IMG_0049.jpg
 

greenjp

New Member
Messages
22
Reaction score
2
Points
3
Location
Maryland
I couldn't help myself, filled in the hole partially to get closer to Swan's recommended 6" opening. I used a 7"-6" sheet metal HVAC duct reducer as a form, Quikrete's bonding adhesive, and Sakrete concrete mix. My first job with this stuff and it seemed to work out pretty well. The drain pipe is now cut down to 1/4" below the surface, I added a couple studs for the shower door, and have plumbed the studs. Next step is to set the base in a mortar bed (have Sakrete mortar mix for this), let dry and then install the drain and flood test.

IMG_0053.jpg
 
Top
Hey, wait a minute.

This is awkward, but...

It looks like you're using an ad blocker. We get it, but (1) terrylove.com can't live without ads, and (2) ad blockers can cause issues with videos and comments. If you'd like to support the site, please allow ads.

If any particular ad is your REASON for blocking ads, please let us know. We might be able to do something about it. Thanks.
I've Disabled AdBlock    No Thanks