Oakum protruding into drain pipe - Help

Users who are viewing this thread

vly

New Member
Messages
3
Reaction score
0
Points
0
Location
New York
I created a DIY problem when I moved/replaced the toilet in my 1950’s bathroom. I successfully pulled out the old toilet and plumbing including the oakum/lead in the CI hub of the main CI drain pipe. So far so good. I used PVC schedule 40 to connect back into the CI drainpipe. To fit into the CI hub I used oakum and Plastic Seal around the Schedule 40. The new connection is done and the closet flange connected.

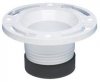
Now for the problem; I just happened to wiggle my hand into the drain from the flange to make sure all felt well and I felt some oakum sticking out. Oh. Oh. I took a picture and sure enough there is lots of oakum sticking out. (see photo)
oakum in pipe.jpg
How do I remove the protruding oakum?
 

Tom Sawyer

In the Trades
Messages
3,625
Reaction score
34
Points
48
Location
Maine
That would be why using oakum and silicone is not a code approved method of joining PVC to CI.
 

Chad Schloss

Member
Messages
327
Reaction score
0
Points
16
Location
USA
I think maybe you should rip out all the oakum and get something like this, that would suit you better.
 

Attachments

  • images.jpg
    images.jpg
    3.6 KB · Views: 627

hj

Master Plumber
Messages
33,608
Reaction score
1,047
Points
113
Location
Cave Creek, Arizona
Website
www.terrylove.com
IF the pipe is pushed all the way to the bottom of the bell, and the oakum is packed properly, there is no way it could have "escaped" into the pipe.
 

vly

New Member
Messages
3
Reaction score
0
Points
0
Location
New York
I believe I may have just put too much oakum on the PVC and when I forced it in some strands protruded. The PVC does fit snuggly all the way into the CI hub. Is it feasible (???) to burn the excess oakum off with either a torch or a soldering iron if I can get my hand far enough into the drain pipe? Is starting a fire or explosion because of methane a risk?

Taking it all apart and redoing it is not a desireable option at this point of construction. I would rather try removing the excess oakum and seeing if I have a leak before taking it all apart.
 

Tom Sawyer

In the Trades
Messages
3,625
Reaction score
34
Points
48
Location
Maine
What part of "not a legal connection" don't you get? It HAS to be taken apart and done correctly unless you like water running through the ceiling
 

hj

Master Plumber
Messages
33,608
Reaction score
1,047
Points
113
Location
Cave Creek, Arizona
Website
www.terrylove.com
I have done THOUSANDS of oakum joints and if the pipe is bedded into the hub properly there is no way you can possibly "hammer" it enough to force the oakum into the pipe. In fact, the rule for installing oakum IS that you pack it down as tight as possible, because IT is what prevents the leak. The lead, or in your case plastic seal, just keeps the oakum tight as the water expands it.
 

Mliu

Active Member
Messages
580
Reaction score
81
Points
28
Location
Colorado
From the photo, it looks like the OP pre-wrapped the oakum around the PVC spigot (rather loosely), applied the Plastic Seal, and then pushed the assembly into the CI bell.
 

Rap

New Member
Messages
63
Reaction score
0
Points
0
Location
california
HJ, with respect, this is how i was taught to make a poured lead joint:
the oakum fibre is not what prevents moisture penetration, no matter how hard it's compressed. Hammering the oakum down could lift or decentre the spigot and allow oakum to enter the hub.


The oakum centres the stub/spigot and prevents the molten lead from penetrating into the hub. A caulking tool is then used in a very balanced manner, first on the rope, and then to firmly drive and compress the poured lead.

Hence, the lead is the key to a sound, poured joint.
 

Hackney plumbing

Homeowner
Messages
1,130
Reaction score
3
Points
38
Location
Alabama
HJ, with respect, this is how i was taught to make a poured lead joint:
the oakum fibre is not what prevents moisture penetration, no matter how hard it's compressed. Hammering the oakum down could lift or decentre the spigot and allow oakum to enter the hub.


The oakum centres the stub/spigot and prevents the molten lead from penetrating into the hub. A caulking tool is then used in a very balanced manner, first on the rope, and then to firmly drive and compress the poured lead.

Hence, the lead is the key to a sound, poured joint.

You were lied to. Oakum is what makes the joint water tight. The lead hold everything together. Oakum swells when it gets wet.
 

Tom Sawyer

In the Trades
Messages
3,625
Reaction score
34
Points
48
Location
Maine
Agreeing with Hackney. Somewhere I have a copy of an 80 year old plumbing text and it clearly says that the oakum swells and seals the joing. Lead keeps the oakum from pushing out. A yarning iron is used to insert the oakum and a packing iron packs it. You then use and inside iron and an outside iron to seat the lead using a crowsfoot patters. Lead pour must be one continuous pour and the packed oakum can not be set above the lead groove.
 

vly

New Member
Messages
3
Reaction score
0
Points
0
Location
New York
I didn't know I was starting the Oakum Wars of 2012. I hear you pros and realize I have to remove the oakum joint and start again. My problem right now is that I have very little space to maneuver between the CI and the elbow, and the CI is fairly tight against the bottom of the floor above. The floor in the bathroom above is newly tiled so I can't work from the top down.

If I cut off part of the schedule 40 connecting pipe and clean out the CI hub of oakum and Plastic Seal is there a way to connect the schedule 40 stub to the CI given the very limited space.

I found a photo I took of the connection before I put the ceiling back up below it. I realize I have to take the ceiling down to get at the connection again, but I sure wouldn't like to pull up the bathroom tiles. See photo for my dilemma.

What would you guys recommend?
CI_to_PVC.jpg

PS: I am getting the hang of this great site and managed to change the default Washington St avatar to something obviously more appropriate to a struggling DIY.
 

Cacher_Chick

Test, Don't Guess!
Messages
5,458
Reaction score
213
Points
63
Location
Land of Cheese
That appears to be 4" C.I. If so, I would install a 4x3 flush bushing installed into the hub with a properly sized rubber donut. Then all you need is a short piece of 3" pipe and a closet bend.
 

Dlarrivee

New Member
Messages
1,150
Reaction score
0
Points
0
Location
Canada
So you took a photo of this crappy joint and then proceeded to glue an elbow on?
 

Tom Sawyer

In the Trades
Messages
3,625
Reaction score
34
Points
48
Location
Maine
I hate rubber donuts, especially when CI, PVC and a water closet are involved because inevitably the toilet moves the pipe around when fat people sit on it enough to make the donut leak. It needs to have a new closet bend and flange properly leaded in.
 
Top
Hey, wait a minute.

This is awkward, but...

It looks like you're using an ad blocker. We get it, but (1) terrylove.com can't live without ads, and (2) ad blockers can cause issues with videos and comments. If you'd like to support the site, please allow ads.

If any particular ad is your REASON for blocking ads, please let us know. We might be able to do something about it. Thanks.
I've Disabled AdBlock    No Thanks