Removing Lead/Oakum from cast iron - replacing tub/sink drain line - pics

Users who are viewing this thread

renstyle

New Member
Messages
13
Reaction score
0
Points
0
Location
Boone, Iowa
Hello all,

This is my first post here, but I've been lurking for months now (you all rock btw). Apologies ahead of time for the novel, just trying to be thorough!

Started "de-muddling" our 1919 foursquare, was duplexed in the past. They put a 2nd bathroom in the corner of the kitchen, turning the room into a large "L". Once we started taking the drywall down, it exposed all of the drain pipes for the bathroom upstairs.

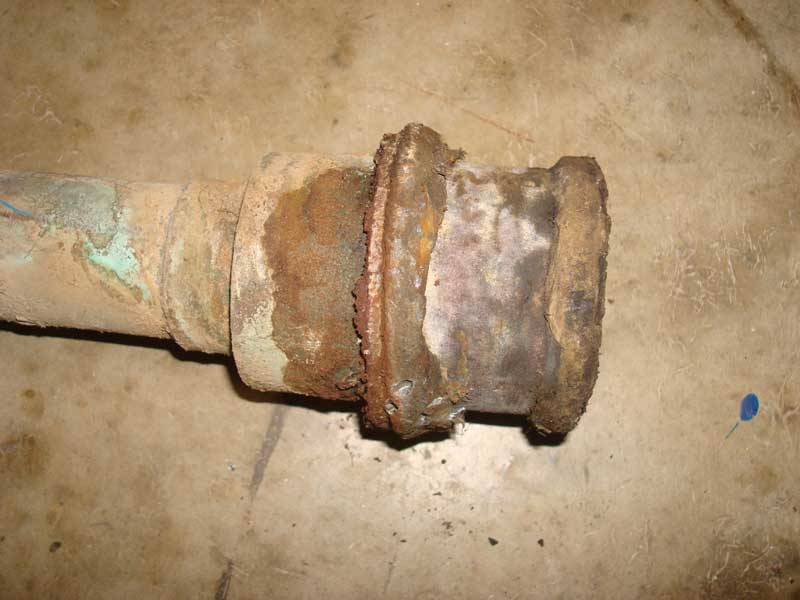
There was a cast iron tee which connected the tub and sink w' 1.5" galvanized pipe to a hub-less hole on the side of the main stack. The tee had a small crack in one of the hubs, plus it was clogged inside (ran slow since we moved in 3yrs ago). When I disconnected the galv lines from the sink and tub the tee basically fell apart in my hands.

Was going to try and re-use the 24" of galv that was left to transition PVC, until I tried to cut it, discovered it had rusted out on the bottom... :(

Moved back to the galv/stack transition, trying to dig out the lead around the galv elbow where it connects to the main stack. Looks like the galv pipe is threaded into a coupler possibly<?> and that coupler is "leaded" into the stack??? Got as far as I could with a small screwdriver and a drill due to the joist clearances. Using the galv pipe for leverage, I can move it maybe 15-20 degrees, somewhat loose, but alot more lead needs to be removed, and I'm not sure if they used any oakum in this particular connection at all??? The lead started out packed flush with the cast iron opening, I've dug out about 1/4" so far. Can't tell how far this lead goes down, possibly all the way into the main drain???

You can see from the pics that there is next-to-zero clearance to back out that galv pipe. I was planning on trimming a hole thru the floor joist just behind the pipe, possibly removing a small section of joist, then using several 2x4s to 'tie' the floor joist on both sides of the galv pipe to it's neighbors (nailed perpendicular to their run) and then using a pair of floor jacks to 'hold up' each side of the joist (and support the cast iron) while I work to drill out the lead from a more "straight-on" angle.

Once the plumbing is all done, this joist and at least two others (which were chopped up when they put the bathroom in) will be sistered the full 9' width of the kitchen, so long-term I'm not concerned with the integrity of this particular joist.

Figured to start with I could use a LONG drill bit and go straight thru the joist to make a few pilot holes, anything to remove more of the lead from the joint? Then maybe move onto section-removal?

The biggest PITA about this setup is the specific section of cast iron pipe I'm dealing with. It is at the end of the run, with a lead elbow heading up to the toilet plus the vent connect to the stack on the same section as this galv pipe I'm trying to remove (so I'm being extremely careful).

Once the lead+pipe are out, I was planning on using a 2" to 1.5" fernco donut to tie in the PVC from the sink/tub.


A few questions:

1. Please feel free to critique my idea on removing that galv pipe. It seems quite do-able, even if it takes a long time to do it right. I'm sure I'll need to move part of the joist to get my work done, but you may have a better idea? EDIT: I've just read on a different thead that I could try cutting the galv on the threads, then using a sawzal to cut from the *inside* of the pipe out thru the lead (being very careful not to nick the cast iron). Sounds like a good idea.

2. I've read in several posts that if you have a standalone shower (with no tub), the drain should be 2". Since ours is a tub/shower combo it looks like the 1.5" PVC that is connected to the tub (not shown in the pics) should be fine to use all the way to the stack?

There will be a DWV combo tee to tie the tub and sink together, then a single 1.5" line over to the stack. It seems like this will work.

I've got PEX run to the upstairs, but will need to get these drains installed before I can hook the water back up (pex lines will run in front of the pipe).

Thanks for all that you do folks, we really appreciate it out here!

Lookin' up from below:
upstairs_drain_2012feb08_01.jpg

The cast iron tee that busted is in the lower LH corner, you can see the rust on the bottom of the 1.5" pipe:
upstairs_drain_2012feb08_02.jpg

upstairs_drain_2012feb08_03.jpg

upstairs_drain_2012feb08_05.jpg

Wish I had a better view of the actual connection:
upstairs_drain_2012feb08_04.jpg
 
Last edited:

Jadnashua

Retired Defense Industry Engineer xxx
Messages
32,771
Reaction score
1,191
Points
113
Location
New England
Not a typical hub? Most are flared so you have a stop and can pack oakum in without it just pushing out into the fitting. Without the oakum, pouring in the lead would be somewhat futile, as it would pour into the line. So, there must be some in there. If you can wiggle it that much now, if you could apply some leverage to try to pull it out while going back and forth, you may have enough out to have the whole thing just come out.

Someone who has worked with this more would likely have better advice!
 

renstyle

New Member
Messages
13
Reaction score
0
Points
0
Location
Boone, Iowa
It's still pretty tight at this point, that bottom pic kinda-sorta shows that the galv pipe is threaded into *something*, but I've no idea what it really looks like, or how far it goes in. I've got zero "pull out" movement, just 15-20 degrees if I try to pull down the "handle".

I am working right now on bracing/reinforcing the stack from underneath so that I can notch out part of the joist to remove more lead. I'm hoping to hit "oakum" soon. :)

Thanks much for the response, I was starting to wonder if I'd done something wrong on my very first post! :)
 

Cacher_Chick

Test, Don't Guess!
Messages
5,458
Reaction score
213
Points
63
Location
Land of Cheese
That appears to be a tee with a side inlet, though the inlet appears to be a spigot, which would normally connect to another pipe with a bell. A couple of measurements would confirm this.
 
Last edited:

Jadnashua

Retired Defense Industry Engineer xxx
Messages
32,771
Reaction score
1,191
Points
113
Location
New England
Wedge something between the CI fitting and the galvanized elbow and use it as a lever as you rock the fitting back and forth.
 

Hackney plumbing

Homeowner
Messages
1,130
Reaction score
3
Points
38
Location
Alabama
Thats an FIP bushing packed and leaded into the hub. It's in a nasty spot. Seems like they always are. LOL

If the customer approved as a professional.....I would use some chain cutters to snap that cast iron and remove that fitting and the lead toilet arm. With a helper I could probably do that just as quick as trying to get that connection apart and in the end they would have a better job for near the same money. Time is $
 

Hackney plumbing

Homeowner
Messages
1,130
Reaction score
3
Points
38
Location
Alabama
This is what you find when the kitchen sink drain is clogged and you run your cable all the way out and then it will not make the turn. After 15 minutes of jabbing at it,threatning it and sweet talking it......you crawl under the house and find that mess. Seems like its always 5:00 on a friday too. Thats whats up.

Here is a few pics of a cast iron washing machine trap that I crawled under the house and cut out. I broke the trap open and found a hard mass. I had to beat it with a hammer to get it to break. Really couldn't tell what it was. Appeared to be soap,grease and rust.

I spent 15 minutes trying to get my cable to go through the trap. No dice slice. So I suit up and go in the crawl space and dug the trap up. Cut it off with a dewalt 18v sawzall witha carbide grit blade that sliced it like hot butta. Its basically worn out. This repair gives him notice to save some money,make arrangments to get the whole pipe replaced

The drain has been in constant use for 50 years...give or take 5.
 
Last edited:

renstyle

New Member
Messages
13
Reaction score
0
Points
0
Location
Boone, Iowa
Thats an FIP bushing packed and leaded into the hub. It's in a nasty spot. Seems like they always are. LOL

I kinda figured something like a FIP. Would that fill enuf of the void that it could have been leaded in without any oakum behind? I'm really trying to baby this particular CI part due to the vent. Can't afford to do "the full monty" if things go south.

If the customer approved as a professional.....I would use some chain cutters to snap that cast iron and remove that fitting and the lead toilet arm.

Would you snap the whole piece, taking the lead bend and the CI "tee"? I'd considered that at first until I realized the main house vent goes "up" on this same CI 'tee'. I might tackle popping the fitting if it weren't for the vent, which is at least another 15-18' of CI straight up. The 2nd to last pic kinda-sorta shows the vent heading up.


With a helper I could probably do that just as quick as trying to get that connection apart and in the end they would have a better job for near the same money. Time is $

You're spot on there. Just got the bill from a local shop for removing the CI line that was servicing our former 'bathroom-in-kitchen'. Was about 10' of CI that also had a branch to the kitchen sink. The guy snapped the CI on the last segment before it hit the main stack in the basement, then ran PVC back to the kitchen sink. There was a vent that was also cut out at the same time. Capped the water lines and cleaned everything up in 3hrs. Came to $301, and it was well worth it to have it "just done" one day when I came home from work!

Since I farmed out that job, I'm having to do most of the work on this one. :)
 

Hackney plumbing

Homeowner
Messages
1,130
Reaction score
3
Points
38
Location
Alabama
I kinda figured something like a FIP. Would that fill enuf of the void that it could have been leaded in without any oakum behind? I'm really trying to baby this particular CI part due to the vent. Can't afford to do "the full monty" if things go south.


Would you snap the whole piece, taking the lead bend and the CI "tee"? I'd considered that at first until I realized the main house vent goes "up" on this same CI 'tee'. I might tackle popping the fitting if it weren't for the vent, which is at least another 15-18' of CI straight up. The 2nd to last pic kinda-sorta shows the vent heading up.


You're spot on there. Just got the bill from a local shop for removing the CI line that was servicing our former 'bathroom-in-kitchen'. Was about 10' of CI that also had a branch to the kitchen sink. The guy snapped the CI on the last segment before it hit the main stack in the basement, then ran PVC back to the kitchen sink. There was a vent that was also cut out at the same time. Capped the water lines and cleaned everything up in 3hrs. Came to $301, and it was well worth it to have it "just done" one day when I came home from work!

Since I farmed out that job, I'm having to do most of the work on this one. :)

It has somthing back there. It should be oakum. I've found rope etc etc.

I totally missed that was a wisconson laying on its back. I'll be honest. That complicates things and I'm glad you pointed out my oversight.

Is that hub actually up in the floor some?

A good plumber can do alot of work if he wants to in 3 hrs if he is prepared and has room to work. Glad you had a good experience.

If you do not wish to damage the wall above,your only option may be to keep trying to get that threaded bushing out. Too bad its loose,you may could have removed the st ell and left the bushing in place.

Thats a crappy spot to work it but its do-able.

I would tell you to cut the st ell off flush with the cast iron hub and then try to saw the bushing in two halves.....but with the limited area that would be very difficult to impossible. And even if you managed to saw it in two halves its very thick and wouldn't collapse. Trying to force it to collapse could break your hub.

If you got it loose enough you might could cut the galvanized street ell at the end of the threads and then insert a crowbar and pull down. This MIGHT pull the lead out far enough for you to drive a large screwdriver between the bushing and the lead and pry all the lead out in one piece or whats left of it. This would have been easier to do with all the lead in the joint.....you have removed some. if all the lead was still in the joint you would have more meat there to dig into.

If they poured cold joints this method doesn't work because the lead comes out in layers like they poured it. A cold joint is where the plumber poured in lead but it wasn't enough.....so he heats up more and pours on top to fill the joint up. These layers will not stick together. It shouldn't be done.
 
Last edited:

renstyle

New Member
Messages
13
Reaction score
0
Points
0
Location
Boone, Iowa
Is that hub actually up in the floor some?

It is a hub, the vent runs up inside the wall just behind the toilet.

If you do not wish to damage the wall above,your only option may be to keep trying to get that threaded bushing out. Too bad its loose,you may could have removed the st ell and left the bushing in place.

Thats a crappy spot to work it but its do-able.

That's why I was considering popping out a portion of that joist just behind the ell. Removing the bathroom obviated the need for a large 2" steel vent that was running up thru a wall and across the kitchen ceiling. They notched out the joists pretty bad to make the vent fit, so I've already got the boards lined up to sister those joists anyway.

Figured taking a chunk out of this one (with a cross-beam and a floor jack to hold up the joist , kinda overkill but I've got an extra jack...) just long enough to get a good straight shot at that lead with a drill will allow me to rotate the pipe downward and then tap it out of it's hole. That's the theory anyway...

I would tell you to cut the st ell off flush with the cast iron hub and then try to saw the bushing in two halves.....but with the limited area that would be very difficult to impossible. And even if you managed to saw it in two halves its very thick and wouldn't collapse. Trying to force it to collapse could break your hub.

If you got it loose enough you might could cut the galvanized street ell at the end of the threads and then insert a crowbar and pull down. This MIGHT pull the lead out far enough for you to drive a large screwdriver between the bushing and the lead and pry all the lead out in one piece or whats left of it. This would have been easier to do with all the lead in the joint.....you have removed some. if all the lead was still in the joint you would have more meat there to dig into.

If they poured cold joints this method doesn't work because the lead comes out in layers like they poured it. A cold joint is where the plumber poured in lead but it wasn't enough.....so he heats up more and pours on top to fill the joint up. These layers will not stick together. It shouldn't be done.

I'll be honest, the idea of using a crowbar anywhere on this cast iron piece has me spooked. I'll know a little more once I get the spot clear for the drill. That little bit of lead that I was able get out in the pics was done mainly with a rubber mallet and a medium-head flat screwdriver (didn't have a chisel small or long enuf to clear the joist). Took an effing long time (3+ hours?) but it did work.

I can see how this connection appears to have been designed to accept a CI hub originally. Since it isn't really a hub, do I even have the option of using a donut (bought one already thinking that)? Would I be forced to use a sleeve the way this connection looks? I guess it's prolly gonna be a sleeve...(glad I started a 'receipts' envelope with this project).
 

Hackney plumbing

Homeowner
Messages
1,130
Reaction score
3
Points
38
Location
Alabama
No it was designed to accept a 2" pipe. Or a 2" x whatever bushing you have. That wisconsin fitting (AKA side inlet sanitary tee) is typically installed vertical with the 2" portion serving a bathtub or a shower. They also make a 1.5" inlet wisconson. This allows the tub/shower to connect to the stack a little bit higher than the toilet connection. Your not suppose to have a toilet dumping into a stack wet venting a tub/shower.

I only would suggest a crowbar because of where the problem is located. You insert the lever portion of the crowbar into the pipe then gently apply increasing pressure until the galvy pipe comes down......this will cause the lead at the top of the joint to be pushed out toward you.

Remove the crowbar and use a hammer to drive the galvy pipe and the bushing farther in the joint. That should leave a space between the bushing and the lead that you really cant see. At this point you would take a large flat head screwdriver and drive it between the lead and the bushing. If it grabs well and the joint was made proper to begin with......it should start peeling out of the joint in one solid ring.

I will keep this thread in mind the next time I have to do one and be sure to post some pics or even a video maybe.
 

renstyle

New Member
Messages
13
Reaction score
0
Points
0
Location
Boone, Iowa
No it was designed to accept a 2" pipe. Or a 2" x whatever bushing you have. That wisconsin fitting (AKA side inlet sanitary tee) is typically installed vertical with the 2" portion serving a bathtub or a shower. They also make a 1.5" inlet wisconson. This allows the tub/shower to connect to the stack a little bit higher than the toilet connection. Your not suppose to have a toilet dumping into a stack wet venting a tub/shower.

Makes me think that I should start the "vent" fund now so that when that lead bend finally needs to go the 'wisconsin' could be popped out too.

If the lead bend did need to get replaced, would I be required to update the 'wisconsin' connection too? I'd lean towards no since it supports the vent, but I'm not an inspector either...

I think I'd be fine running ABS vent up and out myself, pretty sure it's a straight shot up thru the roof. The roof penetration is what has me concerned the most with that, since it's a 2-story foursquare. No easy way to get on the roof w/o a big ladder for install, much less if something goes awry. Perhaps when the basement privy is finished...

I only would suggest a crowbar because of where the problem is located. You insert the lever portion of the crowbar into the pipe then gently apply increasing pressure until the galvy pipe comes down......this will cause the lead at the top of the joint to be pushed out toward you.

Remove the crowbar and use a hammer to drive the galvy pipe and the bushing farther in the joint. That should leave a space between the bushing and the lead that you really cant see. At this point you would take a large flat head screwdriver and drive it between the lead and the bushing. If it grabs well and the joint was made proper to begin with......it should start peeling out of the joint in one solid ring.

I will keep this thread in mind the next time I have to do one and be sure to post some pics or even a video maybe.

Will keep the pics coming. Since I have the 'luxury' of bare joists in the kitchen I'll take advantage of it. I'd shudder to think what this would take to pop out if you could not take part of the joist away. And I wouldn't be so gung-ho about messing with the joists if they weren't already chewed up by a previous muddle.

Do you have a pic of a bushing that *could* be holding this pipe? Just to give me an idea of what I could be dealing with? I have visions of something like this perhaps, but with rounded-off edges? Either that or a standard galv coupler (which is what the edge looks like right now)...

2-1.5-galvanized-bushing.jpg 2-galvanized-coupling.jpg
 
Last edited:

Hackney plumbing

Homeowner
Messages
1,130
Reaction score
3
Points
38
Location
Alabama
Makes me think that I should start the "vent" fund now so that when that lead bend finally needs to go the 'wisconsin' could be popped out too.

If the lead bend did need to get replaced, would I be required to update the 'wisconsin' connection too? I'd lean towards no since it supports the vent, but I'm not an inspector either...

I think I'd be fine running ABS vent up and out myself, pretty sure it's a straight shot up thru the roof. The roof penetration is what has me concerned the most with that, since it's a 2-story foursquare. No easy way to get on the roof w/o a big ladder for install, much less if something goes awry. Perhaps when the basement privy is finished...


Will keep the pics coming. Since I have the 'luxury' of bare joists in the kitchen I'll take advantage of it. I'd shudder to think what this would take to pop out if you could not take part of the joist away. And I wouldn't be so gung-ho about messing with the joists if they weren't already chewed up by a previous muddle.

Do you have a pic of a bushing that *could* be holding this pipe? Just to give me an idea of what I could be dealing with? I have visions of something like this perhaps, but with rounded-off edges? Either that or a standard galv coupler (which is what the edge looks like right now)...

View attachment 15544 View attachment 15545

In the pics I posted in an earlier post to this thread I show a cast iron trap with a piece of copper sticking out of it on the inlet side. They used a bushing there to transition to copper. It is similar to what you have possibly except your has threads in it. Yours will be brass or bronze form my experiences but plumbers back then are no different than those of today.....you will find odd fittings and ways of doing things. One thing about the way they did it......it lasted a very long time.

I will break that copper out of the cast iron and show you what the bushing looks like. Check back tonight.....I hafta leave the office shortly and have a full day of service calls.

No if you cut it all out you would need to use a proper fitting to conform to the current codes. My inspectors would not approve the use of a wisconson laying on its back.
 

renstyle

New Member
Messages
13
Reaction score
0
Points
0
Location
Boone, Iowa
In the pics I posted in an earlier post to this thread I show a cast iron trap with a piece of copper sticking out of it on the inlet side. They used a bushing there to transition to copper. It is similar to what you have possibly except your has threads in it. Yours will be brass or bronze form my experiences but plumbers back then are no different than those of today.....you will find odd fittings and ways of doing things. One thing about the way they did it......it lasted a very long time.

I will break that copper out of the cast iron and show you what the bushing looks like. Check back tonight.....I hafta leave the office shortly and have a full day of service calls.

No if you cut it all out you would need to use a proper fitting to conform to the current codes. My inspectors would not approve the use of a wisconson laying on its back.

Now I know why you included that pic earlier, didn't notice the hub...

Good to have a heads-up on that 'wisconsin', I thought it odd that the toilet drained 'upstream' from this tub/sink connection.
 

renstyle

New Member
Messages
13
Reaction score
0
Points
0
Location
Boone, Iowa
We're out

Here's what I was able to get done last nite. Most of the time was setting up the bracing for the joist notch.

Notched the joist:

01.drain-notch-joist.jpg


Finally hit some oakem! Kinda smells like axle grease w' creosote mixed in.

02.drain-hit-oakem.jpg

the angle was *much nicer* to drill holes into the lead:

03.drain-holes.jpg

The lead finally gives:

04.drain-lead-gives.jpg

Only the oakem left:

05.drain-oakem.jpg
 

Hackney plumbing

Homeowner
Messages
1,130
Reaction score
3
Points
38
Location
Alabama
Good Job......sorry i didn't get the pic posted for you I forgot. I will post it to this thread in a few minutes. Maybe you could also post the pic of the bushing you removed.

Its a good feeling when you labor and see the benefit.

The lead is still on it. I'll cut the ring of lead off and melt it down for re-use.

The right side is the bottom of course and there is a bead on the bottom of the joint.

001-2.jpg
 
Last edited by a moderator:

renstyle

New Member
Messages
13
Reaction score
0
Points
0
Location
Boone, Iowa
The bushing has held up pretty well in the 83 years since it was installed (I assume it came with the house new in 1919).
07.drain-lead-detail.jpg

09.drain-lead-detail.jpg

Doesn't look nearly as imposing now...

10.drain-empty-hole.jpg

Initial cleaning of the hub:

11.drain-cleaning.jpg

OK, now that the *fun* is past, I've got two questions:

1. how much more cleaning do I need to do inside that hub/spigot?

2. What type of transition piece can I use here? A donut? Or would I be required to use a sleeve owing to the lack of an outright hub?

It looks like this connection was designed to take a small (2" cast iron maybe) pipe, the hole opening into the main stack looks to be only 1.5". Is this what hubs can look like for smaller diameter cast iron pipes?

I figured there would be no "ring" at the bottom of the connection, just a 3" hole into the stack.

The big box store nearby (Men****) has a 3" to 1.5" PVC donut listed, which looks like it will drop right into this hole!

What I'm hoping to do is get a 3" donut to transition a small stub of PVC into this connection. The tub is 1.5", and the sink is either 1.25" or 1.5". It looks smaller than the 1.5" PVC coming from the tub. I'll measure the ID and OD tonite.

These two will join using a a combo wye (I think it's called).

combo-wye.jpg

The tub will connect to the "straight" connection, the sink from the curve. Thankfully somebody already gave me the heads-up on the difference between DWV PV and "regular" PVC connections labeled in degrees, so I've got all DWV connections.

I did think of something else to ask: Assuming I can use a donut, the instructions fernco sends out recommends inserting the center pipe such that 1.5" is sticking "into" the stack. With the toilet literally 18" upstream, is that depth still recommended? The more I look at that inner hole inside the connection, it doesn't look like it will pass a 1.5" PVC into the stack, so we'd make a butt connection?
 
Last edited:

renstyle

New Member
Messages
13
Reaction score
0
Points
0
Location
Boone, Iowa
That appears to be a tee with a side inlet, though the inlet appears to be a spigot, which would normally connect to another pipe with a bell. A couple of measurements would confirm this.

Sorry for the delay answering, the ID of the hub/spigot is almost exactly 3".

The "inner hole" going into the stack doesn't look to be much more than 1.5" tops.
 

renstyle

New Member
Messages
13
Reaction score
0
Points
0
Location
Boone, Iowa
Just got back to the house. I picked up both a 2"x2" and a 3"x2" Fernco donut to see which one may fit this hole, but one is too big, one is too small!

It makes sense when you compare the donut to a actual 3" CI with a hub. The 3" donut is 3 5/8" in diameter, and I need something that is right at 3". If they made a 2.5" Fernco, I bet it would fit like a glove... :(

With the smaller inner hole, it looks like I'll have to do something similar to the original packing around a 1.5" pipe. To repack with oakum, does the bushing have to be metal or could I use a PVC bushing? Or is there some other method to transition from PVC to the stack?

Doesn't look like a sleeve will work, there would be pooling inside the connection.

I'll keep looking around, see what I can find out.

EDIT: Found only *one* other page thru googling where somebody else had run into a 'cast iron sanitary tee with side inlet', and they were unsure why the bottom of the "3.25" side inlet reduced to 1.5, which is very similar to mine. The answer in that thread was to use a 3"x1.5" fernco (which expects something like 3.8") and force it into the inlet with clamps.
 
Last edited:

renstyle

New Member
Messages
13
Reaction score
0
Points
0
Location
Boone, Iowa
No it was designed to accept a 2" pipe. Or a 2" x whatever bushing you have. That wisconsin fitting (AKA side inlet sanitary tee) is typically installed vertical with the 2" portion serving a bathtub or a shower. They also make a 1.5" inlet wisconsin. This allows the tub/shower to connect to the stack a little bit higher than the toilet connection. Your not suppose to have a toilet dumping into a stack wet venting a tub/shower.

I had to re-read your post earlier, 2" pipe... :(
 
Top
Hey, wait a minute.

This is awkward, but...

It looks like you're using an ad blocker. We get it, but (1) terrylove.com can't live without ads, and (2) ad blockers can cause issues with videos and comments. If you'd like to support the site, please allow ads.

If any particular ad is your REASON for blocking ads, please let us know. We might be able to do something about it. Thanks.
I've Disabled AdBlock    No Thanks