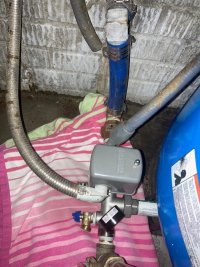
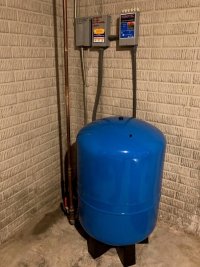
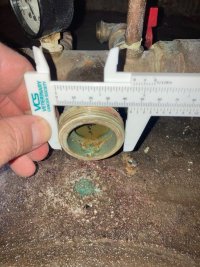
I have an old steel pressure tank that started leaking from the union tee. I took it apart and replaced the gasket, which fixed the leak, but since the tank was over 20 years old I picked up a new tank to install. The old tank had water sloshing around behind the membrane when I changed out the gasket, so it seems timely for a replacement. The problem is that I was unable to attach the new tank, so I put the old tank back on.
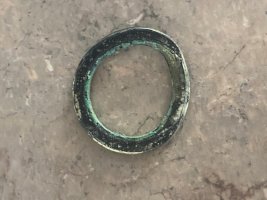
There is only one store in the city that carries a replacement union tee and it is stainless steel. The threads on the new stainless steel union don't match up with my old brass tee. When I went back to the store the salesman said those unions are not universal so they never match up. I don't really want to replace the whole tee, mostly because I don't have a heat gun so don't want to mess with taking out or possibly cracking the blue plastic pipe coming in from the well. I'd really love to just get a matching brass union tee piece, screw it onto the new tank, and install it in a few minutes to the old brass tee. I think this is an old style brass union tee that is no longer in production. Is there another alternative in finding a match? The union tees that I saw online look like they have a short male end with a rubber o ring to make mating easier, so wouldn't match up with this flat faced union tee. I feel like there has to be a simple solution and when I asked at the plumbing store they said they didn't have any available parts.
The old tank was a well-rite online wr200, which is a 62 gallon tank. The union pipe on the old tank is welded on by the manufacturer so I can't harvest it to resuse it, unless I were to cut it off and get a sharkbite fitting or equivalent attached to the cut end. But that sounds like not the best idea.
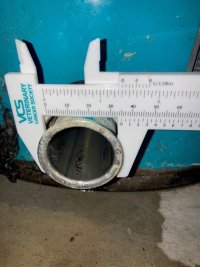
Current plan is I bought a schudle 80 pipe nipple and a schedule 80 FPT union, and hope to get lucky with the threads when I take the old tank off again. If that doesn't work, it looks like I'll have to cut the copper piper to unscrew the T. I found a 1.25" brass coupler union that I could put on between the well and the check valve, which should make the installation easier (there might not be enough space between the floor to easily twist off the tee) and future replacements easier to deal with.
Any thoughts on how to avoid changing out the whole brass tee unit? Thanks!
There is only one store in the city that carries a replacement union tee and it is stainless steel. The threads on the new stainless steel union don't match up with my old brass tee. When I went back to the store the salesman said those unions are not universal so they never match up. I don't really want to replace the whole tee, mostly because I don't have a heat gun so don't want to mess with taking out or possibly cracking the blue plastic pipe coming in from the well. I'd really love to just get a matching brass union tee piece, screw it onto the new tank, and install it in a few minutes to the old brass tee. I think this is an old style brass union tee that is no longer in production. Is there another alternative in finding a match? The union tees that I saw online look like they have a short male end with a rubber o ring to make mating easier, so wouldn't match up with this flat faced union tee. I feel like there has to be a simple solution and when I asked at the plumbing store they said they didn't have any available parts.
The old tank was a well-rite online wr200, which is a 62 gallon tank. The union pipe on the old tank is welded on by the manufacturer so I can't harvest it to resuse it, unless I were to cut it off and get a sharkbite fitting or equivalent attached to the cut end. But that sounds like not the best idea.
Current plan is I bought a schudle 80 pipe nipple and a schedule 80 FPT union, and hope to get lucky with the threads when I take the old tank off again. If that doesn't work, it looks like I'll have to cut the copper piper to unscrew the T. I found a 1.25" brass coupler union that I could put on between the well and the check valve, which should make the installation easier (there might not be enough space between the floor to easily twist off the tee) and future replacements easier to deal with.
Any thoughts on how to avoid changing out the whole brass tee unit? Thanks!


")