More tile questions

Users who are viewing this thread

Blown

Engineer
Messages
77
Reaction score
0
Points
0
Location
Wichita KS
My last thread was geared toward dealing with plumbing when installing new tile, so I thought that starting a new thread was apt. Hopefully this weekend I'll have the toilet flange dealt with and will install the Ditra underlayment over the plywood I laid down.

I extended the plywood about half way into the door jamb, with the plan that with the door closed you will see only tile from the bathroom side and only carpet from the hallway side. I will cut the vertical door trim to slip the tile underneath. I'm unsure about cutting the door casing though. It seems that I should cut the casing and slide the tile underneath (or the saddle if I decide to use one), but I don't think I should cut the casing the entire width of the door jamb since there is carpet on the hallway side. I'm afraid the existing carpet won't hide the space made by removing the bottom part of the casing. How should I deal with this?

IMG_0138.jpg

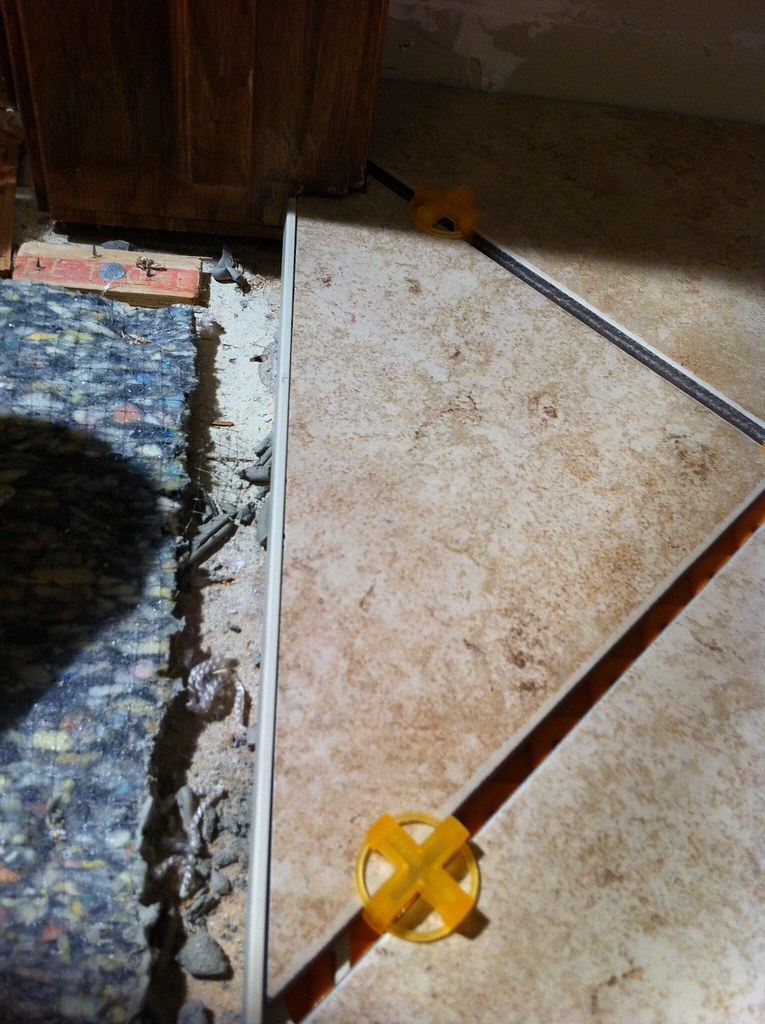
Second question. I plan to lay the tile diagonally. I was thinking that I should cut some tiles in half edgewise, then start by setting those tiles against a flat wall (making sure it's really straight first). That would get me a nice straight set and also make the cutting easier since it's straight in half. Does that sound like a good idea or not? If so, I'm not sure which wall to start on. See the pic below take from the doorway. The vanity will be immediately to the right of the door, then you see where the toilet will be. So the RH side won't be very visible, and the LH side will be very visible. So it seems like i should start from the LH wall, but I might end up tiling myself into a corner since the door is on the LH side? Also, you can see on the LH wall agains the tub the wall flares out b/c of the tub/shower skirt that's molded into the wall.

IMG_0136.jpg
 

Jadnashua

Retired Defense Industry Engineer xxx
Messages
32,771
Reaction score
1,191
Points
113
Location
New England
Ideally, you don't want tiny slivers anywhere and it's really nice if the pattern is symmetrical. So, you really need to lay it out first, either in scale on paper, or maybe easier by laying at least a few tiles out on the floor to see how it works out and looks. Remember to leave at least 1/4" gap around the room, and do NOT grout that space or you could end up with expansion/tenting problems down the road. The key points are the entryway, and the edges that you look at all the time while entering the room.
 

Blown

Engineer
Messages
77
Reaction score
0
Points
0
Location
Wichita KS
I just did some quick measuring, haven't laid anything out yet, but starting with a half tile up against the LH wall and moving to the right would put a row of tiles right in line with the center of the doorway. That should look symmetrical with respect to the space between the vanity and the LH wall, which I think is going to be the important spot.

I still need to figure out the plan of attack for the door trim/casing though, since that's my next step.
 

mrmedic

Junior Member
Messages
58
Reaction score
0
Points
6
Location
Delaware
Website
www.thehousemedic.com
As for the door trim casing, I used to always cut them with a back cut saw or "Chinese" saw back to just before the door stop. You can do this by using the saw cutting from the corner in on an angle. It will cut both the trim and the door frame at the same time. Lay a tile upside down on a piece of cardboard and lay your saw on the tile to give you the right height to cut out. Remember you have the Detra, tile and the thin-set height to deal with. When you get to where you want to stop I use a small chisel or screwdriver to cut the vertical cut on the piece you want to remove. I now have one of those oscillating saws and they work great for this type of work.

Ron
 

Blown

Engineer
Messages
77
Reaction score
0
Points
0
Location
Wichita KS
Hmm, now I'm worried that I should have put the plywood further into the doorway; closer to the stop. Based on my picture, what do you think?
 

Jadnashua

Retired Defense Industry Engineer xxx
Messages
32,771
Reaction score
1,191
Points
113
Location
New England
If you want to tile to the middle of the door, then the ply should go at least that far.
 

BobL43

DIY Senior Member
Messages
1,802
Reaction score
8
Points
38
Location
Long Island, NY
If you want to tile to the middle of the door, then the ply should go at least that far.

In a room that small with barely more than one sheet of plywood, its gets a little tough to get the wood into the room into position as you have it. Allowing the extra piece to extend into the doorway would have made you cuss even more. I just went through this myself with a sheet and a half of T&G 3/4 plywood in a 7X7 foot bathroom. Got it glued and screwed, but it was tricky and called for a lot of accurate measuring, even allowing 1/4 gap around the perimeter. I am glad that part is done;)
 

mrmedic

Junior Member
Messages
58
Reaction score
0
Points
6
Location
Delaware
Website
www.thehousemedic.com
It all depends on what type of transition strip you are going to use. There are "T" molding strips that push into a metal "U" channel so if you used that type then the finished side of the "T" molding would end up just about at the stop. The "U" channel gets screwed down on the sub floor and you might have enough depth to still mount it and still lock in the "T" after installing your tile.
 

Blown

Engineer
Messages
77
Reaction score
0
Points
0
Location
Wichita KS
OK, I'm back at this project and ran into an issue. I borrowed a tile saw, and after fighting with it (the water system was shot, and I found out after making several cuts that the feed table was not in line with the blade) I've made a bunch of cuts while dry laying the tile.

At the doorway I decided to use a Schluter strip. I was under the impression that this would hide the very edge of the tile, covering any imperfections in the cut edge. I was incorrect. It really just butts up against the Schluter strip, and my slightly imperfect cuts are really bothering me. Check out my pic. I can probably get the cut straighter than that, but it won't be gnat's butt perfect. Also, I despite having what appears to be a good blade I can't keep from getting a few tiny chips in the finished surface of the tile right at the cut edge. The chips are maybe 1/64" in size but it's dark brown under the finished surface and butted against the Shluter strip I'm just not happy with the finish.

Ideas?

6259907070_8973ea70d1_b_d.jpg
 

BobL43

DIY Senior Member
Messages
1,802
Reaction score
8
Points
38
Location
Long Island, NY
OK, I'm back at this project and ran into an issue. I borrowed a tile saw, and after fighting with it (the water system was shot, and I found out after making several cuts that the feed table was not in line with the blade) I've made a bunch of cuts while dry laying the tile.

At the doorway I decided to use a Schluter strip. I was under the impression that this would hide the very edge of the tile, covering any imperfections in the cut edge. I was incorrect. It really just butts up against the Schluter strip, and my slightly imperfect cuts are really bothering me. Check out my pic. I can probably get the cut straighter than that, but it won't be gnat's butt perfect. Also, I despite having what appears to be a good blade I can't keep from getting a few tiny chips in the finished surface of the tile right at the cut edge. The chips are maybe 1/64" in size but it's dark brown under the finished surface and butted against the Shluter strip I'm just not happy with the finish.

Ideas?

6259907070_8973ea70d1_b_d.jpg


Is that the door casing where the hard to see (too dark) bat cut is? If so, why don't you mark the casing molding at the top of the tile and have the tile go under the molding? You can use a special saw made for this or a Fein Multimaster tool or one of its copy cat units like a Dremel, Rockwell, Craftsman, etc.
 

Jadnashua

Retired Defense Industry Engineer xxx
Messages
32,771
Reaction score
1,191
Points
113
Location
New England
What color grout are you planning on? The trim strip is meant to have a slight gap and to be grouted. The grout will tend to hide some imperfections. It doesn't look like you have the right trim strip...they come in numerous heights to correspond to the tile thickness. It should be flush with or slightly below the height of the tile after setting with thinset. It depends somewhat on how thick of a thinset setting bed you are planning (i.e., notch size and spacing) whether it would line up properly.

A misaligned sliding tray, too much slop in the tray guides, a worn blade or bent blade, an out-of-square motor shaft, and a worn motor bearing along with the incorrect blade or not enough water can all cause problems on a tile's edge. There are probably other things as well. A tile stone might be useful to knock the edge down slightly. I happen to use a diamond pad. If all else is perfect, feeding the tile too fast can also cause this.
 

Blown

Engineer
Messages
77
Reaction score
0
Points
0
Location
Wichita KS
Is that the door casing where the hard to see (too dark) bat cut is? If so, why don't you mark the casing molding at the top of the tile and have the tile go under the molding? You can use a special saw made for this or a Fein Multimaster tool or one of its copy cat units like a Dremel, Rockwell, Craftsman, etc.
No, the "bad" cut is the one that is up against the trim strip. The other cuts, like the ones around the door casing, are easier to hide. I did cut the casing molding at the top of the tile to slip it underneath. As you said, it's too dark in that area to see what I did. :)

What color grout are you planning on? The trim strip is meant to have a slight gap and to be grouted. The grout will tend to hide some imperfections. It doesn't look like you have the right trim strip...they come in numerous heights to correspond to the tile thickness. It should be flush with or slightly below the height of the tile after setting with thinset. It depends somewhat on how thick of a thinset setting bed you are planning (i.e., notch size and spacing) whether it would line up properly.
Hmm, I think the grout is a tan, darker than the tile but not terribly dark. I was no aware at there was supposed to be a slight gap filled with grout between the tile and trim strip. How much of a gap, approximately?

Am I correct that the trim strip fits directly under the tile, then the whole thing goes down on the thinset bed? You can't tell from the pic, but the trim strip is a tiny bit higher than the tile when fit in dry, maybe 1/64" higher. I was going to use a 1/4 x 3/8" trowel.


A misaligned sliding tray, too much slop in the tray guides, a worn blade or bent blade, an out-of-square motor shaft, and a worn motor bearing along with the incorrect blade or not enough water can all cause problems on a tile's edge. There are probably other things as well. A tile stone might be useful to knock the edge down slightly. I happen to use a diamond pad. If all else is perfect, feeding the tile too fast can also cause this.
I corrected the sliding tray alignment. Not sure how much is too much, but the tray guides and saw blade dont seem to have too much slop.

If I knock the edge off the tile, it will show the dark brown tile underneath. It seems like the cut edge should definitely be beveled, but won't the dark showing through look bad?
 

Jadnashua

Retired Defense Industry Engineer xxx
Messages
32,771
Reaction score
1,191
Points
113
Location
New England
The picture makes the trim look higher than that small value, so once thinset is under it, it should be okay. If there isn't at least a slight gap that can be filled with grout, it will act like a very good dirt, crud catcher that will be nearly impossible to keep clean. Also, it stabilizes the edge better as the trim would be essentially glued to the tile edge by the grout. As to the edge, maybe just a pass or two with the stone to take the sharp edge off, but not expose much of any of the base layer. That's one reason why I like through-body, unglazed porcelain...you can play with the edges and not see the core, since it is the same as the surface.
 

Blown

Engineer
Messages
77
Reaction score
0
Points
0
Location
Wichita KS
Ok, great!

So am I right about installing the trim strip? The tile sits directly on it? Or is there supposed to be grout between the two?

Should I thinset in the trim strip first? Or at the same time as the tile?
 

Dlarrivee

New Member
Messages
1,150
Reaction score
0
Points
0
Location
Canada
You need thinset under the flange of that trim strip, it probably has perforations for the mortar to ooze through.
 

Blown

Engineer
Messages
77
Reaction score
0
Points
0
Location
Wichita KS
You need thinset under the flange of that trim strip, it probably has perforations for the mortar to ooze through.
Yes, it does. How thick of thinset should be between the flange and the Ditra underlayment?

I know I'm probably over thinking this, but I don't want to have problems later like I've seen with other do-it-yourself tile jobs.
 

Jadnashua

Retired Defense Industry Engineer xxx
Messages
32,771
Reaction score
1,191
Points
113
Location
New England
Spread out your thinset, smush the trim down into it as if it was a tile, add a little more on the top of the flange, then set the tile. You want a little gap so it can be filled when you grout the tile. If in doubt, call Schluter.
 
Top
Hey, wait a minute.

This is awkward, but...

It looks like you're using an ad blocker. We get it, but (1) terrylove.com can't live without ads, and (2) ad blockers can cause issues with videos and comments. If you'd like to support the site, please allow ads.

If any particular ad is your REASON for blocking ads, please let us know. We might be able to do something about it. Thanks.
I've Disabled AdBlock    No Thanks