Thanks Wayne, WorthFlorida – great info! Let me see if I understand – responses and questions in blue
Wayne’s comments:
OK, two important points that are not reflected in your proposed layout:
- Under the UPC, the laundry sink needs a 2" drain (Table 702.1, footnote 2)
Rob: Understood – I’m leaning towards replacing the 1.5” drain with a single 2” drain for both.
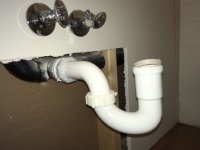
- The lavatory vent take-off is not currently correct, so this is the time to fix it.
Rob: It’s currently a San-Tee, which I understand is incorrect. Should it be a “Combo Wye” (long sweep?) or a “Wye+45 degree bend” –Is one better?
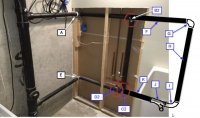
So you're going to have to run a 2" drain around the corner to your 3" stack, which means adding a 3" x 2" san-tee or combo to the stack. But you can keep the 1-1/2" horizontal vent run and use it for both the lavatory and the laundry sink (by extending it).
Now, to determine whether to add a separate 2" drain below your 1-1/2" drain, or to simply replace the 1-1/2" drain with a 2" drain for both fixtures, you need some information on trap heights. Laundry sinks are often deeper than lavatories, so the existing drain height may be too high. That would call for a new, lower 2" drain.
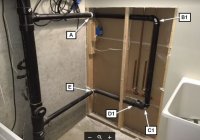
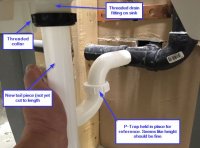
That means the first step is to hold up your p-trap under the laundry sink, and look at what range of heights above the floor would work for the trap arm to enter the wall. Also, determine the current height of the lavatory drain above the floor (on the side in the pictures), and then check under the lavatory to see if the p-trap can be moved up or down (but probably not down), and by how much.
Rob: The bottom of the lavatory sink drain is 27” off the ground. 20” for the utility sink. I’ve included a mock up picture of the utility p-trap – I think it’s too low to run a 2” drain above the existing 1.5” drain, so it probably makes more sense to just replace the 1.5” drain with a 2” for both sinks – does that make sense?
With that info, we can advise you on how to run the plumbing for the laundry sink and fix the lavatory venting.
Cheers, Wayne
WorthFlorida’s comments:
This is a fairly simple to do, as Wayne suggest a 2" drain pipe low enough to handle both traps.
Rob: Yes, I think replacing the 1.5” drain with a single 2” drain will be cleaner, easier.
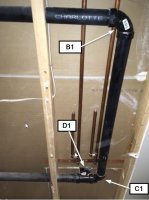
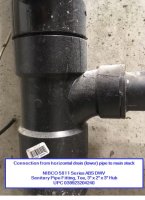
From the picture it looks like the san-tee at the stack is 3x2x3.
Rob: Yes, I checked the UPC code and that’s exactly what it is: UPC 039923204240
NIBCO 5811 Series ABS DWV Sanitary Pipe Fitting, Tee, 3" x 2" x 3" Hub
A 2" to 1.5" reducer might have been used, if true, there is a tool you can buy to ream out the 1.5" pipe. The three 3" stack will be the hassle part of the job. You might have to go past the 45 elbow to get things to fit together. google "socket saver" or "pvc reamer". A closer look at the pics the stack has a 45 at the floor and to cut out the 3" tees there is no length of pipe to cut out just the tees. 3" reamers are sold.
Rob: OK, not sure I’m following all this. I think what you’re saying is I can cut off the 1.5” drain pipe and ream out that end of the 3x2x3 san-tee so it fits a new 2” pipe – is that correct? If I do that, do I still have to make changes to the 3” stack? I think I can handle the new drain and vent pipes, but I’m reluctant to cut into a main stack on my first DWV adventure!
This work looks like it was done by a plumber or someone that was very handy.
Rob: Agreed, it doesn’t look like a “homeowner’s special” But I’m curious – why would a plumber have used 1.5” drain pipe (maybe it’s OK for a single sink?) and the san-tee on the lavatory (I didn’t think that was ever OK)
The copper water lines have the old way of making hammer arrestors. These eventually fill with water and makes then useless. Replace them with hammer arrestors by Oatley or Sioux Chief brands. A hacker wouldn't bother with the extra cost for arrestors.
Rob: Good suggestion, thanks! – I have more experience with water lines vs DWV, so I can replace the hammer arrestors while I’m at it.
Another is the horizontal drain pipe. 1.5" abs must be flexible enough to get the length of pipe through the the studs. The length is longer than the spacing of the studs. 2" might not be flexible enough. To rerun with 2" abs you may need to use two short pieces with a coupler.
Rob: Thanks I didn’t think of that! But I’d have probably figured it out as soon as I tried to fit the new ~5’ section of 2” drain pipe between the studs! ☹ I can deal with couplers
WorthFlorida,
Rob: Once again, I really appreciate all the patience and detailed guidance!
 .
.