Can cast iron Radiator be removed to retile floor?

Users who are viewing this thread

CeeTee

New Member
Messages
24
Reaction score
0
Points
1
Location
Philadelphia
Dear All,

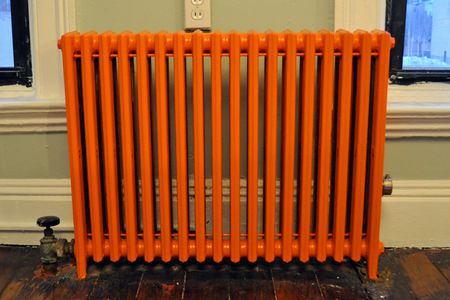
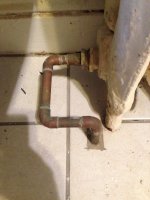
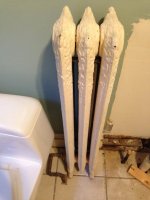
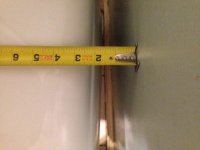
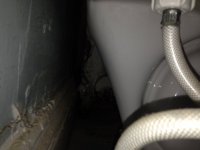
I'm new to the forum and have been working on our 1925 Victorian house in Philadelphia, on and off for a few year. We are currently gutting the 3rd floor bathroom which appears to have been very badly 'remodeled' some time in the late 90's. I am doing the demolition myself currently and have removed the old cast iron tub, vanity and the cracked fiberglass shower stall and also cut & capped the water pipes so that I can proceed removing tile etc. My concern is the small cast iron radiator which is wedged between the toilet and vanity and which is connected using copper pipes, (unlike all but one other radiator connections in the house. I'm not even certain if copper connections are up to code in Philadelphia.) We plan on lifting the subfloor and laying a new one so will hopefully have good access to any plumbing.

I will be getting a plumber in, but I wanted to know this information for myself. We have a one-pipe steam system in the house which is currently in use. Can this radiator be temporarily removed in a similar process to cutting and capping the water pipes? That is: shut off the heating and drain the system before cutting and capping? Sharkbite caps were used for the water, but I'm assuming soldered caps would be the minimum requirement for the radiators? I know this is very minimal information to go on and several questions. I've attached photos of the copper connections and radiator to hopefully make it clearer.

Thank you in advance!
 

Attachments

  • radiator1.JPG
    radiator1.JPG
    75.5 KB · Views: 994
  • radiator2.JPG
    radiator2.JPG
    66.4 KB · Views: 2,280

Dana

In the trades
Messages
7,889
Reaction score
509
Points
113
Location
01609
Yes it can be removed and replaced. This is a 1-pipe steam system- it's not full of water (or shouldn't be). There is nothing to drain, but the heating system needs to be turned off while working on it.

It looks like you'll have to cut the copper to do it- the longer stretch between the ells looks like the easiest place to do it. Since the pressures are extremely low here a sharkbite would be extreme overkill. A sweat solder pipe cap can be taped in place with aluminum tape as a temporary seal and tied/restrained by wire to hold it during heating cycles if the tape doesn't seem to stick. A residential 1-pipe steam system should be running less than 0.5 psi, though sometimes people crank it up to 2 psi (still a very low pressure) out of ignorance.

Using a sweat union to marry it all back together would make future work a lot easier, but a sweat soldered coupling can also be used.

When putting it back, make sure there's a bit of slope to the radiator (you may need to shim it) to guarantee the condensate drains toward the pipe. If putting it back together with a union this would be adjustable after the fact, but if reinstalling with a sweat coupling it will be critical to verify the slope before soldering.

While you have it out it's a good time to think about cleaning it up and painting it to match or complement your decor. Any color works as long as it's not metalic. The metalic silver (sometimes gold/bronze) painted radiators were done that way to REDUCE the heat output of oversized radiators overheating the rooms. Standard interior latex or alkyd house paints have a service temperature limit of 200F, and the steam is typically delivered at 215F (could even be 225-230F if somebody cranked up the pressure), so look up the service temperature limits of anything you paint it with. It's not a particularly high temperature, but using 200F paint may end up with a crazed/cracked appearance over time. (That can look fine if it's a glossy alkyd enamel, not so much for latex.) Using automotive manifold spray paints work (overkill, really) but the color palette is somewhat limited. Bake-on automotive body paints are sometimes rated high enough. Automotive engine enamel is always good to at least 500F.
 
Last edited:

CeeTee

New Member
Messages
24
Reaction score
0
Points
1
Location
Philadelphia
Yes it can be removed and replaced. This is a 1-pipe steam system- it's not full of water (or shouldn't be). There is nothing to drain, but the heating system needs to be turned off while working on it.

It looks like you'll have to cut the copper to do it- the longer stretch between the ells looks like the easiest place to do it. Since the pressures are extremely low here a sharkbite would be extreme overkill. A sweat solder pipe cap can be taped in place with aluminum tape as a temporary seal and tied/restrained by wire to hold it during heating cycles if the tape doesn't seem to stick. A residential 1-pipe steam system should be running less than 0.5 psi, though sometimes people crank it up to 2 psi (still a very low pressure) out of ignorance.

Using a sweat union to marry it all back together would make future work a lot easier, but a sweat soldered coupling can also be used.

When putting it back, make sure there's a bit of slope to the radiator (you may need to shim it) to guarantee the condensate drains toward the pipe. If putting it back together with a union this would be adjustable after the fact, but if reinstalling with a sweat coupling it will be critical to verify the slope before soldering.

Hi Dana,

Thanks very much for responding and for the information - this is good to know and encouraging that it is not a major undertaking! The radiator is so awkwardly placed that I'm hoping a plumber could potentially move it or replace it with a modern radiator that I'm not hitting my elbows on!

Best regards!
 

Dana

In the trades
Messages
7,889
Reaction score
509
Points
113
Location
01609
Hi Dana,

Thanks very much for responding and for the information - this is good to know and encouraging that it is not a major undertaking! The radiator is so awkwardly placed that I'm hoping a plumber could potentially move it or replace it with a modern radiator that I'm not hitting my elbows on!

Best regards!

Looks like you posted while I was editing.

Moving the radiator to a new location might be complicated on the plumbing end, or not. You don't appear to have a lot of width to work with between the toilet and sink plumbing to be able to install shorter rad with equivalent output. You may have enough room behind the toilet to fit a wider cast iron baseboard radiator if there's 10" or more clearance between the bottom of the tank portion and the floor. With baseboard rads it's even more critical to pay attention to slope.

Before replacing it, be sure it's the right size. If the temperature in that room is about the same as other rooms on system during the heating season, estimated it's equivalent direct radiation square feet (EDR) and replace with something similar. (That link isn't working right now, nor any of that company's pages- perhaps their server is offline at the moment.) You can upsize/downsize the EDR of the new radiator if the room tends to run hot or cold. A thermostatic radiator vent could allow you adjustably down-size it's output if its overheating the room.
 

CeeTee

New Member
Messages
24
Reaction score
0
Points
1
Location
Philadelphia
Looks like you posted while I was editing.

Moving the radiator to a new location might be complicated on the plumbing end, or not. You don't appear to have a lot of width to work with between the toilet and sink plumbing to be able to install shorter rad with equivalent output. You may have enough room behind the toilet to fit a wider cast iron baseboard radiator if there's 10" or more clearance between the bottom of the tank portion and the floor. With baseboard rads it's even more critical to pay attention to slope.

Before replacing it, be sure it's the right size. If the temperature in that room is about the same as other rooms on system during the heating season, estimated it's equivalent direct radiation square feet (EDR) and replace with something similar. (That link isn't working right now, nor any of that company's pages- perhaps their server is offline at the moment.) You can upsize/downsize the EDR of the new radiator if the room tends to run hot or cold. A thermostatic radiator vent could allow you adjustably down-size it's output if its overheating the room.

Thanks again - these are definitely things worth considering and not something I would have thought of! Many thanks!
 

Dana

In the trades
Messages
7,889
Reaction score
509
Points
113
Location
01609
If going the re-paint route, DupliColor Engine Enamel comes in a fairly wide range of colors designed to match automotive OEM colors, and can handle steam temperatures, and is fairly widely available. (Click on the "Colors" tab.) The aluminum & bright white colors would reduce the heat output of the radiator, but the rest of the palette would be fine.

Some people really go nuts- this probably isn't going to work in most interior color schemes. :)

painted-radiator-via-smallspaces.about.com-56a8894d3df78cf7729ea0d7.jpg


3e20337971c77eb402495f3811436b3c--steam-radiators-grand-designs.jpg
 
Last edited by a moderator:

CeeTee

New Member
Messages
24
Reaction score
0
Points
1
Location
Philadelphia
If going the re-paint route, DupliColor Engine Enamel comes in a fairly wide range of colors designed to match automotive OEM colors, and can handle steam temperatures, and is fairly widely available. (Click on the "Colors" tab.) The aluminum & bright white colors would reduce the heat output of the radiator, but the rest of the palette would be fine.

Some people really go nuts- this probably isn't going to work in most interior color schemes. :)

Thanks again for taking the time to respond - this is terrific info - luckily I am not in charge of the color schemes, so will have to defer to the wife on this one!
 
Last edited by a moderator:

Dana

In the trades
Messages
7,889
Reaction score
509
Points
113
Location
01609
If there is 3" between the wall and the plumbing for the washbasin a cast iron baseboard radiator can fit in there. If there's room one right side of the sink for the existing radiator, running the plumbing above the floor (perhaps behind protective sheet metal cover) it it can be moved without gutting drilling anything. If the wall isn't load bearing or structural it could be even notched for clearance to accomodate the plumbing, but again, pay attention to slope, leave at least 1/2" clearance to wood or the interior gypsum, and insulate around the pipe with rock wool batts.

With low-temp hydronic systems radiators can to match the kickboard, window trim or wainscot using the exact same standard interior latex paint, but unfortunately that's a recipe for flaking-peeling paint with steam.
 

Dana

In the trades
Messages
7,889
Reaction score
509
Points
113
Location
01609
A second reference for estimating the EDR lives here. Without an end-on picture I'm guessing it's a 2-column radiator about 36" tall, maybe 3.5' EDR per section for 10-11' EDR?

The ~10" Burnham Baseray or Weil-McLain Snug or Crane RC or equivalent would be about 3.4' EDR per running foot, so a 3 footer would be about right, and probably fits. Add another 8" for plumbing/valve covers on each end.

It can be trimmed out to match whatever you're doing with the kickboards:

34345d1404754843-cast-iron-baseboard-radiator-cover-help-radiator-finish-trim-best-idea.jpg

Baseray 9A (9-7/8"tall) ^^^

c8affwwsccka.jpeg

^^Snug (9-7/8"tall) this is a 3-footer with end caps. ^^^^^

xelasb6bd51d.png

^^^Crane RC^^^

This stuff often shows up cheap on the secondary/used market at less than $25/foot, sometimes less than $15/foot. BaseRay & Snug end caps are still available new.

If buying used, make sure it's a complete unit with a cast-in foot on the end pieces establishing the distance to the floor, not a section out of a longer run with no feet, or a foot on just one end.

There is also as lot of 7" cast iron baseboard out there (6" across the face, 6-7/8" tall at the feet), at about 2.1 feet EDR per running foot. If my 10-11' EDR WAG on the existing radiator is correct it would take a 5 foot section of BaseRay 7A to replace it, but it's more likely to be able to sneak behind/under the toilet than the 10" stuff.
 

Jadnashua

Retired Defense Industry Engineer xxx
Messages
32,770
Reaction score
1,190
Points
113
Location
New England
Be very careful if you want to try to run a baseboard unit behind the toilet as two things can occur:
- you'll be very limited on which toilet you choose either now or in the future
- a steam radiator might get hot enough to melt a wax ring on the toilet, so you'd probably want to go with either a waxless one or one of the synthetic foam rubber jobs.
 

CeeTee

New Member
Messages
24
Reaction score
0
Points
1
Location
Philadelphia
Be very careful if you want to try to run a baseboard unit behind the toilet as two things can occur:
- you'll be very limited on which toilet you choose either now or in the future
- a steam radiator might get hot enough to melt a wax ring on the toilet, so you'd probably want to go with either a waxless one or one of the synthetic foam rubber jobs.

Thanks to Dana again and many thanks jadnashua regarding the wax ring! We might be keeping the one-piece toilet that we have as it is in excellent shape and does fit in the limited space available.
 

Dana

In the trades
Messages
7,889
Reaction score
509
Points
113
Location
01609
Be very careful if you want to try to run a baseboard unit behind the toilet as two things can occur:
- you'll be very limited on which toilet you choose either now or in the future
- a steam radiator might get hot enough to melt a wax ring on the toilet, so you'd probably want to go with either a waxless one or one of the synthetic foam rubber jobs.

If it's hot enough to melt the wax ring seal you won't be using that toilet anyway, eh? (At least not sitting down!) :)

In practice the tank will be much warmer than the bowl or floor, and it has the thermal mass of the water to limit the rate of temperature rise as the heat cycles on/off, and dampens out the temperature swings at the porcelain. It'll only be a problem if running a very high duty cycle on the steam, which is rare. Most legacy residential steam systems are more than 3x oversized for the actual heat load, and thus run at less than a 35% duty cycle more than 99% of the time.

I was a bit concerned about that when installing a Weil Mclain Snug behind the toilet in my upstairs bath. While mine is a low temp hydronic system with ~125F water, and being sized EXACTLY for the load at the 99% outside design temp the duty cycle is much higher, but there's never a noticable elevation in temperature at the toilet-seat level. Had their been room for a bit more radiation in that room I would have added it, but the average temp of the porcelain wouldn't change much.

Mine is barely above room temp, never even reaching the temperature of a Japanese style heated toilet seat, but it might with 10" baseboard in CeeTee's bathroom (which some might consider a plus.) With 7" cast iron baseboard it would likely be comparable to mine, assuming 3" or more of air between the tank and top of the baseboard, and 2" or more between the face of the baseboard to the back of the siphon.

Melting wax rings are a more likely scenario when heated from below by radiant floor, but if pulling the toilet for the re-tile (likely) using a synthetic seal for the closet flange is cheap insurance.

From the picture it looks like 2" or more of space between the back of the tank and the wall, which would be an easy convection path to keep the tank temp reasonably well controlled, but it's a bit hard to tell at that angle:

index.php
 

Dana

In the trades
Messages
7,889
Reaction score
509
Points
113
Location
01609
Thanks to Dana again and many thanks jadnashua regarding the wax ring! We might be keeping the one-piece toilet that we have as it is in excellent shape and does fit in the limited space available.

What model is that, and how much space is there between the tank & wall?
 

CeeTee

New Member
Messages
24
Reaction score
0
Points
1
Location
Philadelphia
What model is that, and how much space is there between the tank & wall?

Its an Eljer one-piece (I'm not sure of the model - I would need to check for a number maybe in the tank lid). There is about 2 inches as you guessed. I've added a couple of additional photos. The third photo is the best I could get facing the toilet from the left to view the space at the baseboard.
 

Attachments

  • toilet1.JPG
    toilet1.JPG
    40.5 KB · Views: 382
  • toilet2.JPG
    toilet2.JPG
    64.2 KB · Views: 366
  • toilet3.JPG
    toilet3.JPG
    39 KB · Views: 2,051

Dana

In the trades
Messages
7,889
Reaction score
509
Points
113
Location
01609
Looks like the "Canterbury" series 081-1620, -1625, or -1630 (?):

eljer-toilet-image-canterbury-081-1620.jpg


Couldn't find a dimensioned drawing on that one, there is a dimensioned drawing of the 081-3025, which is similar. Unfortunately the dimensions we care about here aren't on the drawing.

Most of the 10" baseboard is 2.5" proud of the wall, 9-7/8" tall. The 7 inchers are also 2.5" thick, just shorter. In a pinch can be installed directly on the studs (assuming it's not an exterior wall) buying you another 1/2" - 3/4" of clearance. The kickboard trim is probably 3/4" thick.

If you want to test fit it, build a 2.5" x 10" cardboard box land a 2.5" x 7" to get an idea of how much clearance you'd have to the back of the porcelain at an point up to 10" off the floor. Ideally you'd have at least a couple of inches between the back of the siphon section and the baseboard (4" between siphon & wall), but it's probably not a show-stopper at 1". Tighter than that would be pushing your luck.

index.php
 
Top
Hey, wait a minute.

This is awkward, but...

It looks like you're using an ad blocker. We get it, but (1) terrylove.com can't live without ads, and (2) ad blockers can cause issues with videos and comments. If you'd like to support the site, please allow ads.

If any particular ad is your REASON for blocking ads, please let us know. We might be able to do something about it. Thanks.
I've Disabled AdBlock    No Thanks