Stack Replace

Users who are viewing this thread

JayKuul

New Member
Messages
16
Reaction score
0
Points
1
Location
New Jersey
Hello everyone! Professional DIYer here :) Been a long time forum lurker here, absorbing so much experienced info.
I have done a lot of plumbing over the last 30 years but, have a few questions on my latest bath remodel.

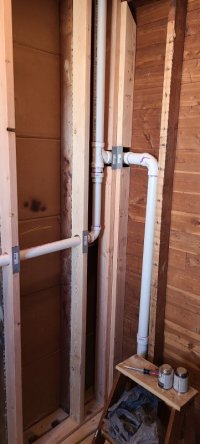
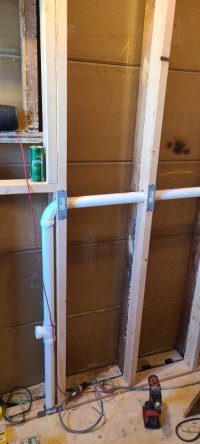
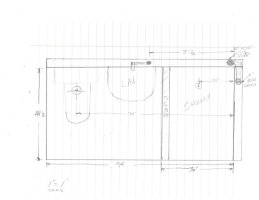
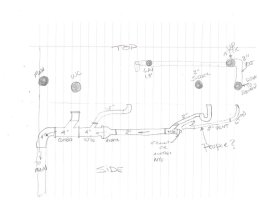
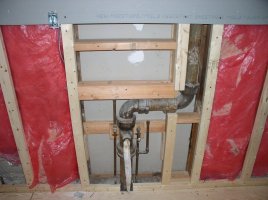
Attached are a few pics of the DWV system, that has already been taken out. The plan is to replace 90% of it all with PVC of course but, I'm assuming this layout was all up to code and correct when the house was built?
(1950's Ranch in NJ)

If you follow the pics, everything is 4inch cast, 1st branch after the 90 is the toilet, next is the 1.5 lav and then reduced to a 2" out to a wye for the shower. The end of the wye, goes out and up through the attic/roof, to an all cast vent. I guess my question is, would this previous layout be best practice to reproduce in pvc, if not, what would be a better method? Also, is the preferred method to cut off that cast cleanout and attach the pvc with a nohub, to the elbow in the concrete? Or, fernco clamp to the existing section I cutoff above the cast cleanout?
Many thanks for all your time and knowledge!

Jay

20210106_171124.jpg
20210106_171139.jpg
20210106_171150.jpg
20211120_091859.jpg
20211206_125936.jpg
 

Breplum

Licensed plumbing contractor
Messages
1,977
Reaction score
804
Points
113
Location
San Francisco Bay Area
Make sure your 4" cleanout plug is functional, then, start by reducing everything else above to 3".
I don't have the patience to deal with the rest. I prefer each fixture be vented individually, then the vents combined.
 

wwhitney

In the Trades
Messages
6,567
Reaction score
1,847
Points
113
Location
Berkeley, CA
So the only fixtures draining into the slab there are a lav, a shower, and a WC?

I don't see a picture of the shower wye, but it looks like the part at the end wasn't done correctly. If you want to maintain that end-of-line 2" vent, then it needs to come off the shower trap arm vertically. I.e. you could put a san-tee below the vent stub-down, which dry vents the shower trap arm, and then hit a LT90 to go horizontal again. Or if the vent stub-down is between the shower drain and the stack, you can have the vent takeoff via an upright combo.

The WC can connect in the old location, but it needs to be via an upright combo, not a san-tee on its back. It is wet vented by the lav and/or shower.

Cheers, Wayne
 

JayKuul

New Member
Messages
16
Reaction score
0
Points
1
Location
New Jersey
So the only fixtures draining into the slab there are a lav, a shower, and a WC?

I don't see a picture of the shower wye, but it looks like the part at the end wasn't done correctly. If you want to maintain that end-of-line 2" vent, then it needs to come off the shower trap arm vertically. I.e. you could put a san-tee below the vent stub-down, which dry vents the shower trap arm, and then hit a LT90 to go horizontal again. Or if the vent stub-down is between the shower drain and the stack, you can have the vent takeoff via an upright combo.

The WC can connect in the old location, but it needs to be via an upright combo, not a san-tee on its back. It is wet vented by the lav and/or shower.

Cheers, Wayne
Thanks Wayne!

Alas, I dont have a better pic of the shower wye, I believe the vent was just leaded into the end of the shower wye. I do plan to move the shower pan to drain to left, instead of the right as it was so, I may be able to do as you've suggested.

As far as the WC, its odd as my main bath stack is using the identical san-tee. But that bath, the vent is off the lav, not the stack.
How about that cast long sweep, its massive lol.

20210310_184027.jpg
 

Jeff H Young

In the Trades
Messages
8,979
Reaction score
2,245
Points
113
Location
92346
cant comment too much it looks like 2 stacks to me ? And kind of hard to figure out from pics I was only born in the 50s and not being a historian and never been in NJ So did it ever meet code? answer Maybe. Would it meet code now? No . Is it horrible ? I guess not it worked well for 65 or 70 years.
Santees on back dont fly now but wo9rk ok most of time for venting but good practice to avoid , avoiding vents that arent wet from being horizontal below flood level of fixture is code and best practice , If you must have the vent run horizontal then use sweeping fittings .
If that Cleanout is too hard to get operational you could add a pvc c/o above it, Im guessing the scope of work is the basement and you arent gutting all the plumbing so you gotta basicaly follow whats there
 

JayKuul

New Member
Messages
16
Reaction score
0
Points
1
Location
New Jersey
So the only fixtures draining into the slab there are a lav, a shower, and a WC?

I don't see a picture of the shower wye, but it looks like the part at the end wasn't done correctly. If you want to maintain that end-of-line 2" vent, then it needs to come off the shower trap arm vertically. I.e. you could put a san-tee below the vent stub-down, which dry vents the shower trap arm, and then hit a LT90 to go horizontal again. Or if the vent stub-down is between the shower drain and the stack, you can have the vent takeoff via an upright combo.

The WC can connect in the old location, but it needs to be via an upright combo, not a san-tee on its back. It is wet vented by the lav and/or shower.

Cheers, Wayne
Thanks Wayne and Jeff..

Question in regards to the WC choice.. You mentioned a combo, would that include a WYE with a street 45?
In regards to the vent, I'll get some pics posted to find if I did it wrong but, I ran some of the plumbing above to
tie the 1.5" lav to the 2" vertical vent. I had to frame another stud wall in front of the load bearing one, the original was disgustingly hacked to get all the supplies to the fixtures. The original lav drain, came up through the floor in front of the old wall. (That corner is just for the drywall, original stud is behind it.)

I'm more of a visual learner and may need some more help in that regards, to the new vertical stack below in the basement.
 

Attachments

  • 20220227_133336.jpg
    20220227_133336.jpg
    61.3 KB · Views: 94
  • 20220227_133339.jpg
    20220227_133339.jpg
    57.1 KB · Views: 88

wwhitney

In the Trades
Messages
6,567
Reaction score
1,847
Points
113
Location
Berkeley, CA
Yes, combo = wye plus 45. Not sure if there was another question in there.

If the load bearing wall in your photos has hacked up studs, those are worth sistering. Holes in the bottom plate don't matter for gravity loads.

Cheers, Wayne
 

JayKuul

New Member
Messages
16
Reaction score
0
Points
1
Location
New Jersey
Yes, combo = wye plus 45. Not sure if there was another question in there.

If the load bearing wall in your photos has hacked up studs, those are worth sistering. Holes in the bottom plate don't matter for gravity loads.

Cheers, Wayne
Thx.. Does that vent and drain setup in pics look ok?
I'll get a mockup as best I can soon, of the replacement stack.. The tie in to the vent to the shower arm, has got me perplexed.
 

wwhitney

In the Trades
Messages
6,567
Reaction score
1,847
Points
113
Location
Berkeley, CA
If the horizontal vent in the first picture is 6" above the flood rim of the lavatory (?) then that's fine. In the second picture, I'm not sure what the vent on the right is for, but again as long as that upside down san-tee is 6" above both fixture flood rims, the connectivity is fine.

Cheers, Wayne
 

JayKuul

New Member
Messages
16
Reaction score
0
Points
1
Location
New Jersey
If the horizontal vent in the first picture is 6" above the flood rim of the lavatory (?) then that's fine. In the second picture, I'm not sure what the vent on the right is for, but again as long as that upside down san-tee is 6" above both fixture flood rims, the connectivity is fine.

Cheers, Wayne
It is above the flood line, that much I learned from all you pros. The vent on the right, was the original 2" that supplied the whole stack at the end of the old stack. Thats the one you stated I need to tie in to the shower trap arm, if I want it done correctly.
 

wwhitney

In the Trades
Messages
6,567
Reaction score
1,847
Points
113
Location
Berkeley, CA
How about a floor plan of the bathroom, showing the locations of the pipes in the two photos, and showing the location of the stack below in the basement that you need to tie back into? Vertical pipes can be shown as circles representing their cross section.

Cheers, Wayne
 
Last edited:

JayKuul

New Member
Messages
16
Reaction score
0
Points
1
Location
New Jersey
Will do.. lemme get something together later with some crayons, when I get home from the office.. ;)
 

JayKuul

New Member
Messages
16
Reaction score
0
Points
1
Location
New Jersey
How about a floor plan of the bathroom, showing the locations of the pipes in the two photos, and showing the location of the stack below in the basement that you need to tie back into? Vertical pipes can be shown as circles representing their cross section.

Cheers, Wayne
How about this? I can post some actual pics of the area as it now, if needed. The new stack will be offset from the main in the floor now, due to me building a new stud wall for the dwv. I'm not sure if how I've drawn is right, tying in the down vent to the shower arm as you wanted. Correct me on anything, you've been more than helpful, I cannot thank you enough so far.
 

Attachments

  • image2022-03-01-030118.jpg
    image2022-03-01-030118.jpg
    43.1 KB · Views: 87
  • image2022-03-01-030559.jpg
    image2022-03-01-030559.jpg
    43.5 KB · Views: 84

wwhitney

In the Trades
Messages
6,567
Reaction score
1,847
Points
113
Location
Berkeley, CA
Assuming I understand correctly the location of the basement stack you need to tie into (it's shown in the second diagram, but not the first), the simplest wet vent method for the bathroom would be as below. Red is 3" (minimum), blue is 2", and purple is determined by your code. Purple would be 2" for the UPC, 1.5" for the IPC, and you'll have to check the NSPC to determine which size you would need. The dashed line is the vent up in the wall, at least 6" above the lav flood rim; the other solid lines are below the floor.

However, that layout assumes you can confirm the DWV layout in the wall of the bathroom above, and could abandon that vent stub down (you can't just cap it, as it could get water and hold it). Is the scope of the work limited to the basement? If so, you'll need a different layout that uses the 2" vent stub down to dry vent the shower, which will ensure the WC is properly wet vented, regardless of what the lav DWV looks like above.

Cheers, Wayne

image2022-03-01-030118.jpg
 

wwhitney

In the Trades
Messages
6,567
Reaction score
1,847
Points
113
Location
Berkeley, CA
OK, if your work is restricted to the basement, so you have to just use the pipes that currently go through the floor, and you want to dry vent the shower with that 2" vent stub down, you need to do something like the following, in order to avoid having an unallowed horizontal dry vent under the floor.

Here blue is 2", green is 1.5", red is 3" or greater. And I may not have the lines in quite the right places, you can adjust as needed, the point is to show the connectivity. The shower trap lets you swivel the U-bend around to get some offset towards the top or bottom of the page as required.

What is happening on the right at the shower vent is that the horizontal trap arm is hitting a san-tee, with the vent at the top, and a street LT90 out the bottom to send the vented shower drain back towards the stack. This will involve a loss of elevation on the shower drain, so hopefully that is OK.

To minimize that loss of elevation, rotate the san-tee and LT90 45 degrees about the san-tee side entry, and put a street 45 on the top for the vent to go back to vertical. An example of that is shown here:


(Look at the fittings on the left of the picture. Just above (in the picture) the tape measure the shower trap arm is going to come into the san-tee side entry. And just above that is the LT90 exit sending the shower drain back to the right.)

Cheers, Wayne


image2022-03-01-030118 (1).jpg
 

JayKuul

New Member
Messages
16
Reaction score
0
Points
1
Location
New Jersey
Correct on the stack drawing, that's my fault. It wont be directly inline but yes, that's where it is is.

Not limited in any respect except, I've already glued up all that you see in the wall already, with 1.5. This vent in the wall was added from the original layout, which was only using the 2" vent down for the whole system. Would upsizing and utilizing the new wall vent line to 2", be the best proper way in the end, without utilizing the original vent placement?

I'd like to keep the original connection to the main with 4" instead of the 3", since that was what original? (and I purchased all 4" already lol)

I you posted again after the first..
 

wwhitney

In the Trades
Messages
6,567
Reaction score
1,847
Points
113
Location
Berkeley, CA
I glanced at the NSPC, looks like wet venting a 3" WC drain would require a 1.5" dry vent but a 2" wet vent, i.e. a 2x1.5x1.5 san-tee at the lav. Also looks like wet venting a 4" WC drain would require a 2.5" wet vent, 3" in practice, which would be annoying. Although you could upsize the branch drain from 3" to 4" after the WC to shower/lav connection to avoid that requirement.


So with that info, you can decide on one of the above two layouts. [That is, the solid purple should be 2", and the dashed purple can be 1.5", if the red is 3" up to the wye.] With a 4" stack, tying in at 4" is fine, but there's no real upside to a 4" branch drain over a 3" branch drain, as it just serves one bathroom.

Cheers, Wayne
 

JayKuul

New Member
Messages
16
Reaction score
0
Points
1
Location
New Jersey
I glanced at the NSPC, looks like wet venting a 3" WC drain would require a 1.5" dry vent but a 2" wet vent, i.e. a 2x1.5x1.5 san-tee at the lav. Also looks like wet venting a 4" WC drain would require a 2.5" wet vent, 3" in practice, which would be annoying. Although you could upsize the branch drain from 3" to 4" after the WC to shower/lav connection to avoid that requirement.


So with that info, you can decide on one of the above two layouts. [That is, the solid purple should be 2", and the dashed purple can be 1.5", if the red is 3" up to the wye.] With a 4" stack, tying in at 4" is fine, but there's no real upside to a 4" branch drain over a 3" branch drain, as it just serves one bathroom.

Cheers, Wayne
Much appreciated Wayne..

I may post some dry fits before glue up if you dont mind, when I'm ready if thats ok? Just so I get it right.
 

wwhitney

In the Trades
Messages
6,567
Reaction score
1,847
Points
113
Location
Berkeley, CA
Sure.

P.S. The above sizing is predicated upon a single lav (not double) and a single showerhead in the shower.

Cheers, Wayne
 

JayKuul

New Member
Messages
16
Reaction score
0
Points
1
Location
New Jersey
Sure.

P.S. The above sizing is predicated upon a single lav (not double) and a single showerhead in the shower.

Cheers, Wayne
On a side note, when I remodeled my main bath about 15 years ago, this is what was behind the Lav :)
 

Attachments

  • PA142485.JPG
    PA142485.JPG
    88.7 KB · Views: 91
Top
Hey, wait a minute.

This is awkward, but...

It looks like you're using an ad blocker. We get it, but (1) terrylove.com can't live without ads, and (2) ad blockers can cause issues with videos and comments. If you'd like to support the site, please allow ads.

If any particular ad is your REASON for blocking ads, please let us know. We might be able to do something about it. Thanks.
I've Disabled AdBlock    No Thanks