Small voids in solder joints

Users who are viewing this thread

klm917

New Member
Messages
22
Reaction score
4
Points
3
Location
OH
Hello - I am a DIYer working on improving my solder skills and ran into an issue yesterday. When I was working on these, the solder seemed to have good "flow," I used the proper amount (3/4" per joint), and it generally felt good as it went into the joint, but I appear to have two tiny voids in the joints.

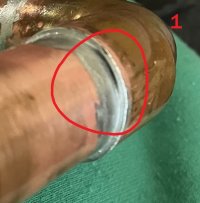
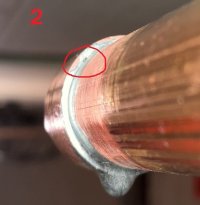
In the pictures, #1 looks worse than #2. However, if I tilt #1 the right way under bright light (hard to capture with my camera), it appears that #1 is sealed up just a few millimeters in from the lip of the fitting so it may well not leak. I can't really see into void #2 so I don't really know what to expect from that one, but #2 might actually be a little more concerning even though it is harder to see in the picture.

These may not end up leaking, but, any way to avoid this particular issue in the future? I wonder if maybe the pipes or fittings were not perfectly round?

Should I try to re-heat these and fix them, or start over?

I used Oatey H20 water soluable flux on these. I like to use the tinning flux but I realized the Oatey tinning flux I have is petrolatum based and I would prefer water soluble for my project because I am doing a decently long run of pipe straight to the cold water tap in my kitchen (replacing some very old galvanized pipe) and I don't want petrolatum-based flux to sit in my drinking water pipe for decades.

I have an order being shipped for the Oatey water soluble tinning flux which should arrive tomorrow, hopefully that helps a little bit.
 

Attachments

  • IMG_1285 - Copy.JPEG
    IMG_1285 - Copy.JPEG
    119.5 KB · Views: 96
  • IMG_1287 - Copy.JPEG
    IMG_1287 - Copy.JPEG
    87.7 KB · Views: 92
Last edited:

John Gayewski

In the Trades
Messages
4,363
Reaction score
1,348
Points
113
Location
Iowa
Are you starting from the bottom of the joint and working your way up? To completely fill a joint you need to fill from the bottom up. You'll see it go in then when it's full it'll start to run out. Reduce the heat a little and work your way up one side stopping at about 3 o clock. Then work your way up the other side stopping at about 9o clock. You should see the solder wanting to run back out as you work your way up each side. After you've done the sides cap the top returning to 3 o'clock and work from 3 to 2 to 1 to 12 to 11, 10, and 9.

You should use very little flux the flux should work is way back out and be displaced by the heavier solder. As you cap the top a flux puddle should dribble out both outside and inside of the joint.

Maybe try reheating and filling those joints.

It's actually easier to learn on bigger pipe. Small pipe heats so fast it's hard to observe what's actually happening. Propane burns colder than map gas which can help.
 

klm917

New Member
Messages
22
Reaction score
4
Points
3
Location
OH
Thanks, this gives me plenty to think about. I have generally heated from the bottom and inside the joint on the premise that heat rises if I touch the solder to the pipe at the top at the right moment, it will flow down and towards the heat, filling the joint. Maybe I took that advice too literally.

Slowing things down would help a lot as you’re correct that the process feels extremely fast. once the joint is hot enough and the solder starts to melt, i don’t feel like I have time to think or self-correct. I am using a basic bernzomatic torch with the blue propane tank, however, the torch is annoying in that you need both hands to turn off the flame because it’s a little dial you have to turn to extinguish the flame.

I think I am going to buy a torch with trigger operated on/off because it’s also very distracting to be holding a live flame torch in one hand while trying to solder and pay attention to detail. These pipes are hanging from my basement ceiling too which adds some difficulty vs. soldering on my workbench.
 
Last edited:

Tuttles Revenge

In the Trades
Messages
4,205
Reaction score
1,459
Points
113
Are you starting from the bottom of the joint and working your way up? To completely fill a joint you need to fill from the bottom up. You'll see it go in then when it's full it'll start to run out. Reduce the heat a little and work your way up one side stopping at about 3 o clock. Then work your way up the other side stopping at about 9o clock. You should see the solder wanting to run back out as you work your way up each side. After you've done the sides cap the top returning to 3 o'clock and work from 3 to 2 to 1 to 12 to 11, 10, and 9.

You should use very little flux the flux should work is way back out and be displaced by the heavier solder. As you cap the top a flux puddle should dribble out both outside and inside of the joint.

Maybe try reheating and filling those joints.

It's actually easier to learn on bigger pipe. Small pipe heats so fast it's hard to observe what's actually happening. Propane burns colder than map gas which can help.
I rarely see anyone describe properly how to solder.
Slowing things down would help a lot as you’re correct that the process feels extremely fast.
Yes, slow down, pull the flame away and keep it at just the right temp. Most people who fail at soldering do so because they burn the flux in the fitting.

Very likely those solder joints wouldn't leak, but they are a weak joint because they could be moved and break the solder.. not incredibly likely but possible. Filling the entire void prevents any possibility.
 

Fitter30

Well-Known Member
Messages
4,371
Reaction score
800
Points
113
Location
Peace valley missouri
Just because the book tell u to only use 3/4" of solder per joint doesn't take in how tight the fittings are to the pipe. Heat the bottom of the fitting cup first soldier flows to heat.When handling pipe and fittings wear jersey gloves the oil in your skin will create voids in the joint and flux doesn't remove the oil. Joints should be capped and wiped with a dry cotton rag after soldering. Turbo torch style tips can't be turn down from full open damage will occur when tip turns red hot and the tip falls apart. Trigger handle helps with controlling heat. Spray bottle with water is good to have not to cool the joint down but for fire.
 

Weekend Handyman

Active Member
Messages
437
Reaction score
131
Points
43
Location
Nova Scotia
Just because the book tell u to only use 3/4" of solder per joint doesn't take in how tight the fittings are to the pipe. Heat the bottom of the fitting cup first soldier flows to heat.When handling pipe and fittings wear jersey gloves the oil in your skin will create voids in the joint and flux doesn't remove the oil. Joints should be capped and wiped with a dry cotton rag after soldering. Turbo torch style tips can't be turn down from full open damage will occur when tip turns red hot and the tip falls apart. Trigger handle helps with controlling heat. Spray bottle with water is good to have not to cool the joint down but for fire.
What do you mean the joints should be capped?
 

klm917

New Member
Messages
22
Reaction score
4
Points
3
Location
OH
I tried to reheat and patch up the joints from the pictures above. The gap in picture #1 did not want to take much additional solder so perhaps it’s some kind of problem with the surface not being totally clean. The gap in picture #2 filled in very nicely and easily with just a little heat and a dab of solder.

Then I did 6 more joints today including a lead free ball valve. I followed all of your advice above, starting from the bottom, going slowly and keeping the flame low. I didn’t end up buying a trigger operated torch just yet but turning the flame lower really helped me feel more in control.

I was able to test the entire run of pipe from both directions using a washing machine hose, a Sharkbite female adapter, and a hose bibb. I’m happy to report no leaks and my valve works perfectly. Next step is to actually tee into my existing system and “go live” with this run of pipe. A few more joints to go…

Thanks to you all!
 

Jeff H Young

In the Trades
Messages
8,954
Reaction score
2,235
Points
113
Location
92346
I tried to reheat and patch up the joints from the pictures above. The gap in picture #1 did not want to take much additional solder so perhaps it’s some kind of problem with the surface not being totally clean. The gap in picture #2 filled in very nicely and easily with just a little heat and a dab of solder.

Then I did 6 more joints today including a lead free ball valve. I followed all of your advice above, starting from the bottom, going slowly and keeping the flame low. I didn’t end up buying a trigger operated torch just yet but turning the flame lower really helped me feel more in control.

I was able to test the entire run of pipe from both directions using a washing machine hose, a Sharkbite female adapter, and a hose bibb. I’m happy to report no leaks and my valve works perfectly. Next step is to actually tee into my existing system and “go live” with this run of pipe. A few more joints to go…

Thanks to you all!
good job , you might try holding torch a bit farther away as well when you think its getting too hot. another thing if joint wasent taking solder it can be the flux was burned . capping the joint is when you have a bead going around on the edge of fitting. it can be hard to get a real cap on it but you dont want that void . you can get a cap pretty easy with brazing but thats a whole other process
 
Top
Hey, wait a minute.

This is awkward, but...

It looks like you're using an ad blocker. We get it, but (1) terrylove.com can't live without ads, and (2) ad blockers can cause issues with videos and comments. If you'd like to support the site, please allow ads.

If any particular ad is your REASON for blocking ads, please let us know. We might be able to do something about it. Thanks.
I've Disabled AdBlock    No Thanks