Shower faucet problems

Users who are viewing this thread

cheech

New Member
Messages
5
Reaction score
0
Points
0
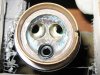
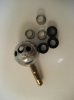
We recently had our tub enclosure tiled and the tilers didn't leave enough space to put the escutchen back in place, so I removed the faucet handle and figured I would nip away some of the tile. When I put everything back the way I thought it was supposed to go, the water doesn't turn off! There is hardly any difference between when the knob is in the up or down direction!

I am including 2 images which may help. I think it is an old Delta model faucet, but couldn't find any markings. It is the single handle type, and has three holes (see image) I think there were washers and springs in all 3 holes but I couldn't swear to it because when I pulled the front off the springs came out and I could only find 2. So I went to the hardware store and bought a Delta replacement kit and thought it would be an easy fix, but it made no difference at all. So I hope I'm missing something obvious. Thank you for any help.
 

Attachments

  • f1.jpg
    f1.jpg
    89.1 KB · Views: 885
  • f2.jpg
    f2.jpg
    59.6 KB · Views: 870

cheech

New Member
Messages
5
Reaction score
0
Points
0
Thanks, and more info needed.

Thank you for sending me the diagram. As you see from my image, there are three holes in the inner assembly. Do only the 2 side holes have the washer and spring? I put the washers in the two side holes and do I put the springs in there also, or do maybe the springs go in the ball set? And which way do the springs face, with the small side in or the large side in? (They are cone shaped) I tried it both ways but can't get the springs to stay if I put the large side in.

Sorry for all the questions, but I don't know what all this is supposed to look like!
 

Verdeboy

In the Trades
Messages
2,041
Reaction score
6
Points
0
You only need to use the seats and springs in the two side holes. Isn't that how it was when you took it apart? Insert the springs in the two holes and put the rubber seats over them.

Next, you must install the ball valve correctly. In most Delta valves, there's a little protruding guide post to help orientate the ball valve to the correct position. If yours dosn't have one, you'll need to experiment with putting it in, 'til you get it lined up properly.

Then, you must install the plastic v-shield, with the protruding side facing the groove in the valve.

Then, you must install the metal cap and trim.
 
Last edited:

cheech

New Member
Messages
5
Reaction score
0
Points
0
Thank you!

When I took the thing apart, the springs sprung, so I didn't see how they were originally configured. I put the rubber seats in first, since they fit in there so nicely. Doing it your way worked much better! It's all put back together and working fine. Thank you again.
 
Top
Hey, wait a minute.

This is awkward, but...

It looks like you're using an ad blocker. We get it, but (1) terrylove.com can't live without ads, and (2) ad blockers can cause issues with videos and comments. If you'd like to support the site, please allow ads.

If any particular ad is your REASON for blocking ads, please let us know. We might be able to do something about it. Thanks.
I've Disabled AdBlock    No Thanks