Washer Standpipe and old 1-1/2” basement drain

Users who are viewing this thread

Redrabbitdownthehole

Clueless Guru
Messages
4
Reaction score
0
Points
1
Location
PA
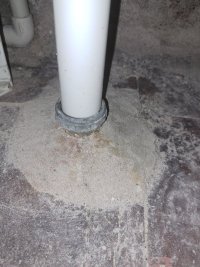
I recently replaced Laundry tub and faucet in my basement. I also had to replace the old metal 1-1/2" s-trap drain (leaking) and was thinking about adding a washer standpipe instead of having it drain into the tub. The house was built in the 1950’s and the drain pipe opening that goes into the basement floor is 1-1/2” wide. Not exactly sure what the code is in PA, but I think it requires standpipe to be 2” now. I have no problem adding a 2” standpipe, but it will be drained down to a 1-1/2” pipe that goes underground (to the main line I assume). Does that work or having 1-1/2” drain pipe defeats the whole cause of the 2” standpipe? If it doesn’t matter should I just use 1-1/2” standpipe and not worry about the reducer fittings?

The Laundry tray sit next to the washer so I was going to use a sanitary tee to connect the standpipe (30" or 36" whatever length is above the tub and washer) and the sink drain together before going through a p-trap. And use another sanitary tee to connect the drain and air admittance valve (this is allow in PA…I think). Can I have the AAV under the sink or does it have to be above the sink and above the standpipe?

Also any opinion on Oatey Fusion single step (good or bad)? I was planning on buying this since it seems more forgiving (longer cure time more room to work with) and easier process (no primer). Thanks for the help.
 

Reach4

Well-Known Member
Messages
38,858
Reaction score
4,428
Points
113
Location
IL
Discharging the WM into the laundry sink is the approved way with a 1.5 inch drain.

Most of PA uses IPC 2012
It would appear this all-in-one would not comply with the code currently.

705.14.2 Solvent Cementing

Joint surfaces shall be clean and free from moisture. A purple primer that conforms to ASTM F 656 shall be applied. Solvent cement not purple in color and conforming to ASTM D 2564, CSA B137.3, CSA B181.2 or CSA B182.1 shall be applied to all joint surfaces. The joint shall be made while the cement is wet and shall be in accordance with ASTM D 2855. Solvent-cement joints shall be permitted above or below ground.
 
Last edited:

Terry

The Plumbing Wizard
Staff member
Messages
29,942
Reaction score
3,459
Points
113
Location
Bothell, Washington
Website
terrylove.com
Older homes from the 60's had 1.5" washer drains. The changed eventually to 2"
Sometimes you can see a connection from the 2" cast iron below the slab, where the hub is above grade, with a 1.5" galvanized pipe leaded into the joint. Where I see those, I remove the 1.5" and using a donut push in a 2" pipe.

If I'm stuck with a 1.5" trap and drain, I like to upsize the standpipe above the trap to 2" to act as some kind of buffer when the washer drains.
 

Redrabbitdownthehole

Clueless Guru
Messages
4
Reaction score
0
Points
1
Location
PA
Discharging the WM into the laundry sink is the approved way with a 1.5 inch drain.

Most of PA uses IPC 2012
It would appear this all-in-one would not comply with the code currently.

705.14.2 Solvent Cementing

Joint surfaces shall be clean and free from moisture. A purple primer that conforms to ASTM F 656 shall be applied. Solvent cement not purple in color and conforming to ASTM D 2564, CSA B137.3, CSA B181.2 or CSA B182.1 shall be applied to all joint surfaces. The joint shall be made while the cement is wet and shall be in accordance with ASTM D 2855. Solvent-cement joints shall be permitted above or below ground.
Thanks Reach4 for your quick response. So far it works with the washer draining into the sink. The reason I wanted a standpipe is mainly because of the humidity and sometimes the water splashes when it comes out of the washer and once in a while it would even overflow out of the tub. But in those cases it was few in between when the sink opening clogs from accumulating dirt and such.

I understand that 1.5” is no longer valid size piping and it’s safer and in code to have 2” pipes now. I am still debating with keeping as is or making it work with Terry Suggestion with 2” standpipe all the way with 2” p-trap until it goes down the drain into the ground which reduces to 1.5”.

So plumbers have to use purple primer and then cement. I guess this all in one step does not meet the current solvent cementing code? Maybe this is advertised to attract lazy DIY to spend the extra cash for a one step process and not the professionals.
Reach4 I have a few more questions, if you have the time please take a look and I look forward to your professional advice and personal opinion.
 

Redrabbitdownthehole

Clueless Guru
Messages
4
Reaction score
0
Points
1
Location
PA
Older homes from the 60's had 1.5" washer drains. The changed eventually to 2"
Sometimes you can see a connection from the 2" cast iron below the slab, where the hub is above grade, with a 1.5" galvanized pipe leaded into the joint. Where I see those, I remove the 1.5" and using a donut push in a 2" pipe.

If I'm stuck with a 1.5" trap and drain, I like to upsize the standpipe above the trap to 2" to act as some kind of buffer when the washer drains.
Thanks Terry for your responses. I am leaning towards putting in the standpipe. I am taking you advice to up-size to 2” standpipe and also 2” P-trap. There are a few more questions I hope you can provide more insight and experience opinion on. Thanks.
 

Redrabbitdownthehole

Clueless Guru
Messages
4
Reaction score
0
Points
1
Location
PA
I have a few more questions.

  • I attached a picture of the basement drain. Right now there is a plastic pipe that fits into that 1-1/2” opening drain. There is nothing holding it in besides gravity and the weight of the plastic pipe and the connecting pipes on top. I did not do this, but was done by a friend previously. Should I just leave it that way since I haven’t notice any leaks or what can be done?

  • There was this particular 1-1/2 in. PVC Schedule 40 MPT x S Male Adapter that I was trying to fit to a 1-1/2” sanitary tee, but it would only go half way in. Is this normal and would I be able to easily knock it together with a mallet (or will it break)? Or should I look for another brand PVC that may have a better fit?

  • I saw a video where it was tested and show as the Air admittance valve (AAV) held tight and did not leak after the drain backed up multiple times with different brand AAV’s. From that it looks like AAV will hold find against any backup drain. Do you think it is alright to install the AAV under the sink or it would be best to add more PVC pipes until it goes above the sink and standpipe?

  • Any personal experience and/or opinion on Oatey Fusion single step? How does it compare to the normal Purple primer and PVC cement combo?
Thank you for helping here.
 

Attachments

  • 20220811_000808.jpg
    20220811_000808.jpg
    110 KB · Views: 198

Reach4

Well-Known Member
Messages
38,858
Reaction score
4,428
Points
113
Location
IL
You could put a water alarm dangling into the sink. The Basement Watchdog has a remotable sensor, and it is inexpensive.

I like the mesh lint traps over the end of the discharge hose.

AAV needs to be 4 inches or more above the trap arm.

PVC sockets have tapered walls, and you cannot insert the pipe all of the way until you prime and glue-- or use your all-in-one. The glue melts the PVC a bit.
 
Top
Hey, wait a minute.

This is awkward, but...

It looks like you're using an ad blocker. We get it, but (1) terrylove.com can't live without ads, and (2) ad blockers can cause issues with videos and comments. If you'd like to support the site, please allow ads.

If any particular ad is your REASON for blocking ads, please let us know. We might be able to do something about it. Thanks.
I've Disabled AdBlock    No Thanks