How thick are your tile? If your tile are like 3/8" thick, when you add thinset underneath, that gap could easily be hidden.
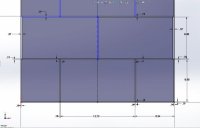
How does that layout work around the corners? Note that the tile industry bible calls for all changes of plane or materials (i.e., corners and wall to floor) to be a joint that can handle expansion/contraction...IOW, when you consider how thick the tile is on the other walls, when it come close to the wall depicted, how much of a gap will there be? That gap does need to be either filled with caulk (well, use a foam backer rod so it won't actually be full) and may just look normal. NOte, the industry bible also highly suggests that on tile that large that you use a 1/3'rd offset on tile versus a brick pattern. Now, that pattern COULD work, but with most tile will NOT. The reason is that many tile have a slight bow to them. THat means that having the next row have the lowest point (the ends) adjacent to the highest point (the middle) of the tiles above and below. That can create a rather severe lippage situation. By offsetting by a third, you halve that error. To test for this, take two tile, place them face to face and see if they lay flat against themselves especially if you hold one end of them together...is there a gap at the other end? If not, your pattern will work.
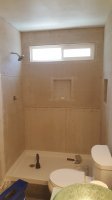
Your shower should be not damaged by moisture even prior to installing the tile, grout, and any caulk. Tile is the decorative, wear surface, not waterproofing.
Any details on how the pan is constructed and the walls? Building a trouble-free shower isn't hard, but there is LOTS of misinformation out there, and the approved procedures are very detail oriented. It's easy to make a tactical error, either through ignorance, or misdirection.
A few details on how things like the walls, pan, and curb are built might help direct you towards a reliable shower. It's lots easier to fix, if needed, prior to the tile going up! Check out
www.johnbridge.com .