heyitsmatt
New Member
Hello
I've been a lurker on here for quite some time and every issue I've come across has been addressed until now.
Let me go to the beginning.
My 6 yo daughter kicked our shower wall while taking a bath . What I didn't know was how bad the wall behind the tile was. The wallboard (I assume just drywall - built in 1970) was completely rotted as well as the subfloor.
I asked a family friend for help removing the 350lb cast iron tub and replacing the subfloor. At that point the subfloor was my biggest worry. This family friend is a handy man of sorts (mainly a finish carpenter) and actually had some home remodels featured in Better Homes and Garden. So, I took what he said as scripture (mistake). I purchased a new steel tub (Bootzcast) and he came over removed the cast iron tub - in one piece without any damage to the tub (had I known it would have came out that easy I would have put it back in). The new tub was deeper and wider - the wife wanted the bigger tub. Fine. So according family friend - the 1/2" subfloor was fine. He installed the new tub and was on his way. This pissed me off - why remove a perfectly fine 350lb cast iron tub to put a new tub on top of rotten subfloor?
About 2 hours later the subfloor condition was still stuck in my head. I removed new tub and further inspected. There were areas of the subfloor that I was able to push my finger through. To me that is no good. I cut all of the 1/2" out and replaced it with new 1/2" then laid 3/4" on top of that. I did remove all floor covering as well. So the entire bathroom has had damaged 1/2" replaced and 3/4" on top. The old flooring was 1/2" sub, 3/4" particle board (NASTY), thin linoleum tile,1/2" cement board then ceramic tile. With the 3/4" on top plus 1/4" cement board and tile it should match my hardwood hall perfectly.
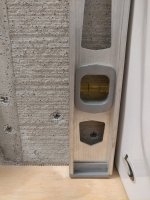
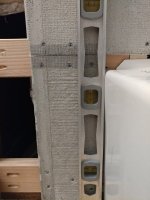
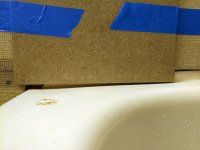
On to my current issue. The new tub. It's 1/8" off in one spot. I figured that shouldn't be a problem (any adjustments to bring the 1/8" up threw everything else off) except when I was laying out my tile. I think it's just in this one front edge - manufacturer defect maybe? I put the level on it's fine. This spot must drop towards the front of the tub? Let me just say, at this point it's not coming out.
What are my options? Part of me feels like I'm overthinking - my OCD is kicking in.
Sorry this is so long. I appreciate all of your expertise.
I've been a lurker on here for quite some time and every issue I've come across has been addressed until now.
Let me go to the beginning.
My 6 yo daughter kicked our shower wall while taking a bath
. What I didn't know was how bad the wall behind the tile was. The wallboard (I assume just drywall - built in 1970) was completely rotted as well as the subfloor. I asked a family friend for help removing the 350lb cast iron tub and replacing the subfloor. At that point the subfloor was my biggest worry. This family friend is a handy man of sorts (mainly a finish carpenter) and actually had some home remodels featured in Better Homes and Garden. So, I took what he said as scripture (mistake). I purchased a new steel tub (Bootzcast) and he came over removed the cast iron tub - in one piece without any damage to the tub (had I known it would have came out that easy I would have put it back in). The new tub was deeper and wider - the wife wanted the bigger tub. Fine. So according family friend - the 1/2" subfloor was fine. He installed the new tub and was on his way. This pissed me off - why remove a perfectly fine 350lb cast iron tub to put a new tub on top of rotten subfloor?
About 2 hours later the subfloor condition was still stuck in my head. I removed new tub and further inspected. There were areas of the subfloor that I was able to push my finger through. To me that is no good. I cut all of the 1/2" out and replaced it with new 1/2" then laid 3/4" on top of that. I did remove all floor covering as well. So the entire bathroom has had damaged 1/2" replaced and 3/4" on top. The old flooring was 1/2" sub, 3/4" particle board (NASTY), thin linoleum tile,1/2" cement board then ceramic tile. With the 3/4" on top plus 1/4" cement board and tile it should match my hardwood hall perfectly.
On to my current issue. The new tub. It's 1/8" off in one spot. I figured that shouldn't be a problem (any adjustments to bring the 1/8" up threw everything else off) except when I was laying out my tile. I think it's just in this one front edge - manufacturer defect maybe? I put the level on it's fine. This spot must drop towards the front of the tub? Let me just say, at this point it's not coming out.
What are my options? Part of me feels like I'm overthinking - my OCD is kicking in.
Sorry this is so long. I appreciate all of your expertise.