Trouble locating closet flange screw "nut"

Users who are viewing this thread

Mark Ezrin

Member
Messages
60
Reaction score
4
Points
8
Location
Maryland
Ok, this is probably an easy question and a stupid one.

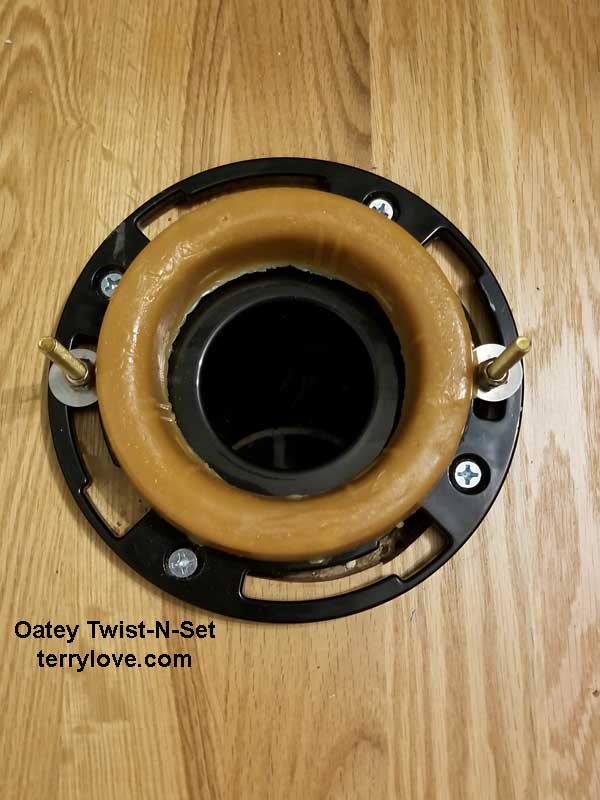
I was repairing a toilet that had leaked. I removed the toilet to clean up and then put in a new wax ring. Of course the flange screws/bolts were stripped so I bought new ones.

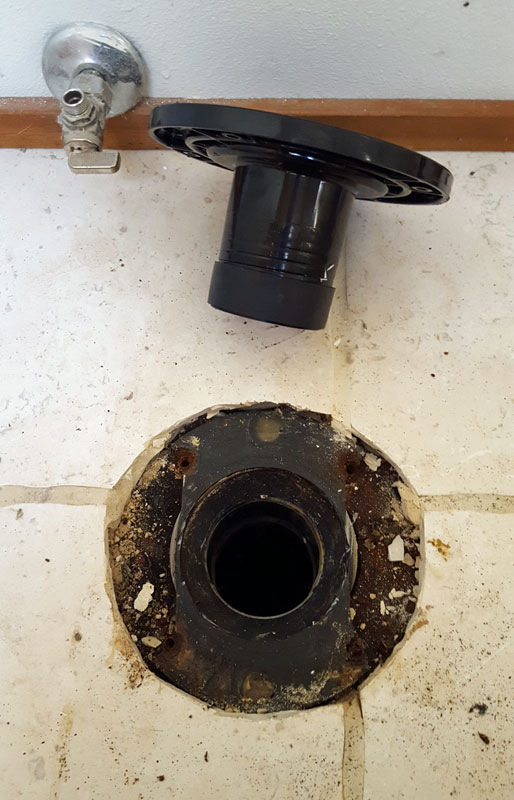
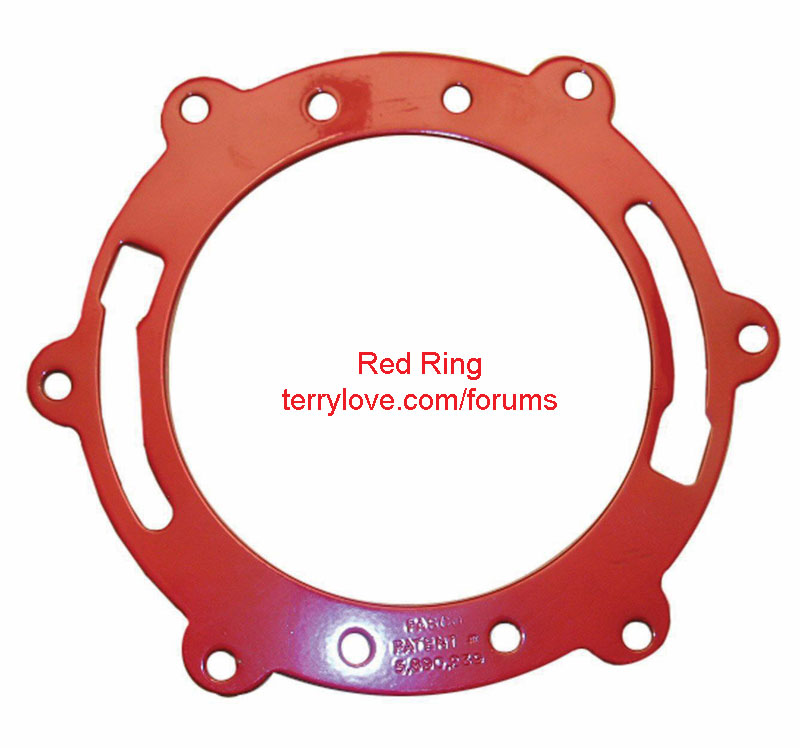
What do the bolts connect to? Because of the flange and limited visibility, I can't really see what I'm looking for.

I was able to get one easily installed. The 2nd was some trouble but it looks like there is some type of mesh netting that it grabbed and held. Is this correct?

Since I've got limited visibility, I can't get the 3rd and 4th bolts to connect or grab anything. Are there some tricks or suggestions you can share?

Thank you.
 

Terry

The Plumbing Wizard
Staff member
Messages
29,942
Reaction score
3,459
Points
113
Location
Bothell, Washington
Website
terrylove.com
The closet flange gets secured to the floor, either by screws or tapcons.
The closet bolts, those things that hold the toilet, will have a flat head that fits either in the slot of the flange, or sometimes in two notches.

oatey-twist-n-set-terrylove-3.jpg
 

Mark Ezrin

Member
Messages
60
Reaction score
4
Points
8
Location
Maryland
My apologies for not being clear.
I'm talking the screws that go down into the flooring. I can't seem to get the new screws to fully connect with something. Is there a nut in the floor below? Is that wire like mesh what they grab onto it?

The flange is sitting on standard bathroom tile.

I hope my question makes more sense. Thanks.
 

Reach4

Well-Known Member
Messages
38,863
Reaction score
4,430
Points
113
Location
IL
Those screws into the floor vary with the floor. Sometimes a longer screw will be able to go down to some deeper layer where the screw can bite. The 3rd and 4th screws that don't hold -- how long are they?

What do you think is down there -- concrete slab, wood subfloor, or what?

flange-repair-insert-1.jpg
 
Last edited by a moderator:

Mark Ezrin

Member
Messages
60
Reaction score
4
Points
8
Location
Maryland
It is hard to see through the flange and determine what the builder has under the tile. All the screws are 2.5" long, and the same length as the screws I removed. I do feel like I see concrete or something for screws 3 and 4. I repositioned screw #3 and it started to give resistance. A lot of resistance. But not knowing what it is, I'm afraid of pushing hard and doing some damage.

For the 2nd screw, does a mesh material of some sort seem reasonable for what it is connecting to? Given what it is, the screw will clearly never fully bite.
 

Reach4

Well-Known Member
Messages
38,863
Reaction score
4,430
Points
113
Location
IL
  1. Is this toilet on the ground floor?
  2. If you stick a probe, such as a skewer, into hole 4, how deep can the skewer go? This is probing for whether a longer screw might be needed. It is also possible that a fatter screw could give you the bite you need.
  3. Is your house on a slab?
If you cannot screw the flange down sufficiently, you could use a repair flange.
PASCO 21013 and Superior 21015 are repair rings with mounting tabs outside. The repair flange would go atop the existing flange. With extra holes, you should be able to get

flange-repair-red-ring-1.jpg
 
Last edited by a moderator:

Mark Ezrin

Member
Messages
60
Reaction score
4
Points
8
Location
Maryland
Just getting back to this and trying to make time to finish.

I know the 4 screws were definitely catching on something when I removed them.

I saw this at the hardware store - if I use the flange repair part, what does everything lock to if there are no places the screws are catching underneath the toilet?
  1. Is this toilet on the ground floor?
    • No, the toilet is in the 2nd level/bedroom level of the house. I've got a main/ground floor level and an in-ground basement.
  2. If you stick a probe, such as a skewer, into hole 4, how deep can the skewer go? This is probing for whether a longer screw might be needed. It is also possible that a fatter screw could give you the bite you need.
    • I'm not sure about the depth and unfortunately don't have a probe. The screws are the same length and diameter as the original screws (and I was able to get one to bite).
  3. Is your house on a slab?
    • I honestly don't know. :-(
  4. the two front 'bolts' are unnecessary. I usually "dummy" them with stove bolts and nuts through the bowl with the caps on them.
    • when you dummy them, are they connecting into anything? if not, why the need to even dummy them?
Attached is a picture of the current flange.
1: secure. it won't turn tighter
2: secure. it won't turn tighter.
3: secure and bit on something but it can still be turned.
4: I can screw it in this far and have a lot of resistence. I can probably keep trying to screw it further or, I could remove it and drill a small pilot hole.
Any more thoughts?

Thank you for your help.
 

Attachments

  • flange.jpg
    flange.jpg
    38.5 KB · Views: 213

Reach4

Well-Known Member
Messages
38,863
Reaction score
4,430
Points
113
Location
IL
You have a basement, so not a slab. Plus, this toilet is on the second floor, so it doesn't really matter what is under the first floor for this purpose.

I think you have some screws that keep turning. Longer and/or wider screws could fix those.

For the screw that is a sight as it gets, you may have to make a clearance hole through the floor tile to get to the wood. I am not a plumber.
 

Mark Ezrin

Member
Messages
60
Reaction score
4
Points
8
Location
Maryland
Are you saying screw #4 is the one I should drill the small pilot hole for?

One of the responders above said I really don't need the front screws (3 & 4).

My problem is I don't see any wood that this is catching on. It looks like cement or plaster of some type. At least as best as I can tell.
 

Treeman

Active Member
Messages
235
Reaction score
34
Points
28
Location
Michigan
It is difficult to believe that there is not at least one layer of wood (planks or sheet) over your floor joists before they installed the tile backer material (maybe cement board, mortar, etc?).
image-3.gif

My guess is that the screw hole is stripped out. That's why Reach4 suggested a bigger diameter or longer screw to catch some good wood.

A repair procedure wood be similar to repairing a stripped door hinge screw. Drill out the hole to clean wood. Blow out all the dust with compressed air. Glue proper sized wood dowels into the hole, making sure it goes into the wood. Drill a pilot hole and install new screws.

Those screws DO have wood type threads, correct? Not machine screw threads. Be careful not to drill excessively deep in case there is plumbing or electrical under there (there shouldn't be, but sometimes hack work is done).

Door hinge repair: https://www.wikihow.com/Repair-a-Loose-Wood-Screw-Hole-for-a-Hinge
 
Last edited:
Top
Hey, wait a minute.

This is awkward, but...

It looks like you're using an ad blocker. We get it, but (1) terrylove.com can't live without ads, and (2) ad blockers can cause issues with videos and comments. If you'd like to support the site, please allow ads.

If any particular ad is your REASON for blocking ads, please let us know. We might be able to do something about it. Thanks.
I've Disabled AdBlock    No Thanks