Toto Carlyle II - 10" or 12" Rough-in Adapter?

Users who are viewing this thread

Pesh115

New Member
Messages
5
Reaction score
0
Points
1
Location
Austin, TX
I am in the middle of a series (three) of toilet upgrades in a relative new home (built in 2018) which has three bathrooms.

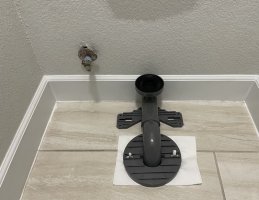
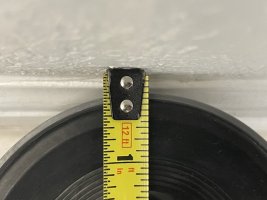
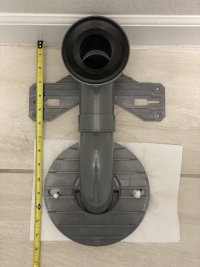
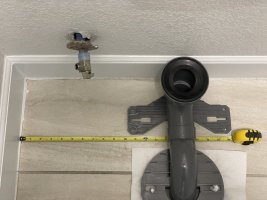
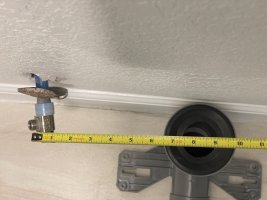
The first two bathrooms had 12" from wall to rough-in center and the standard Toto 12" adapter worked great. I just removed the third and final toilet to find the center of rough-in is at about 11-1/4" from the base board. When I put the 12"adapter, as far forward as possible, I end up with 1/4-to-3/8" from wall. The adapter is sitting flush on the ground and clearing the baseboard (height-wise). My water supply line is to the left of the toilet at about 8" left of center of rough-in.

Attached are pictures with the supplied 12" rough-in adapter.

Can I go ahead and use the 12" adapter with a super tight fit?
Or should I get the 10" adapter and have more space between back of toilet and wall?
 

Attachments

  • IMG_2809.jpeg
    IMG_2809.jpeg
    101.1 KB · Views: 167
  • IMG_2810.jpeg
    IMG_2810.jpeg
    61.7 KB · Views: 172
  • IMG_2811.jpeg
    IMG_2811.jpeg
    81.3 KB · Views: 171
  • IMG_2812.jpeg
    IMG_2812.jpeg
    89.2 KB · Views: 160
  • IMG_2813.jpeg
    IMG_2813.jpeg
    64.5 KB · Views: 166

Terry

The Plumbing Wizard
Staff member
Messages
29,942
Reaction score
3,459
Points
113
Location
Bothell, Washington
Website
terrylove.com
Use the 12" adapter, it's nice that the shutoff is 8" over to the side to miss the back of the bowl.

ms614_side_3.jpg
 
Last edited:

Reach4

Well-Known Member
Messages
38,847
Reaction score
4,427
Points
113
Location
IL
You can tear/nibble off that old escutcheon and put on a new split escutcheon. This does not help the function, but it I a lot easier access when the toilet is off. I don't say that removing the old escutcheon is not going to take some effort.t

Some split escutcheons are metal (with a hinge), and some are chromed plastic that are more flexible.
 

Pesh115

New Member
Messages
5
Reaction score
0
Points
1
Location
Austin, TX
You can tear/nibble off that old escutcheon and put on a new split escutcheon. This does not help the function, but it I a lot easier access when the toilet is off. I don't say that removing the old escutcheon is not going to take some effort.t

Some split escutcheons are metal (with a hinge), and some are chromed plastic that are more flexible.
Replacing the rusted escutcheon is definitely part of my place. I have some tin snips that allow me to cut off the old one fairly easily. I've already got a chrome plated split escutcheon (not sure if its metal or plastic) from Home Depot. But before i worried about the escutcheon, I was trying to figure out the toilet adapter 10" vs 12" situation.
 

Pesh115

New Member
Messages
5
Reaction score
0
Points
1
Location
Austin, TX
Use the 12" adapter, it's nice that the shutoff is 8" over to the side to miss the back of the bowl.
Terry - Thanks for the quick reply. From the pictures, does the less-than-half-inch gap between the wall and the back of the adapter worry you? I'm suspecting the toilet will be approx 1/4 -to - 1/2" from wall after installed.

Is that ok?
 

Reach4

Well-Known Member
Messages
38,847
Reaction score
4,427
Points
113
Location
IL
You may have more clearance than that. But try it out. You can adjust where you place the adapter within limits. There is some tolerance/slop.

Expect to use shims to prevent rocking, but those shims can be added after you set the toilet down. When it is in position, caulk around the edge with acrylic caulk, such as Polyseamseal. The caulk is mandatory and structural. That is what prevents the front of the toilet from being knocked left or right.


I hope that flooring is not porcelain because that is very hard to drill.

ms614-spec-2022.jpg
 
Last edited by a moderator:

Pesh115

New Member
Messages
5
Reaction score
0
Points
1
Location
Austin, TX
You may have more clearance than that. But try it out. You can adjust where you place the adapter within limits. There is some tolerance/slop.

Expect to use shims to prevent rocking, but those shims can be added after you set the toilet down. When it is in position, caulk around the edge with acrylic caulk, such as Polyseamseal. The caulk is mandatory and structural. That is what prevents the front of the toilet from being knocked left or right.


I hope that flooring is not porcelain because that is very hard to drill.

View attachment 85780

Yeah, the floor is porcelain tile :( I've been using a tile bit to get started followed by a masonry bit with a hammer drill. These are all first-floor installations. Once I get thru the tile, then i'm into the foundation.

I will try to test fit it and see if the toilet will even set on the adapter before drilling.
 

Pesh115

New Member
Messages
5
Reaction score
0
Points
1
Location
Austin, TX
Sadly, the Carlyle II toilet which has been sitting in a box for years due to COIVD delays on remodel had a crack in rear near drain connection. After speaking to Toto, the toilet is not safe to install. Consequently, it is a non-starter. We'll be using a Kohler 1-piece Santa Rosa Toilet instead. Upon dry-fit, the Kohler Santa Rosa seems to fit with 1/2" - 3/4" of clearance from wall.
 
Top
Hey, wait a minute.

This is awkward, but...

It looks like you're using an ad blocker. We get it, but (1) terrylove.com can't live without ads, and (2) ad blockers can cause issues with videos and comments. If you'd like to support the site, please allow ads.

If any particular ad is your REASON for blocking ads, please let us know. We might be able to do something about it. Thanks.
I've Disabled AdBlock    No Thanks