Sorry for this basic question, I’m sure it’s been answered before, but I’m new to this forum so looking for help with an issue I’ve run into while preparing to tile my bathroom floor.
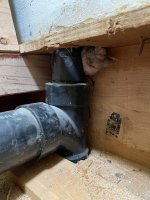
Due to prior, unrepaired water damage I’ve elected to replace a section of subfloor before I proceed. I cut off the flange to remove the flooring and a 4x3 flange (Nibco w/ steel flange) but I realize now that the fit may not be the best. I appears the overlap of the flange into the 3” socket will only be about 1/2” due to the elbow sitting slightly under the joist height and the tile stackup (estimate 7/8” w”/ thinset, 1/4” hardy + tile).
Is a 1/2” overlap acceptable and up to code? I suppose not, so what would be the recommended workaround here? Since I have the floor up, I could cut off the elbow and replace with a closet elbow. Or is there an easier solution? I could try a 4-3 reducer with a 4” flange but I expect I would then have the flange too high. Or a flange with a longer neck? The NIBCO flange I have measures 2 3/4” tall and I haven’t seen any longer in that size.
Thanks for your help!