Shower niche contstruction

Users who are viewing this thread

Rdura

New Member
Messages
21
Reaction score
1
Points
3
Location
California
I have a 2x4 rough opening of approx 12 wide by 16 high. I am wanting to build a shower niche box to fit into this rough rectangle, and I wish to use left over materials, of which I will redgard with three light coats and seam tape. My options are 1/2 inch ply, or 1/4 inch hardybacker. I prefer the hardy as it gives me a bit more real estate inside the box. My concern is I wish to have a shelf in the box (covered top and bottom will ceramic tile). Is the hardybacker strong enough, i.e. will it deflect?

My idea for construction is: first affix the floor of the box. Then affix two side walls and a back wall about 4 inches in height. Then slot in the shelf so that it rests on the lip of each wall. Then two more side walls and a back wall, and a ceiling.

Yes, the lip isn't much, but I'm thinking the eventual 1/4 inch tile will provide more support from below.

Other option is build a plywood box in the garage with glue and nails. Push the entire box into the rough opening and affix. I'm not opposed to making the entire box out of ply, but using hardy for a shelf - I can route a slot for the 1/4 inch hardybacker. I like a thin shelf because I think (but not sure) once the shelf is sandwiched with 1/4 inch tile tile top and bottom, the face of the shelf will accept a pencil tile for trim.

Thank you, I am a DIYer and this is my first shower niche
 

Jadnashua

Retired Defense Industry Engineer xxx
Messages
32,770
Reaction score
1,190
Points
113
Location
New England
HardieBacker is the only cbu that is specified for 1/4" thickness on a wall, so yes, it should work, but your end result's longevity will depend on how you actually build things out. You must recognize that no cbu is considered waterproof, but (normally) it's not damaged by being wetted.

What method of moisture containment are you planning on using in your shower? The bottom edge and the shelf should have a slight slope out into the shower, and you'd want to provide some waterproofing.

There are some already waterproofed, premade, tileable shower niches, but you may not find one in exactly those dimensions.

Probably the best place to ask tile related questions is www.johnbridge.com.

Horizontal surfaces in a shower need some water containment. It's easier to tie into the rest of the shower if you've used a surface applied membrane.

FWIW, Hardie is very thirsty, prior to spreading any thinset on it, or some waterproofing, it needs to be properly prepared, or it will suck too much moisture out of the stuff being applied, and mess things up. It's not too wet unless there's liquid water on the surface.
 

Rdura

New Member
Messages
21
Reaction score
1
Points
3
Location
California
Thank you for the tips. I plan to redgard the entire shower enclosure and niche - and as you say, add a slight incline to the niche sill so that the water can run outward. The shower enclosure itself is 1/2 inch hardy. I have a sheet of 1/4 inch hardy so I was wanting to not let that go to waste.

I was also planning to prime the hardy by mixing some water and redgard for a prime coat before applying a full coat of redgard,
 

Jadnashua

Retired Defense Industry Engineer xxx
Messages
32,770
Reaction score
1,190
Points
113
Location
New England
Waterproofing with RedGard calls for two full-strength coats, ideally, applied at 90-degrees to each other, and, on Hardiebacker, after you install a watered down 'primer' coat. You MUST thinset and tape all seams first, and let that cure. The tape must be an alkali resistant mesh. Be careful, you're not trying to make it pretty like you would on a drywall seam that is being painted, you're helping to bond the various pieces together...the tile is the finish that needs to be done well. Too much thinset used when taping can create speed bumps that are difficult to then get a nice finished coat with the tile.

Buy a wet film thickness gauge (a paint store will have them) and study how to properly use one. Painted on waterproofing only works properly when it is applied between the min/max listed. Getting the required thickness is harder than you might think. Most people end up with it too thin. Too thin is as bad as too thick. Like in Goldilocks...it needs to be just right.
 

Rdura

New Member
Messages
21
Reaction score
1
Points
3
Location
California
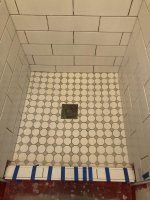
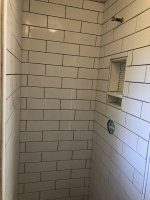
Making progress
 

Attachments

  • unnamed.jpg
    unnamed.jpg
    84.6 KB · Views: 166
  • IMG-3354.jpeg
    IMG-3354.jpeg
    64.8 KB · Views: 169
Top
Hey, wait a minute.

This is awkward, but...

It looks like you're using an ad blocker. We get it, but (1) terrylove.com can't live without ads, and (2) ad blockers can cause issues with videos and comments. If you'd like to support the site, please allow ads.

If any particular ad is your REASON for blocking ads, please let us know. We might be able to do something about it. Thanks.
I've Disabled AdBlock    No Thanks