Rinnai I-series tankless combi intermittent E430

Users who are viewing this thread

Nhandojo

New Member
Messages
15
Reaction score
3
Points
3
Location
Toronto
Boiler is piped wrong heat side. It needs hydraulic separation and constant flow through it. The built in pump flows enough for one small zone but not the three or four. Primary secondary loop is needed with built in pump just for the boiler another for the zones with some headers instead of all the tees. Are there zone valves?
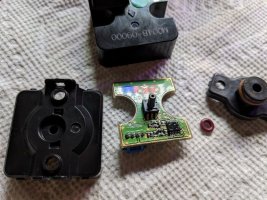
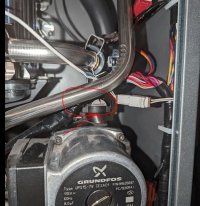
As much as I don't trust the contractor that installed this system (and I did find mistakes in how they wire the boiler to my existing air handler/thermostat), I think they actually did plumb the CH side correctly. Due to the limited space, the piping is a bit convoluted, and hard to follow from the pics I posted. I drew a diagram to clarify the CH piping (and convince myself that the plumbing is indeed correct).

Closely-spaced tees used provide hydraulic separation between the boiler and the air handler (this is a small system with only a single zone). And water have been circulating to the air handler with no issues.

1673580321159.png
 

Nhandojo

New Member
Messages
15
Reaction score
3
Points
3
Location
Toronto
Well my luck ran out (or came in, depending on your perspective). The water heater started acting up a few weeks ago, and rinsing the sensor with tap water only make the problem go away for a week or so.

So I purchased a new sensor (out of pocket, don't have time to spend to convince Rinnai), and voila transient pressure dips go away completely.

Given I now have a completely redundant sensor, I decided to open it up and found that the pinhole was almost completely covered in scale, so much that I originally thought the scale was part of the sensor itself.

There was no component marking on the PCB, but if I have to guess, the pressure sensor part is this (based on looks): Digikey

In 1.5 year or whenever the new sensor starts acting up again, I'll put this old sensor back and see if I'd broken it.
 

Attachments

  • PXL_20230219_221251274.jpg
    PXL_20230219_221251274.jpg
    104.6 KB · Views: 221

TonyaGilmore

New Member
Messages
17
Reaction score
7
Points
3
Location
Ontario, Canada
Hello! Your Rinnai water heater appears to be having a problem. It's excellent that you have already conducted preliminary examinations and observations to compile data on the issue. One possibility could be a damaged pressure sensor or a cabling or connection issue between the controller and the pressure sensor. Even when the water pressure is within the standard range if the sensor gives erroneous data or does not communicate properly it could still cause the error. Contacting a plumber or a technician experienced with Rinnai water heaters would be preferable. They will be better skilled and equipped to identify the problem.
 

Fitter30

Well-Known Member
Messages
4,338
Reaction score
791
Points
113
Location
Peace valley missouri
Need a piping diagram of both dhw and ch with brand ,model of pumps and type of heat emitters. The gpm flow sensor normally is used just for dhw not ch. Has dhw side been cleaned with vinegar since system is 1.5 years old?
 

Nhandojo

New Member
Messages
15
Reaction score
3
Points
3
Location
Toronto
To be clear, problem was solved. Pressure sensor was dirty, the transducer hole was caked with what I presume is dissolved minerals. Purchased a new sensor and the problem went away. I then thoroughly cleaned the old sensor, and tried to identify the pressure transducer part so if this happens again I can reuse the old sensor.

Nothing to do with plumbing arrangement, though perhaps related with the use of black iron fittings..
 

Fitter30

Well-Known Member
Messages
4,338
Reaction score
791
Points
113
Location
Peace valley missouri
Dhw side? Needs to be cleaned with vinegar details on you tube and manual. Mineral build up will cause heat exchanger to fail.
 

engineeringden

New Member
Messages
1
Reaction score
0
Points
1
Location
Victoria BC Canada
Needs to be cleaned with vinegar details on you
Hello! Your Rinnai water heater appears to be having a problem. It's excellent that you have already conducted preliminary examinations and observations to compile data on the issue. One possibility could be a damaged pressure sensor or a cabling or connection issue between the controller and the pressure sensor. Even when the water pressure is within the standard range if the sensor gives erroneous data or does not communicate properly it could still cause the error. Contacting a plumber or a technician experienced with Rinnai water heaters would be preferable. They will be better skilled and equipped to identify the problem.
Oh Wow your Error code 403 and your analysis were spot on! Also identical to my problems with my i120cn Rinnai combo boiler that have been a pain in the wallet since it was installed new in March 1 2021. Ever since every 6 months or less I get the pressure sensor alarm. They sold me a separator filter ($1200) to get rid of the oxides and the problem persisted.They even put in a new pressure sensor and that cleared the problem for 6 months but every 5-6 months the problem reappears. Need a permanent solution!!
 

jbrown29

New Member
Messages
2
Reaction score
0
Points
1
Location
USA
Well my luck ran out (or came in, depending on your perspective). The water heater started acting up a few weeks ago, and rinsing the sensor with tap water only make the problem go away for a week or so.

So I purchased a new sensor (out of pocket, don't have time to spend to convince Rinnai), and voila transient pressure dips go away completely.

Given I now have a completely redundant sensor, I decided to open it up and found that the pinhole was almost completely covered in scale, so much that I originally thought the scale was part of the sensor itself.

There was no component marking on the PCB, but if I have to guess, the pressure sensor part is this (based on looks): Digikey

In 1.5 year or whenever the new sensor starts acting up again, I'll put this old sensor back and see if I'd broken it.
Having exact same problem with my Rinnai i120cn. water pressure drops when switching between Domestic hot water and central. i have even replaced the expansion tank and was still able to replicate the issues similarly as in your case.
How do you remove the sensor itself? I am having a hard type pulling the metal tab at the bottom of the sensor.
Also, does anyone know what that gray cap is for? it seems that has some build-up that needs cleaning as well.
 

Attachments

  • tab2.JPG
    tab2.JPG
    46.6 KB · Views: 132
  • tab1.JPG
    tab1.JPG
    105.3 KB · Views: 118

Fitter30

Well-Known Member
Messages
4,338
Reaction score
791
Points
113
Location
Peace valley missouri
Having exact same problem with my Rinnai i120cn. water pressure drops when switching between Domestic hot water and central. i have even replaced the expansion tank and was still able to replicate the issues similarly as in your case.
How do you remove the sensor itself? I am having a hard type pulling the metal tab at the bottom of the sensor.
Also, does anyone know what that gray cap is for? it seems that has some build-up that needs cleaning as well.
Here's a exploded view. Scroll down to Documentation, English, technical, data sheets, 800000115 I series boiler tech data
 

Nhandojo

New Member
Messages
15
Reaction score
3
Points
3
Location
Toronto
Having exact same problem with my Rinnai i120cn. water pressure drops when switching between Domestic hot water and central. i have even replaced the expansion tank and was still able to replicate the issues similarly as in your case.
How do you remove the sensor itself? I am having a hard type pulling the metal tab at the bottom of the sensor.
Also, does anyone know what that gray cap is for? it seems that has some build-up that needs cleaning as well.
Disconnect the sensor wiring to avoid ripping it accidentally. Isolate the boiler then drain water from the boiler before you undo any of these clips so you won't get sprayed (and the tension relief makes it easier to undo the clips).

You need to remove that section of piping from above the pump by pulling the metal tab that you circled in red. And then there's another clip where the piping enters the heat exchanger (just above where you circled in your pic). Pull that out too.

Once you got the pipe section off, the sensor is secured with 2 Philips head screw. Undo and open the sensor plastic cover. You may decide to strip it to bare PCB at this time to get better access to the actual sensor itself. I bought a spare sensor just in case I f it up during disassembly.

Also the grey cap ontop of the pump is air bleed valve. It looks like it is/was leaking. Manual says to leave it open for a week (if memory serves) then screw it tight to close.

After you reassembled everything, don't forget to run the bleed program (see your manual on how to trigger that). This requires that grey bleeder valve to be open.
 
Last edited:

Nhandojo

New Member
Messages
15
Reaction score
3
Points
3
Location
Toronto
@jbrown29 Here's the relevant part from the exploded parts dwg. Remove clip 454 (the horizontal one) and 506. This should allow you to pull 419 away. Then you can unscrew 413.

1700176664438.png
 

jbrown29

New Member
Messages
2
Reaction score
0
Points
1
Location
USA
@jbrown29 Here's the relevant part from the exploded parts dwg. Remove clip 454 (the horizontal one) and 506. This should allow you to pull 419 away. Then you can unscrew 413.

View attachment 95198
Thank you! i looked all over this, but somehow missed this section.
it would be top 3 on rinnai videos if you make a video on it on youtube.
lots of ppl looking for it, and not easy to find how to fix this issue.
 
Last edited:

Nhandojo

New Member
Messages
15
Reaction score
3
Points
3
Location
Toronto
Thanks for telling me this is a common problem. This tells me the sensor is flawed. They should've picked a sensor body with different material, one that doesn't react with dissolved minerals in water. If I crack open my boiler again I'll make a video.

Another important point I wanted to make; some suggested flushing with vinegar as a solution. Flushing the DHW loop will NOT work. And the manual specifically states to NOT flush the primary CH loop, which is where this pressure sensor is.
 

Fitter30

Well-Known Member
Messages
4,338
Reaction score
791
Points
113
Location
Peace valley missouri
Thanks for telling me this is a common problem. This tells me the sensor is flawed. They should've picked a sensor body with different material, one that doesn't react with dissolved minerals in water. If I crack open my boiler again I'll make a video.

Another important point I wanted to make; some suggested flushing with vinegar as a solution. Flushing the DHW loop will NOT work. And the manual specifically states to NOT flush the primary CH loop, which is where this pressure sensor is.
CH is the heating loop not the DHW look at page 107 There are lots of videos on cleaning combi water heaters
 

Nhandojo

New Member
Messages
15
Reaction score
3
Points
3
Location
Toronto
Exactly, see section 14.2, and I quote:
The Rinnai boiler must be isolated from the
system while the system is flushed. No
system cleaner should ever enter the boiler
heat exchanger due to its caustic nature
which could damage the heat exchanger.
 
Top
Hey, wait a minute.

This is awkward, but...

It looks like you're using an ad blocker. We get it, but (1) terrylove.com can't live without ads, and (2) ad blockers can cause issues with videos and comments. If you'd like to support the site, please allow ads.

If any particular ad is your REASON for blocking ads, please let us know. We might be able to do something about it. Thanks.
I've Disabled AdBlock    No Thanks