Replace Bypass Valve on Acid Neutralizer

Users who are viewing this thread

Bob DIYer

New Member
Messages
5
Reaction score
0
Points
1
Location
Maryland
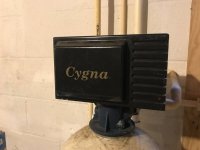
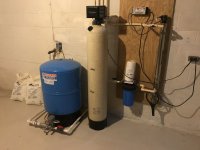
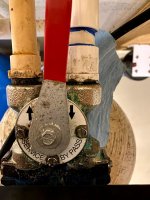
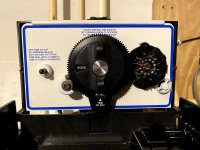
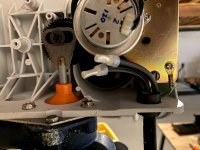
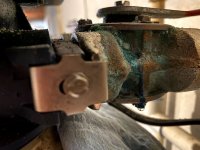
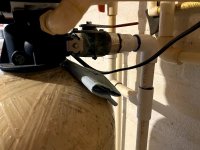
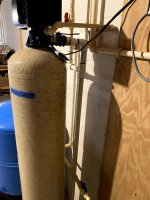
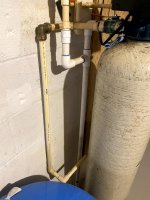
Hi all, I have an acid neutralizer that is about 20 years old. I believe it is a tectonic rebrand. The bypass valve has developed a leak. Due to the amount of visible corrosion on the valve I think it is best to replace. I’ve sourced an appropriate replacement valve. My question to the group is what is the best way to plumb this. The valve is stainless steel (see here https://www.filtersfast.com/P-Fleck...WEgHVjY4cK-D4RpgEqAm3jXjblNFKFeQaAoLKEALw_wcB). The neutralizer side connection a compression fit. The inlet/outlet side is 3/4” FPT. Inlet side is PVC Sch 40. Outlet side is CPVC.

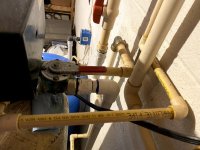
The outlet side seems straight forward.

FROM BYPASS VALVE: Stainless steel MPT CPVC slip -> CPVC -> 90 -> CPVC -> existing sharkbite connector.

It is the inlet side I am not sure of the best approach. As you’ll see in the pictures there is a PVC tee connection that is within 2” of the PVC 90 that leads to the bypass valves. I am hoping not to have to plumb that branch going off the tee. The following is the approach I am considering.

FROM BYPASS VALVE: Stainless steel MPT CPVC slip -> CPVC -> 90 -> CPVC -> CPVC to PVC sharkbite connector.

I would appreciate any feedback about this approach or discussion of alternatives. I don’t have much experience with plumping projects but feel this is something that I can tackle.

Pictures of the acid neutralizer system have been attached.
 

Attachments

  • IMG_0921.jpg
    IMG_0921.jpg
    81.6 KB · Views: 181
  • IMG_0922.jpg
    IMG_0922.jpg
    82.2 KB · Views: 177
  • IMG_0923.jpg
    IMG_0923.jpg
    94 KB · Views: 188
  • IMG_0925.jpg
    IMG_0925.jpg
    98.8 KB · Views: 187
  • IMG_0926.jpg
    IMG_0926.jpg
    88.5 KB · Views: 174
Last edited:

Sylvan

Still learning
Messages
2,766
Reaction score
695
Points
113
Location
New York
Before you pick a replacement valve it is a great idea to know what type of "acid" your working with other wise just replace in kind and worry about it in another 20 years
 

Reach4

Well-Known Member
Messages
38,892
Reaction score
4,435
Points
113
Location
IL
They probably make a compatible bypass in plastic.

Does that bypass have 1 inch or 3/4 inch threads? Your bypass looks like a Fleck 17290 (3/4) or 13399 (1 inch).

Fleck 60049 would be a 3/4 plastic bypass.

Can you show us the front of the valve?
 

Bob DIYer

New Member
Messages
5
Reaction score
0
Points
1
Location
Maryland
It is 3/4". Attached a couple more pictures of set up. I'm not sure what you mean by showing the front of the valve since the front it connected to the head. Maybe you want to see the head, im not sure. BTW, i've already purchased the stainless steel bypass valve. Are you suggesting that it would be better to use a plastic valve instead (last longer / easier to install)?
 

Attachments

  • IMG_0541.jpg
    IMG_0541.jpg
    53 KB · Views: 167
  • IMG_0545.jpg
    IMG_0545.jpg
    62.5 KB · Views: 174
Last edited:

Reach4

Well-Known Member
Messages
38,892
Reaction score
4,435
Points
113
Location
IL
How about taking the Cygna front cover off, if it comes off easily enough. Somebody might recognize your valve. Take one picture from the front, and one from the top. If you can't readily get the cover off, somebody still might recognize the valve and therefore the bypass.
 

Bob DIYer

New Member
Messages
5
Reaction score
0
Points
1
Location
Maryland
Ok I'll give that try. In the meantime I have these other pictures that may help. According to an email interaction that I had with someone at softnerparts.com, this system is a rebrand of Tectonics. Supposedly the valve was made by Fleck and the valve body is based on the Fleck 5600. This person also had recommended the Fleck 17290 bypass valve which I purchased. However, if there is a plastic equivalent then I probably would return that valve and use the plastic one as it would resist the acidic water. I'll take some picture with the cover off and repond soon.
 

Attachments

  • IMG_1003.jpg
    IMG_1003.jpg
    99.2 KB · Views: 170
  • IMG_1004.jpg
    IMG_1004.jpg
    86.1 KB · Views: 189
  • IMG_0997.jpg
    IMG_0997.jpg
    103.8 KB · Views: 177

Bob DIYer

New Member
Messages
5
Reaction score
0
Points
1
Location
Maryland
Ok cover off. picture of inside head unit. You can see the top of the piston. Picture of front of body filter.
 

Attachments

  • IMG_1008.jpg
    IMG_1008.jpg
    84.5 KB · Views: 167
  • IMG_1012.jpg
    IMG_1012.jpg
    70.7 KB · Views: 169
  • IMG_1015.jpg
    IMG_1015.jpg
    87.1 KB · Views: 175
Top
Hey, wait a minute.

This is awkward, but...

It looks like you're using an ad blocker. We get it, but (1) terrylove.com can't live without ads, and (2) ad blockers can cause issues with videos and comments. If you'd like to support the site, please allow ads.

If any particular ad is your REASON for blocking ads, please let us know. We might be able to do something about it. Thanks.
I've Disabled AdBlock    No Thanks