Remove flange and put over new tile?

Users who are viewing this thread

Jumpyg

New Member
Messages
75
Reaction score
0
Points
0
Location
Michigan
I'm redoing a bathroom. Right now, the old vinyl flooring has been removed and I'm left with the plywood subfloor. I'm going to have a tiler put down cement backerboard and then ceramic tile.

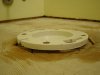
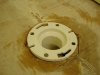
Right now, the bottom of the flange is about 1/4" above the plywood (the top of the flange is 3/4" above). I understand that the flange should rest on top of the flooring material. How can I accomplish this? How difficult is it to remove the ring and replace it after the tile is installed? For what it's worth, even though the flange did NOT rest on the flooring material previously, the toilet never rocked. The flange is very solid, and cannot be wiggled side-to-side even a little bit. It seems to be in pretty good shape after I cleaned all the wax off. Below are some pictures.

Also, do you recommend the standard wax ring? I've seen some with a flange attached to them at Lowe's.
 

Attachments

  • flange1.jpg
    flange1.jpg
    17 KB · Views: 2,417
  • flange2.jpg
    flange2.jpg
    23.9 KB · Views: 2,192

hj

Master Plumber
Messages
33,603
Reaction score
1,042
Points
113
Location
Cave Creek, Arizona
Website
www.terrylove.com
flange

Your pictures do not show the orientation of the flange with the back wall, but I am guessing that the bolts go into the long closed slots rather than the two short "open" ones. If so, then I would be concerned about reusing it because it appears that the "left" one is distorting and may crack when the toilet is reconnected to it. I would also not use a wax ring with the "horn/funnel" on it.
 

Jumpyg

New Member
Messages
75
Reaction score
0
Points
0
Location
Michigan
hj said:
Your pictures do not show the orientation of the flange with the back wall, but I am guessing that the bolts go into the long closed slots rather than the two short "open" ones. If so, then I would be concerned about reusing it because it appears that the "left" one is distorting and may crack when the toilet is reconnected to it. I would also not use a wax ring with the "horn/funnel" on it.
HJ, you are correct. The left side does appear slightly bent, but not very noticeable. What is the process for replacing it? Is it a job for a pro? If so, do I have to have him in twice--once to remove the old flange and once to put in the new one once the tile floor is complete? That could get expensive.
 

Don Zorn

New Member
Messages
32
Reaction score
0
Points
0
Location
Alberta
That looks like 1/4" luan on your floor surrounding the toilet flange - that will have to go before your tile. 1/4" luan has no place under a ceramic tile floor -it delaminates too easily, which causes motion and will likely cause tile/grout cracking in future. In addition, you will need to check if the floor meets the L/360 deflection criteria before setting ceramic or L/720 if you want to set stone (like mrable or slate).

The top face of the closet flange can be level or slightly below flush with the the finished floor and still get a good seal with a extra thick wax ring - I had the same situation at my home and installed the toliet this past weekend with an extra thick wax flange. In my case, the ceramic tile was flush with the top of the closet flange.

Don
 

Mike Swearingen

New Member
Messages
621
Reaction score
3
Points
0
Location
On Albemarle Sound In Northeastern NC
Website
www.albemarle-realty.com
Ideally, a toilet flange should sit flush on top of the finished floor and be bolted to it.
If the floor is plywood, they can screw the cement board to it.
If that PVC flange is inside the closet bend pipe, you can cut it into quarters with a hacksaw blade (careful not to cut the pipe), and chip the quarters out with a hammer and chisel. Sand and clean the pipe and install (with PVC primer and PVC glue) a new PVC flange with only the thickness of the flange above finished floor level.
Use an awl or other sharp-pointed tool for a starter point in the finished tile to keep the drill from walking, and drill pilot holes for the flange floor bolts with a masonry bit.
If this bathroom is over a basement or crawlspace, you can simply cut it from underneath, raise it, and re-plumb it. You can use a neoprene rubber sleeve with two stainless steel clamps (aka Fernoc) coupling to reconnect the drain pipe (or a PVC coupling).
Good luck!
Mike
 

Don Zorn

New Member
Messages
32
Reaction score
0
Points
0
Location
Alberta
Mike - Interesting - didn't know that you could cut it into quarters and chip out with a hammer and chisel. Does that apply to an ABS closet flange too?

I guess that would only apply to a closet flange that fits inside of the pipe - right?

Don
 

Jumpyg

New Member
Messages
75
Reaction score
0
Points
0
Location
Michigan
Don Zorn said:
That looks like 1/4" luan on your floor surrounding the toilet flange - that will have to go before your tile. 1/4" luan has no place under a ceramic tile floor -it delaminates too easily, which causes motion and will likely cause tile/grout cracking in future. In addition, you will need to check if the floor meets the L/360 deflection criteria before setting ceramic or L/720 if you want to set stone (like mrable or slate).
Thanks for the tip, Don. The luan goes under the edge of the shower stall, so I won't be able to get that portion up. Can you suggest how to make a cut along the shower base to remove as much of the luan as possible?

Also, can you give me some more info about what L/360 defelection criteria is? I am installing ceramic tile.
 

Don Zorn

New Member
Messages
32
Reaction score
0
Points
0
Location
Alberta
Jumpyg - already answered that one on the "other" forum. Best bet for calculating your deflection is on the John Bridge ceramic tile forum.

then click on "Deflecto". It will ask you for your joist dimensions, spacing, unsupported length and it will calculate your deflection and will tell you if your good to go for ceramic or stone. Make sure you jump in on the forum and ask questions about what thickness of subfloor you need. There are some pretty good tile mechanics that frequent that forum and they will give you excellent advice.

Good Luck. :)

Don
 

JDkimes

Engineer
Messages
199
Reaction score
0
Points
16
Location
Littleton, CO
Check to see if you even need to remove the Luan flooring material. I think there are some ways to avoid that, but someone on there will know if you can leave it in place and still tile. But you should definitely figure out if the floor deflection meets the requirements, they can help w/ that too.
 

Jumpyg

New Member
Messages
75
Reaction score
0
Points
0
Location
Michigan
jdkimes said:
You should also check to see if you even need to remove the Luan flooring material. I think there are some ways to avoid that, but someone on there will know if you can leave it in place and still tile. But you should definitely figure out if the floor deflection meets the requirements, they can help w/ that too.
Thanks, I have been checking out that forum based on other suggestions. They said take the luan out for sure. I'm in the process of figuring out if the floor meets deflection criteria.
 

pawistik

New Member
Messages
5
Reaction score
0
Points
0
jumpyg said:
Can you suggest how to make a cut along the shower base to remove as much of the luan as possible?

Jumpy,
Take a skil saw and set the depth of cut to the thickness of the luan. Mark a line around the perimeter that your saw can cut to (you won't be able to go right against the wall or the shower stall, but you should be able to get within a few inches depending on your saw. Make sure there are no nails that you will hit. You can then replace the luan with good plywood of an appropriate thickness (depending on what's underneath). You could then add a thinner plywood around the perimeter where you could not cut away the luan. If thickness of the floor is not an issue, beef up the floor by adding additional plywood right over top of the luan. That would certainly be your easiest option. A third option would be to cut away the subfloor in the same manner as I described above and rebuild the subflloor from the joists up. When you have the subfloor exposed you can then add cross braces to stiffen and add more support to the floor.
 
Top
Hey, wait a minute.

This is awkward, but...

It looks like you're using an ad blocker. We get it, but (1) terrylove.com can't live without ads, and (2) ad blockers can cause issues with videos and comments. If you'd like to support the site, please allow ads.

If any particular ad is your REASON for blocking ads, please let us know. We might be able to do something about it. Thanks.
I've Disabled AdBlock    No Thanks