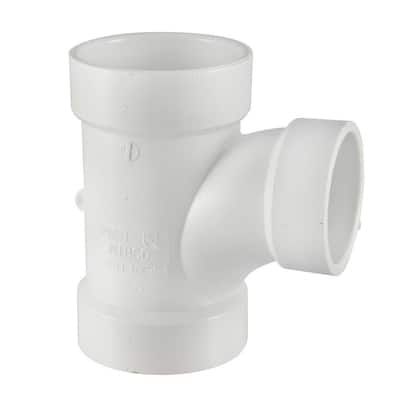
Proper fitting to connect to main...Fernco?

Users who are viewing this thread

J Blow

Member
Messages
116
Reaction score
1
Points
18
Location
South Dakota
I'm ready to tap into my 3" main in my basement but I can't move it at all. Knowing this, I don't see how I cut a section out long enough to slip the fitting in but short enough to be able to catch the flange and glue it in....don't think that is possible. That's lead me to think I need one of the black rubber boots? First, is this an acceptable way to do it at all? Next, if so, which fitting below would be better? The entire rubber boot (2nd pic on top of 3rd pic) or the one that basically has a fitting on it (1st pic) ? Of course the opening would be smaller...

Tap%20Saddle%20TST%206.jpg


$_35.JPG
4f1baf37-c45d-4448-805e-15d4e9b1ca9f_400.jpg
 

Reach4

Well-Known Member
Messages
38,846
Reaction score
4,427
Points
113
Location
IL
I suggest that you post a photo or 2, (8oo pixels or less). Show what exists and what you are trying to accomplish.
It doesn't take much knowledge to know that your 2 flex choices are not proper, but with a photo you might get a useful suggestion of how to accomplish what you are trying to do.
 

J Blow

Member
Messages
116
Reaction score
1
Points
18
Location
South Dakota
This fitting, a few inches above the clean out. Thanks

I suggest that you post a photo or 2, (8oo pixels or less). Show what exists and what you are trying to accomplish.
It doesn't take much knowledge to know that your 2 flex choices are not proper, but with a photo you might get a useful suggestion of how to accomplish what you are trying to do.
 
Last edited by a moderator:

Jadnashua

Retired Defense Industry Engineer xxx
Messages
32,770
Reaction score
1,190
Points
113
Location
New England
You cannot use the thick rubber connection you showed in the first picture...but, you CAN use one of Fernco's ProFlex fittings. YOu may need to cut out a bit more above where you want to fit the new fitting so you have room for the proper overlap of the Proflex after putting a stub into the new fitting. You can put a stub of pipe in the new fitting on both ends, glue it in to a coupling on the bottom, and use the ProFlex (or any other similar product) above. First, take the metal bands and clamps off. Slide the rubber part on the upper section, fold the rubber boot back on itself so you then have room to slide in and glue the assembly to the coupling on the bottom, fold the rubber boot back over the new piece, install the metal band around the rubber bushing. If you slide that part onto the pipe first, you don't have to flatten it out to get it back around the pipe and the boot. You could use a repair coupling, but those are a pain for the DIY'er...you have to move fast, and it's tough. It looks like a normal inline coupling, but does not have a stop in the middle so you can slide it one way, get your pipe lined up, then slide it back to make the seal with it now centered over the joint. Problem is, the glue sets up so fast, you must really know what you're doing and move fast, or it will jam and weld itself in place before you're done! Better to use the ProFlex fitting!

I'm not sure that is the proper fitting for that location, either (a pro would know). I think it should be a Y.
 

J Blow

Member
Messages
116
Reaction score
1
Points
18
Location
South Dakota
After doing some reading on the proflex it appears that the all rubber ones aren't for use above ground? Seems strange to a novice like me but I guess I'll go with the all steel outside. It's a little nerving cutting open the main but....oh well.

Thanks.
 

J Blow

Member
Messages
116
Reaction score
1
Points
18
Location
South Dakota
When trying to find the right part for plastic to plastic they say the part number is 3005-33. I, however, can't find anyplace that carries that and they say 3000-33 is the same thing. The fernco website says 3000-33 is for plastic to cast-iron. Will this work?
 

J Blow

Member
Messages
116
Reaction score
1
Points
18
Location
South Dakota
Anyone care to comment on if the fitting pictured would be ok to go into the 3" main...or do I need something else? Also, still wondering about the cast-iron version of the fernco. Will that work with plastic on both sides? Thanks all!
 
Last edited by a moderator:

Jadnashua

Retired Defense Industry Engineer xxx
Messages
32,770
Reaction score
1,190
Points
113
Location
New England
SOrry, I don't know the specifics on that. CI depends somewhat on when it was made (IOW, they aren't all the same OD!) and the type. PVC is pretty consistent (1/4" walls, and the nominal ID). Have you tried a real plumbing supply store verses a big-box store?

The reason you can use the all rubber connector below ground is that it assumes you will properly support the pipe when backfilling the hole so that the ends won't move and create a step or misalignment. Above ground, you need the metal support to ensure that the two pipe ends stay lined up.
 

J Blow

Member
Messages
116
Reaction score
1
Points
18
Location
South Dakota
I went ahead and purchased the version that says it's for cast iron to plastic. It looks identical on both ends so I can't imagine it could hurt much. I also night a different wye...this one has the inlet at a 45° angle instead of the 90° straight out of the side.
 

Cacher_Chick

Test, Don't Guess!
Messages
5,458
Reaction score
213
Points
63
Location
Land of Cheese
The proper fitting depends on what you are connecting and how it is vented. A sanitary tee would be correct in most situations, and a wye is OK in others, but they are not necessarily interchangeable.
 

J Blow

Member
Messages
116
Reaction score
1
Points
18
Location
South Dakota
Went to get the fernco, guy started asking me questions, told me I needed a different fitting....but when I look at other pictures of people doing similar things I think what I did was wrong by using a different fitting. It goes to a bar sink about 6 feet away from the stack. It's vented elsewhere.

In addition, I had a really tough time getting the fitting in there. The PVC out of the top of the fixture fits inside the rubber boot obviously (no leaks anywhere) but doesn't seat against the lip in the rubber boot. The same is true with the PVC coming from above into the rubber. It was just too tight of a fit getting the fitting in there since the stack doesn't budget - then of course when it slides down over the PVC pipe, it leaves a gap.

I'm thinking I need to cut this fitting out, go with the original I pictured, and then put a fernco on both the top and the bottom....thoughts?
 
Last edited by a moderator:

Reach4

Well-Known Member
Messages
38,846
Reaction score
4,427
Points
113
Location
IL
If there is too much of a gap, use two banded couplers. Cut a section out of the pipe at the top of the picture, and cut a new piece of PVC that just fills the gap. Attach the new piece top and bottom with banded couplers.

Now if the piece coming out of the top of the Y fitting is not long enough for the coupler to grab well, then that would be a problem.
 

J Blow

Member
Messages
116
Reaction score
1
Points
18
Location
South Dakota
It grabs - just doesn't seat all the way against the rubber lip in the fernco coupler - top or bottom. It seems to be working fine as is - doesn't leak at all. I'm actually more worried about if this fitting will work knowing a sink with a p-trap will be on the end about 6 feet away.
 

J Blow

Member
Messages
116
Reaction score
1
Points
18
Location
South Dakota
Theoretically speaking, inspection won't be part of this final process - function is key....if that helps. ;)
 

Jadnashua

Retired Defense Industry Engineer xxx
Messages
32,770
Reaction score
1,190
Points
113
Location
New England
It sounds like your stub in the fitting may have been a little short. Did you remove the metal reinforcement band while putting the rubber sleeve on? Trying to install it with the band still on there is a pain. There is a ridge in the middle of the sleeve, and ideally, the pipe is up against it on either side. If it's close, I don't think anyone is going to chastise you too much, unless that gap is huge. A little bit of water of liquid dishwashing detergent can make sliding the sleeve on easier, but normally, once you take the band off, it's not a big deal. It makes it a little easier if you scrape or lightly sand the sharp edge off of the pipe...doesn't take much. Sort of like deburring the inside, deburr the outside edge as well.

The magic to make this work is to put the fitting on one side, fold half of it back on itself, slide the new piece in place, the fold it back. IF you don't have enough depth to get the fitting glued into the socket, then you need the trick of using two fittings above and a short section of pipe in between. THen, you have enough gap to get the glued bits in place, then, using the two fittings, put that other section in place.

If the entire clamping band is on the pipe, your gap isn't big, AND you've torqued it to spec, you should be fine.
 

J Blow

Member
Messages
116
Reaction score
1
Points
18
Location
South Dakota
The problem is that the main won't budge so I have to have an opening in the pipe that allows me to insert the fitting (with the stub pipe already glued into the fitting of course) in without moving the main at all. This definitely makes the stub short. I got every single inch I could out of the rubber boot by not only rolling it up but sliding it up the pipe. Using simple math, I needed an 8 inch opening to slide an 8 inch fitting (with stub) in. The flange on that fitting is an inch and a half so when slid down into the fitting, there's an inch and half gap at the boot. I slid the boot down half that distance so there's a 3/4 inch gap from the lip on each side of the rubber. I think that total rubber boot is 3 inches wide so, using simple logic, each side catches about 3/4 inch of plastic. That means it's 3/4 inch from seating on that rubber ridge and the two plastic pieces are 1.5 inches apart.

Right now I'm actually equally worried about this being the correct fitting.
 

Jadnashua

Retired Defense Industry Engineer xxx
Messages
32,770
Reaction score
1,190
Points
113
Location
New England
It IS the correct fitting, but you need to make another cut above, and then a new properly sized piece of pipe with a banded coupling at either end to insert and take up the gap. Done that way, you can seat the fitting right to the stop on all ends. I wouldn't want a 1.5" gap between the ends of the pipe in there. See what one of the pros think, but it's a simple fix...cut say 6" off of the pipe above. Get another fitting. Cut a new piece of pipe so that it is just short enough so that when bottomed out in each fitting, it would just fit in between, tighten them both down, and sleep well.

The alternative, I'd mentioned, would be to have used a repair coupling, but unless you use them a lot, it's an art to getting a good seal. A repair coupling has no stop in the middle, so you slide it up one way, insert the pipe, then slide it back down. Hassle is, once you put the cement on, you have almost no time, and especially on a larger pipe, it's tough to move. Until you get the knack, you're likely to only be able to slide it back a very short amount, if at all, and then you won't have a very strong connection. With that, timing is everything, and practice definitely helps. It's too late for that now, and IMHO, on a first time basis, probably wouldn't have worked anyways.
 

J Blow

Member
Messages
116
Reaction score
1
Points
18
Location
South Dakota
I agree about the coupler...Sounds more than I want to tackle. Cutting that fitting it will make a bigger opening obviously but using a boot on top and bottom will allow me to slide the fitting in exactly where it will be placed versus sliding in and moving up or down to glue into a fitting.

To redo it I just need another fernco rubber. I already have another fitting - pictured in beginning of thread. Although you say this is the correct fitting, others have told me that this wye creates an s trap in conjunction with the p trap at the sink.

Seems like there shouldn't be so dang much to this! Thanks for all the thoughts.
 

Jadnashua

Retired Defense Industry Engineer xxx
Messages
32,770
Reaction score
1,190
Points
113
Location
New England
If that pipe coming down is a drain pipe, then it cannot be used as a vent (it could easily be a vent ABOVE the highest drain inlet, though)! Simple rule, few exceptions (the only ones I know about are a bathroom group on the same floor), once a pipe becomes a drain, it is ALWAYS a drain, and cannot be used as a vent. Now, way back when, they didn't always do that, and things worked, but new work requires current codes.
 

J Blow

Member
Messages
116
Reaction score
1
Points
18
Location
South Dakota
The pipe coming down is from upstairs. The tub, lav, and bar sink all have their own venting pipes tied into a single vent through the roof.
 
Top
Hey, wait a minute.

This is awkward, but...

It looks like you're using an ad blocker. We get it, but (1) terrylove.com can't live without ads, and (2) ad blockers can cause issues with videos and comments. If you'd like to support the site, please allow ads.

If any particular ad is your REASON for blocking ads, please let us know. We might be able to do something about it. Thanks.
I've Disabled AdBlock    No Thanks