Pressure Test Leak

Users who are viewing this thread

Ntcarson

Member
Messages
42
Reaction score
7
Points
8
Location
Tidewater VA
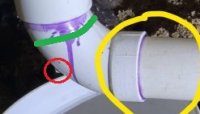
Hi All! With lots of help from you all, I've prepped for my pressure test on the DWV rebuild of this 1938 house. With the exception of 2" and 4" threaded clean-out plugs, my only leak is a slow drip at the joint circled in the picture, at the base of my attic vent stack.

Since this is the attic and, barring much larger issues, will never be under pressure, or leak. Is there a product or technique that can "simply" strengthen this joint and get it past the 15 minute pressure test? I've read about using the vacuum approach and sucking glue through, but that seems a bit complicated for this quandry.

Your consideration and advice is greatly appreciated! Thank you! Neil
 

Attachments

  • Inked20210715_104209_LI.jpg
    Inked20210715_104209_LI.jpg
    94 KB · Views: 206

Reach4

Well-Known Member
Messages
38,888
Reaction score
4,434
Points
113
Location
IL
https://www.menards.com/main/plumbing/pipe-fittings/pipe-repair-clamps-tape/c-8529.htm
Fernco Pow-R Wrap Pipe Repair may be good. Note that once open, that does not have shelf life. I have not tried it.

I have successfully used self-fusing silicone tape topped fairly tightly with good electrical tape for more compression and holding the tape in position during fusing. White Scotch 35 electrical tape would make the repair less obvious at a distance. https://www.lowes.com/pd/Scotch-35-White-66-ft/50109016

SealIt Rescue Tape may be the same as the silicone tape I have used. In buying silicone tape, thicker is better. Not cheap.

People report inconsistent results with Leak-B-Gone Plumbing PVC Pipe Leak Repair Rings

ONE MORE THING: Make sure the leak is not from some place higher. Tie a cotton strip/cord around the bend to detect water coming down, about where I drew the green.

Also, did I circle a drop of water in your photo with red? It seems unlikely that the joint you circled would have caused a drop of water at that location.
 

Attachments

  • img_6.jpg
    img_6.jpg
    14.3 KB · Views: 234
Last edited:

Ntcarson

Member
Messages
42
Reaction score
7
Points
8
Location
Tidewater VA
https://www.menards.com/main/plumbing/pipe-fittings/pipe-repair-clamps-tape/c-8529.htm
Fernco Pow-R Wrap Pipe Repair may be good. Note that once open, that does not have shelf life. I have not tried it.

I have successfully used self-fusing silicone tape topped fairly tightly with good electrical tape for more compression and holding the tape in position during fusing. White Scotch 35 electrical tape would make the repair less obvious at a distance. https://www.lowes.com/pd/Scotch-35-White-66-ft/50109016

SealIt Rescue Tape may be the same as the silicone tape I have used. In buying silicone tape, thicker is better. Not cheap.

People report inconsistent results with Leak-B-Gone Plumbing PVC Pipe Leak Repair Rings

ONE MORE THING: Make sure the leak is not from some place higher. Tie a cotton strip/cord around the bend to detect water coming down, about where I drew the green.

Also, did I circle a drop of water in your photo with red? It seems unlikely that the joint you circled would have caused a drop of water at that location.
Thanks Reach! I see the suspect area that you are referring to. I spent some time up there (in the sweltering heat) and wiped it down, checked and double checked, but will do so one more time, just to be sure. Hopefully that is just a touch of the background insulation doing a photobomb.
I've got bunches of self-fusing tape, but would hate for the inspector to see that. I'm half thinking about putting a repair joint in there, glued heavily, and butted against the elbow joint. What do you think about that?
Thanks again! Neil
 

Reach4

Well-Known Member
Messages
38,888
Reaction score
4,434
Points
113
Location
IL
I could also see drying the piping well, perhaps helped by a hair dryer. Then apply some 60 minute epoxy into the leaky joint area with a toothpick etc.

What do you mean by repair joint? Leak-B-Gone?

You could cut out a piece of pipe, and use a socket saver type tool.
"rambit" "pipe hog" Wheeler Rex Pipe Hog, and Reed Clean Ream are various tools. The Reed has the best reputation here. https://terrylove.com/forums/index.php?threads/can-this-toilet-be-moved.91767/ is one example.

Then you would glue in a new pipe into the socket, and use two shielded couplers to stick a piece of pipe into the gap. I don't think a Homewerks repair coupling would expand enough to fill the gap, but maybe if you could limit the gap size. https://www.homedepot.com/p/Homewer...-Expansion-Coupling-511-53-112-112H/206698174
 
Last edited:

Ntcarson

Member
Messages
42
Reaction score
7
Points
8
Location
Tidewater VA
I could also see drying the piping well, perhaps helped by a hair dryer. Then apply some 60 minute epoxy into the leaky joint area with a toothpick etc.

What do you mean by repair joint? Leak-B-Gone?

You could cut out a piece of pipe, and use a socket saver type tool.
"rambit" "pipe hog" Wheeler Rex Pipe Hog, and Reed Clean Ream are various tools. The Reed has the best reputation here. https://terrylove.com/forums/index.php?threads/can-this-toilet-be-moved.91767/ is one example.

Then you would glue in a new pipe into the socket, and use two shielded couplers to stick a piece of pipe into the gap. I don't think a Homewerks repair coupling would expand enough to fill the gap, but maybe if you could limit the gap size. https://www.homedepot.com/p/Homewer...-Expansion-Coupling-511-53-112-112H/206698174
Sorry - joint was a bad choice of word. I was thinking that I could just cut out a section, leaving around 1/2 inch off of the elbow. Then, I could join the distant end (far from the elbow) with a normal coupling, and use a slip coupling heavily cemented and butted against the elbow and covering the exposed 1/2 inch. That would be a fairly simple repair for my unskilled self to perform in the summer attic heat. Also, it would basically look like normal PVC pipe workings, should the inspector decide to torture himself and go up there (not likely).
Again, since it is not really an area of concern, I think any of these repairs would be more than adequate permanent solutions. This one would require no new tools and just a couple readily available couplings.
Thank you!
Neil
 

Jeff H Young

In the Trades
Messages
8,929
Reaction score
2,229
Points
113
Location
92346
I guess you could just leave the bucket there and never go back . since inspector isnt going up. just a few drops with full head on it?
some guys just drain it and slop glue on it, I doubt youd ever have a problem.
But 15 minutes and a coupling and 90 you could fix it right just depends how quality oriented you are
 

Ntcarson

Member
Messages
42
Reaction score
7
Points
8
Location
Tidewater VA
I guess you could just leave the bucket there and never go back . since inspector isnt going up. just a few drops with full head on it?
some guys just drain it and slop glue on it, I doubt youd ever have a problem.
But 15 minutes and a coupling and 90 you could fix it right just depends how quality oriented you are
Thanks Jeff - I try to be pretty detail oriented and thorough, as, I hope, you can tell from the panel cleanup and water distribution replacement in the same joint (photos attached). I always try to do things right, period. That said, I don't want to overthink this thing.
 

Attachments

  • 20210707_133154.jpg
    20210707_133154.jpg
    117 KB · Views: 200
  • 20210705_121025.jpg
    20210705_121025.jpg
    126.8 KB · Views: 200

Jeff H Young

In the Trades
Messages
8,929
Reaction score
2,229
Points
113
Location
92346
Thanks Jeff - I try to be pretty detail oriented and thorough, as, I hope, you can tell from the panel cleanup and water distribution replacement in the same joint (photos attached). I always try to do things right, period. That said, I don't want to overthink this thing.
Nice work very nice, nt carson. Just one of those things not too hard to fix right. only hassle is the pipe hog tool to drill out fitting around 12 bucks . you don't need a 60 dollar tool for that. I've done repairs in places like that but not supposed to add glue , or caulk , epoxy etc.
 

Reach4

Well-Known Member
Messages
38,888
Reaction score
4,434
Points
113
Location
IL
I hope, you can tell from the panel cleanup
What is the deal with the green equipment grounds? Is there a terminal strip on the right wall of the box? Such a terminal strip should connect to the neutral in the main box.

Where does the bare wire connected to the neutral area go? To the terminal strip on the right? If so, good.
 

Ntcarson

Member
Messages
42
Reaction score
7
Points
8
Location
Tidewater VA
Nice work very nice, nt carson. Just one of those things not too hard to fix right. only hassle is the pipe hog tool to drill out fitting around 12 bucks . you don't need a 60 dollar tool for that. I've done repairs in places like that but not supposed to add glue , or caulk , epoxy etc.
Thanks Jeff - I got pulled out of town for a couple days, but hope to get it knocked out tomorrow. Will let you know how I fare.
 

Ntcarson

Member
Messages
42
Reaction score
7
Points
8
Location
Tidewater VA
What is the deal with the green equipment grounds? Is there a terminal strip on the right wall of the box? Such a terminal strip should connect to the neutral in the main box.

Where does the bare wire connected to the neutral area go? To the terminal strip on the right? If so, good.
Hey Reach. Yeah, I wasn't thrilled with the configuration of the panel, but wasn't annoyed enough to replace - just re-organized as best I could. The ground and neutral are bonded under the mess on the left - I wish there was a strip on the right too. Probably quality of the image upload, but I don't see the green you are seeing. Fortunately, it has already been through a thorough rough-in inspection - plumbing will soon follow, as soon as I knock out the small repair. Then, I need to find someone to add a gas line for the WH, which will go above the water distribution box.
Again, I really appreciate you guys taking your time to help guide me down the right path!
 

Ntcarson

Member
Messages
42
Reaction score
7
Points
8
Location
Tidewater VA
Good news - I got back over there and did the repair, as advised by Jeff H - thank you! Knocked out the plumbing rough-in inspection, framing inspection, and went ahead and threw up the insulation, so I can know that inspection out tomorrow. Thanks again for all of your help!
 
Top
Hey, wait a minute.

This is awkward, but...

It looks like you're using an ad blocker. We get it, but (1) terrylove.com can't live without ads, and (2) ad blockers can cause issues with videos and comments. If you'd like to support the site, please allow ads.

If any particular ad is your REASON for blocking ads, please let us know. We might be able to do something about it. Thanks.
I've Disabled AdBlock    No Thanks