Polaris water heater problem & replacement

Users who are viewing this thread

Dana

In the trades
Messages
7,889
Reaction score
509
Points
113
Location
01609
HTP's Phoenix line of water heaters has been around for a decade or more now, with incremental improvements along the way. In recent years I've only read (via internet) of one that arrived DOA that had to be returned, and it wasn't clear if it was truly defective or installer error. The Phoenix Light Duty series are equivalent to their bigger sisters in every respect but burner size.

The modulating output has make the Phoenix and Phoenix Light Duty fairly popular "combi boiler" solutions for doing both hot water and space heating using hydro-air coils for ducted systems, or micro-zoning room by room with hydronic fan coils running off the water heater. With appropriately sized hydro-air or fan coils there's usually enough burner capacity left over to still provide enough domestic hot water for most 1-2 bathroom houses, even with all zones calling for heat.

A careful heat load calculation is required to make this work- oversizing the coils can take more heat out than is going in, but most reasonably tight ~1800-2500' houses in the US have design heat loads less than 40,000 BTU/hr, leaving the rest of the burner capacity available for domestic hot water. A typical 50 gallon standalone tank has a 40K burner operating at 80% combustion efficiency for about 32K going into the water. The condensing 76K burner of the LD has over 70K of output- a heating system drawing less than 40KBTU/hr isn't going to outrun the burner, and the hot water delivery & recovery times will be no worse than a typical standalone.
 

jtech1

Member
Messages
43
Reaction score
1
Points
8
Location
New Jersey
I am going to swap out the new unit for my old one (I put in about 14 years ago). Do these new Phoenix units run perfect out of the box or do they really need an HVAC tech to check pressures and adjust for optimal operation?
 

Dana

In the trades
Messages
7,889
Reaction score
509
Points
113
Location
01609
I am going to swap out the new unit for my old one (I put in about 14 years ago). Do these new Phoenix units run perfect out of the box or do they really need an HVAC tech to check pressures and adjust for optimal operation?

Read the manual, see how much of it you're up to on a DIY basis.
 

jtech1

Member
Messages
43
Reaction score
1
Points
8
Location
New Jersey
I have no problem with any of the installation. And startup does not say anything about checking any gas levels or making any adjustments. Does that mean there is no need to do that? That it pretty much runs optimally out of the box and no adjustment are necessary?
 

Dana

In the trades
Messages
7,889
Reaction score
509
Points
113
Location
01609
Sounds like as long as the gas pressure is in the right range and the gas plumbing is right for the burner size it should just work, nothing much to tweak.
 

Phog

Active Member
Messages
454
Reaction score
84
Points
28
Location
Rochester NY
This heater almost definitely has a closed-loop control system that will modulate the gas burner level in order to meet the outlet water temperature setpoint. The control system will measure the tank temperature, the incoming water temperature, the water flowrate, and probably the incoming gas pressure, and use these measurements to calculate the correct setting for the gas burner. The control system does all this automatically, and typically there aren't any adjustments required. All you have to do as the end-user is set your desired outlet temperature, the control system does the rest.

I just looked briefly through the manual, there are some user-configurable options. None of these should need to be changed from the default settings. The one exception would be the "maximum power percentage" setting, which you might optionally lower down from its default (80%). This setting limits the max BTU's of the burner, and therefore the CFH of gas flow. You would ONLY need to do this if your other gas appliances are pressure-starved when the water heater kicks on (due to undersized gas plumbing).

You could also raise up the burner maximum to 100%, if you want the fastest possible recovery time. I would be hesitant to do this on my own system, but Tim "The Tool Man" Taylor would definitely disagree with me. More power ho ho ho!!
 
Last edited:

jtech1

Member
Messages
43
Reaction score
1
Points
8
Location
New Jersey
Thanks, everyone! My unit is on the way... in the mean time, I have seen some of the HTP videos about gas pressure and combustion testing...
1) Their videos show a Testo 505 being used to check gas pressure pretty easily. I cant find that unit. Is there a good cheap unit that can do this for me to just check static and pressure drop?
2) Is there a good combustion test port I can put in the exhaust PVC when I install it so any future combustion test can be done easily?
Thanks!
 

Phog

Active Member
Messages
454
Reaction score
84
Points
28
Location
Rochester NY
I don't know about combustion ports, but you can get manual gas pressure dial gauges w/ rubber hookup hose & NPT end fitting for under $50, which will serve your DIY need fine. Electronic instruments such as the Testo line are more for pros who will be using on a daily basis and are quite pricey. You can use one of the manual dial gauges with 0-35 inches w.c. range to get what you're looking for, assuming you have standard gas piping & not one of the newer high pressure 2psi supply systems (uncommon).
 

jtech1

Member
Messages
43
Reaction score
1
Points
8
Location
New Jersey
I received my unit. Now I am on hold with HTP tech support for two issues...
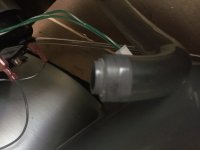
1) Looks like they changed the design in 2017 and there is no longer a condensate neutralizer cartridge... which is OK, I guess, but their literature still said it was there... and my condensate hose in the lower bib, which looks like the fitting was glued to the gray housing, was broken off. It could not have been broken in shipping since they really pack them well in the full crate and wrapping. Nothing was breached. I assume it was not glued properly and sitting in warehouse for a year it came off.
2) My unit says it was manufactured a year ago... I am trying to find out the current revision and release numbers to see if I bought old stock from somewhere.
on hold with HTP tech support now for over 50 minutes... not a great first experience. Otherwise, I really like the look of the unit.
 

jtech1

Member
Messages
43
Reaction score
1
Points
8
Location
New Jersey
Looking for some advice here... as I said above, my unit arrived with the condensate fitting detached. I talked to HTC and decided to try to glue it back on before I go for replacement of unit. They recommended using cpvc cement... but the design is not very solid... and if I use CPVC cement and it comes off again, it may take with it a part of the condensate trap, and the only way to replace that is replace the entire exhaust manifold and tear into the stainless steel skin... not simple and much more than I am going to do on a new unit. The old cement doe snot loop like solvent... the CPVC looks too clean.

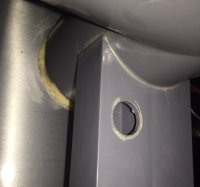
The old condensate neutralizer appears to have connected to the trap box via gasketed stub that went into hole in trap (pictured) (which is part of the exhaust CPVS pipe and not replaceable). It appears when they eliminated the neutralizer box, they simply glued a CPVC fitting into the old hole in the trap box... one end, the clear condensate line slides over with clamp over it... the other end, with about a 1/8" lip only, fits into the hole in the trap box. So the glue surface is only about 1/8" into hole. This seem like a very poor design... given the fact that the rest of the unit appears to be build like a tank! And evidenced by the fact that it fell off during shipping or may be even before, with no damage to the palette or packaging.

Since this is only condensate, and given the fact that I don't want to damage the trap box, could I use silicone to reattach? At least if that fails, I scrape it off and am back to square 1... if cpvc cement fails, down the road, I am looking at a major repair on a NEW unit to replace the entire exhaust CPVC.

Thoughts? Repair or replace... and if repair, with what?
 

Attachments

  • IMG_7343.JPG
    IMG_7343.JPG
    54 KB · Views: 217
  • IMG_7345.JPG
    IMG_7345.JPG
    71.4 KB · Views: 197

Dana

In the trades
Messages
7,889
Reaction score
509
Points
113
Location
01609
I'd be inclined to ask HTP tech support what adhesives to use for gluing it back on. If the can't come up with a recommendation, polyurethane caulk sticks to almost anything, remains fairly flexible, and makes a durable moisture seal.

I would NOT use silicone (unless recommended), which doesn't always adhere well.
 

Phog

Active Member
Messages
454
Reaction score
84
Points
28
Location
Rochester NY
From the picture, it looks suspiciously like ABS cement has been mistakenly used to join CPVC. If so, this would explain why it failed; solvent welded joints should never come apart, they are literally fused. It looks like other nearby seams were also glued using the same glue, and therefore also at risk of future failure. I would consider the whole CPVC manifold suspect and I would be asking for HTP customer service to elevate this issue. At least you deserve an explanation, even if there is a valid reason they used glue instead of solvent welding (servicability?).
 

jtech1

Member
Messages
43
Reaction score
1
Points
8
Location
New Jersey
They indicated I should glue it back on with CPVC primer and CPVC solvent cement. But, I agree, that it does not look like a primer was used in the pictures... and it could be yellow ABS cement. But Oatey makes a 1-step CPVC cement in yellow also.

Anyone else here have a HTC/Westinghouse unit like this that can tell me what their exhaust glue joints look like?
 

jtech1

Member
Messages
43
Reaction score
1
Points
8
Location
New Jersey
The unit stubs for inlet air and exhaust are CPVC. When connecting that to the PVC runs to exterior, can I just use purple primer and CPVC cement or do I need to use all purpose cement for that one joint?
 

jtech1

Member
Messages
43
Reaction score
1
Points
8
Location
New Jersey
I am finishing the installation of my Phoenix unit. I have question about the vent connections to the unit. I see a lot of pictures online (and on these forums) where people have used fernco connectors to connect the intake and exhaust to the unit cpvc stubs. I would like to do it that way, but I don't see anything in the manual that says this is ok. Are they special ferco fittings or just regular plumbing ferncos? Thanks!
 
Top
Hey, wait a minute.

This is awkward, but...

It looks like you're using an ad blocker. We get it, but (1) terrylove.com can't live without ads, and (2) ad blockers can cause issues with videos and comments. If you'd like to support the site, please allow ads.

If any particular ad is your REASON for blocking ads, please let us know. We might be able to do something about it. Thanks.
I've Disabled AdBlock    No Thanks