You are using an out of date browser. It may not display this or other websites correctly.
You should upgrade or use an alternative browser.
You should upgrade or use an alternative browser.
OK Kids... How does this look. My First DWV System
- Thread starter Nelsonba
- Start date
Users who are viewing this thread
Total: 2 (members: 0, guests: 2)
Sponsor
Paid Advertisement
Once you get past the small learning curve for the software it goes pretty fast. The tutorials are really helpful. I probably spent between 5-10 hours on what I did, but that includes resizing the fittings, and trying to figure out the best way to do everything.
You can import dxf files with the free version now.
I'll upload the drawing when I get a chance.
You can import dxf files with the free version now.
I'll upload the drawing when I get a chance.
Here is the link to the model
I've also color coded the pipe sizes.
Green = 1 1/2"
Red = 2"
Blue = 3"
White = 4"
http://sketchup.google.com/3dwarehouse/details?mid=957d1730f4a5688a4dd5f2f581108097
I've also color coded the pipe sizes.
Green = 1 1/2"
Red = 2"
Blue = 3"
White = 4"
http://sketchup.google.com/3dwarehouse/details?mid=957d1730f4a5688a4dd5f2f581108097
Once you get past the small learning curve for the software it goes pretty fast. The tutorials are really helpful. I probably spent between 5-10 hours on what I did, but that includes resizing the fittings, and trying to figure out the best way to do everything.
You can import dxf files with the free version now.
I'll upload the drawing when I get a chance.
How do you import the symbols into the program?
Dunbar Plumbing
Master Plumber
I probably spent between 5-10 hours on what I did.
If that took you 5-10 hours and you're really good at it, the average user is never going to match that time...maybe double it (like me)
That's what I was afraid of; time involvement which kills the idea completely. It almost needs to be a setup where you do a rough drawing on paper, scan it and the software copies the design THEN puts it into motion.
I don't feel so bad now...that I couldn't do that. I can do isometric drawings real good!
That is why I asked.
zhomes
New Member
- Messages
- 25
- Reaction score
- 0
- Points
- 0
nelsonba,
I was trying to use your bathroom as a basis for mine.. is there an easy way to rotate the fittings? when I rotate I the object ends up moving so I have to keep repositioning to see if I rotated it right.
is there a good way to rotate? is there a way to keep it rotating only along the axis? I checked the manual but couldnt seem to find anything there that I didnt try
meecect
New Member
- Messages
- 10
- Reaction score
- 0
- Points
- 0
misc.
A few notes:
1. Although there may be a learning curve, I highly recommend you learn this program (sketchup). Even if you decide to hand draft your plumbing diagrams, you will be amazed at how handy an easy 3d modeler is to have around.
2. If you get the pipes from the charlotte web site listed earlier, I don't think you actually need to resize them. I thought so at first too, as when i import them, they were massive. But then I noticed on the import dialog there is an advanced button to choose the units of measurent. It defaulted to fett, so changing it to inches seemed to work fine for me.
3. My project is cast iron, so I stated with a sketchup model and imported all the fittings from the charlotte pipe website, that way I can just cut n paste them into my actual drawings
4. An easy way to rotate is to select the item, which will give you a bounding box. then select the move tool ( I know, dum ) when you hover around the object you should see 4 red crosshairs on each face. Select one of those. the tool switch to a protractor ( like to rotate tool ) but the protractor is on the _bounding box face_ ,which makes it really easy to rotate 'in place' and in predictable increments around the three principles axis.
Would anyone be interested in me uploading my 'cast iron collection'?
Attachments
Google SketchUp smoothing
You can place your drawing on Google Earth and look at other drawings as well.
If you want to get rid of the 'wire framing' on the wyes and fittings: go to drop down menu -[window] [soften edges] pick 35º and check 'soften coplanars' If you exploded the group, regroup the item. Also change the color slightly to make them stand out.
SketchUp is free which is a lot cheaper then AutoCAD. Libraries are also free. Some companies have converted their AutoCAD drawings of their products to SketchUp; toilets, sinks, doors, windows, pipes fittings, furniture.
The learning curve is much, much faster then AutoCAD--not as powerful, but quicker.
My SketchUps are messy compared to yours.
In the time it takes to draw all that on the computer I could have done a, by hand isometric, had it apporved, installed it and be sitting at home with a beer in my hand. Besides which, after taking all that time, when you finally get to installing you have to change everything around because the framing is off or it's one thing or another. Looks good, but in the end has just about zero value in the real world.
hj
Master Plumber
- Messages
- 33,603
- Reaction score
- 1,042
- Points
- 113
- Location
- Cave Creek, Arizona
- Website
- www.terrylove.com
fitting
How many recognize and know the number of that Stringer fitting the toilet goes into, and also the numbers for the back to back, and topmost toilet variations of them, (which had no "vent" hub but the offset remained so the toilets would all line up properly, 4 3/4" off center from the vertical stack, one above the other).
How many recognize and know the number of that Stringer fitting the toilet goes into, and also the numbers for the back to back, and topmost toilet variations of them, (which had no "vent" hub but the offset remained so the toilets would all line up properly, 4 3/4" off center from the vertical stack, one above the other).
Frenchie
Jack of all trades
In the time it takes to draw all that on the computer I could have done a, by hand isometric, had it apporved, installed it and be sitting at home with a beer in my hand.
Never tried it, have you?
Frenchie
Jack of all trades
If you can use the internet, you can use sketchup.
Seriously. Very intuitive design, and lots of good free tutorials. At this point, I usually reach for SU, before reaching for pen & paper.
Try it... you'll like it.
Seriously. Very intuitive design, and lots of good free tutorials. At this point, I usually reach for SU, before reaching for pen & paper.
Try it... you'll like it.
Doherty Plumbing
Journeyman & Gas Fitter
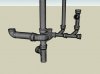
I asked my inspector if I could wet vent the shower through the sink drain and he said that it was ok. (Shower trap is within 5' of sink drain and I'm using 2" pipe for the shower drain. Sink drain and vent would be 1 1/2".
1) If I'm not mistaken, I could just remove the shower vent on the left in this picture altogether correct?
2) Can I tilt the combo fitting 45 degrees towards the wall and use a 45 degree street elbow if I need to? I may have a joist to contend with.
Thanks
This is correct.
Similar threads
- Replies
- 1
- Views
- 188
- Replies
- 3
- Views
- 262
- Replies
- 5
- Views
- 254
- Replies
- 3
- Views
- 469