Oatey No Caulk Brass Shower Drain

Users who are viewing this thread

DJL

New Member
Messages
29
Reaction score
1
Points
3
Location
Ames, Iowa
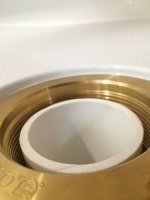
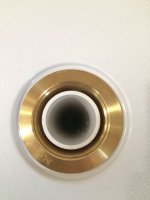
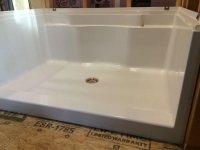
I am installing a Sterling Accord shower in my basement and will be using an Oatey no caulk brass shower drain. This is my first shower install, so I'm trying to figure at what height to cut the 2" PVC drain pipe. I will be putting mortar piles under the shower base (as described in one of Terry's posts) so I'm thinking of leaving the the PVC pipe a little high and then squishing the base down until the top of the PVC pipe is about at the correct height in relation to the brass drain body.

My question is how exact do I need to get the height of the PVC drain pipe? When it's all said and done, does the bottom of the rubber compression gasket need to be seated/touching the bottom shelf/flange of the drain body? I'm not sure if I'm making sense here, so I'll ask another way: will the compression nut push the rubber gasket further down the PVC pipe until it seats on the bottom of the brass drain body -or- will the rubber gasket compress around the PVC pipe and stay in place by friction? Any advice is appreciated.
 

Terry

The Plumbing Wizard
Staff member
Messages
29,942
Reaction score
3,459
Points
113
Location
Bothell, Washington
Website
terrylove.com
The rubber compression ring is squeezed around the pipe tightly. Don't forget to put a rag or something down in the drain to prevent the tool from falling into it while tightening the compression ring.
The 2" can even be a little higher than the compression ring.
The mortar shouldn't be lifting up the pan. It's mainly if you have an out of level floor. It does make it more solid though.
 

DJL

New Member
Messages
29
Reaction score
1
Points
3
Location
Ames, Iowa
The mortar shouldn't be lifting up the pan. It's mainly if you have an out of level floor. It does make it more solid though.

Thanks Terry! That answers my question. And thanks for the comment on the mortar not lifting up the pan as I was considering doing exactly that to make the drain be at the right height in relation to the PVC pipe. I will push the pan down to the floor, making sure it is level.

Just two more quick questions -- do I need thread lock on either the locking nut under the shower or the caulking nut on top? And if I use silicone under the drain body flange is it possible to ever remove this drain if I should need to in the future?
 

Terry

The Plumbing Wizard
Staff member
Messages
29,942
Reaction score
3,459
Points
113
Location
Bothell, Washington
Website
terrylove.com
No thread lock on the nuts.
Silicone is rather permanent. The reason most drains are replaced is leaking. I don't think it will leak with Silicone.
 

DJL

New Member
Messages
29
Reaction score
1
Points
3
Location
Ames, Iowa
Thank you, Terry. This site is a really great resource! Thank you to you and everyone else on here who helps provide it!

-David
 

Cacher_Chick

Test, Don't Guess!
Messages
5,458
Reaction score
213
Points
63
Location
Land of Cheese
Before mixing any mortar, set the shower pan in place with the drain body installed sso you can mark how much to cut off the top of the riser. This also provides you with the opportunity to make sure the trap is adjusted properly so that the riser is perfectly centered to the drain body.
 

DJL

New Member
Messages
29
Reaction score
1
Points
3
Location
Ames, Iowa
Hi cacher_chick....this is a basement bath, so I hope I got the trap adjusted and riser centered properly when I did them about a year ago. It wouldn't be very easy to adjust them now. :)

I'm taking this install slowly as I don't want to screw anything up too badly. I siliconed the drain body on yesterday and dry-fit the shower base. It seems to be well centered.

28086-7769a0460084b0f812a62dfeb8e79608.jpg
28085-0d9792581789ea8d26ae460689715474.jpg

The part I've been concerned with is getting the riser height correct and doing this mortar bed/piles under the pan correctly. An old thread on these forums had a guy who said he didn't account for the thickness of the mortar bed when he cut his riser and his riser ended up about a 1/4" too short....so that got me thinking that I didn't want to have that problem. I think Terry's comment about mortar not "lifting up the pan" really helped, though. I'll just make sure the pan squishes all the way to the floor.

I guess if I put too much mortar and the pan won't squish to the floor, I'll pull it up and remove some mortar and do it again until it goes go to the floor.


Attachments

  • IMG_7512.jpg
    IMG_7512.jpg
    29.5 KB · Views: 1,365
  • IMG_7513.jpg
    IMG_7513.jpg
    24.2 KB · Views: 2,076
  • IMG_7514.jpg
    IMG_7514.jpg
    28.2 KB · Views: 1,223

Cacher_Chick

Test, Don't Guess!
Messages
5,458
Reaction score
213
Points
63
Location
Land of Cheese
Your mortar should be just 8-12 piles, not a slab. Set your pan and shim the "feet" if needed to level it first. A dab of construction adhesive to hold the shims in place on the floor prevents them from moving when you set your piles of mortar later.

Mix your mortar stiff to keep shrinkage minimal as it sets. If you have an extra pair of hands, they can help to set the pan straight down into the mortar. Squish the pan straight down until it is on it's solid on it's feet and walk away until the mortar sets.
 

DJL

New Member
Messages
29
Reaction score
1
Points
3
Location
Ames, Iowa
I set the shower base in mortar as discussed above, hooked up the no caulk drain and tightened the compression nut down on the drain so I could do a simple leak test while the mortar set up. I then waited 24 hours. The good news: the drain doesn't appear to have any leaks and the shower floor feels nice and solid. The bad news: I noticed a bulge near the front of the shower floor.

I guess the first question is what in the heck did I do wrong? There's no mortar underneath the shower at that point. I can reach my hand under there and feel the curve of the bulge and there's no mortar there. See my attached picture of the mortar piles.

Second question - is there any suggestions on how to fix? Would a heat gun and some pressure help these bulges pop back into place? Any ideas at all? Has anyone seen this before? The bulge seems to run most of the length of the threshold but is somewhat flatter in the middle.

IMG_7550.JPG
 

Attachments

  • IMG_7525.JPG
    IMG_7525.JPG
    118.1 KB · Views: 1,056

Cacher_Chick

Test, Don't Guess!
Messages
5,458
Reaction score
213
Points
63
Location
Land of Cheese
Looks to me like a problem that happened during manufacturing, and you just didn't notice it before. You are not too far in to call customer service and see if you can get them to send you a replacement shower pan.
 

Trainmaster

New Member
Messages
3
Reaction score
0
Points
1
Location
Jamaica, NY
That receptor doesn't say "Made in China" on it, does it? That would explain the bulge. No matter how well you do the job, Chinese materials and tools will always mess you up.
 

Trainmaster

New Member
Messages
3
Reaction score
0
Points
1
Location
Jamaica, NY
Looks like a Chinese-made shower receptor. No matter how careful you are or how well you do a job, using Chinese products or tools will always, always come back to mess up your work.

Had a "better" New York job last week and the architect specified a "Fleurco" receptor and surround, known for reliable quality US and Canadian stuff. It arrived on the site with "CHINA" stickers on it. It had an insert that said, basically to check that the base isn't warped and if it is to call them right away.

We had a little meeting and back it went... Everyone understood that paying $2,800 for and installing a Chinese product would not go well.

By the way, it looks like you did a nice job. Around here, we bed these and tubs in Structo-lite, which sets up quickly and doesn't shrink. But we also use plaster around our toilets.
 
Last edited:

Cacher_Chick

Test, Don't Guess!
Messages
5,458
Reaction score
213
Points
63
Location
Land of Cheese
Looks like a Chinese-made shower receptor. No matter how careful you are or how well you do a job, using Chinese products or tools will always, always come back to mess up your work.

Had a "better" New York job last week and the architect specified a "Fleurco" receptor and surround, known for reliable quality US and Canadian stuff. It arrived on the site with "CHINA" stickers on it. It had an insert that said, basically to check that the base isn't warped and if it is to call them right away.

We had a little meeting and back it went... Everyone understood that paying $2,800 for and installing a Chinese product would not go well.

By the way, it looks like you did a nice job. Around here, we bed these and tubs in Structo-lite, which sets up quickly and doesn't shrink. But we also use plaster around our toilets.
You are replying to a post from 2 years ago. Nothing to see here...
 
Top
Hey, wait a minute.

This is awkward, but...

It looks like you're using an ad blocker. We get it, but (1) terrylove.com can't live without ads, and (2) ad blockers can cause issues with videos and comments. If you'd like to support the site, please allow ads.

If any particular ad is your REASON for blocking ads, please let us know. We might be able to do something about it. Thanks.
I've Disabled AdBlock    No Thanks