CaptainMorgan
New Member
I have two Nibco 62/762 sill cocks on my house that are leaking. The house was built in the 70s and these are probably all original. I want to get the innards out to replace the seals.
I have tried removing the innards to replace the washers to no avail. Nothing is coming out.
According to the plate attached to one of them I should only need to "1. Unscrew bonnet" and "2. Pull out assembly".
Yeah, not budging. I'm afraid to yank on it any harder and break something. I've even used a little leverage with no effect.
I've tried with the valve open, closed and half open with no difference.
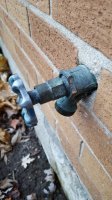
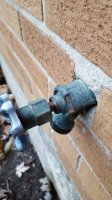
I've attached two cell phone pics of the sill cock. The thread where the bonnet crews on is cast into the body and not removable.
The only thing I have been able to find on the net is an identification guide on Nibco's site. It is located 3/4 of the way down the page and listed as "Historical Sillcock Identification".
http://www.nibco.com/Resources/Technical-Bulletins/
All it shows is a drawing, some washer sizes (nice) and if you replace the whole thing use a "Nibco Figure 95C half-turn sillcock". Nothing more on disassembly.
So how do I get this 'sucker' apart? Do I just need to yank harder? Any tricks? One of them is not attached to the brick anymore so pulling harder is not much of an option (without a second pair of hands anyway).
Thanks in advance!
I have tried removing the innards to replace the washers to no avail. Nothing is coming out.
According to the plate attached to one of them I should only need to "1. Unscrew bonnet" and "2. Pull out assembly".
Yeah, not budging. I'm afraid to yank on it any harder and break something. I've even used a little leverage with no effect.
I've tried with the valve open, closed and half open with no difference.
I've attached two cell phone pics of the sill cock. The thread where the bonnet crews on is cast into the body and not removable.
The only thing I have been able to find on the net is an identification guide on Nibco's site. It is located 3/4 of the way down the page and listed as "Historical Sillcock Identification".
http://www.nibco.com/Resources/Technical-Bulletins/
All it shows is a drawing, some washer sizes (nice) and if you replace the whole thing use a "Nibco Figure 95C half-turn sillcock". Nothing more on disassembly.
So how do I get this 'sucker' apart? Do I just need to yank harder? Any tricks? One of them is not attached to the brick anymore so pulling harder is not much of an option (without a second pair of hands anyway).
Thanks in advance!