New sink not perfectly aligned with drain

Users who are viewing this thread

DanW

New Member
Messages
7
Reaction score
0
Points
1
Location
Lexington, Massachusetts
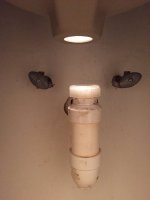
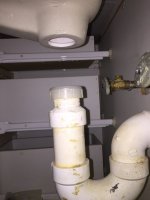
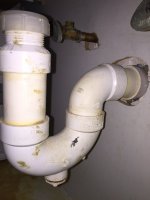
Hi, I'm just wondering if the attached picture of the alignment is fine. I'm sure I can get the tail pipe on the new sink into the existing drain pipe, but the alignment is slightly off. There will be a little tension on the tail pipe. Total newb so maybe this is obvious. But is this ok?
 

Attachments

  • image.jpeg
    image.jpeg
    25.1 KB · Views: 749

Reach4

Well-Known Member
Messages
38,892
Reaction score
4,434
Points
113
Location
IL
Not fine as is. How about a photo of the bottom area.
 

DanW

New Member
Messages
7
Reaction score
0
Points
1
Location
Lexington, Massachusetts
The photo from above shows the amount of offset. The tail pipe is not installed in the sink. It is just the hole looking down at the drain pipe below from directly above. You can see the plastic compression nut of the drain pipe. That's how little it is off. I'll take a pic from underneath. I assume you want to see how the tail pipe aligns (or misaligns) with the drain pipe?

I'll get a couple more pics. It's all PVC...I was hoping there'd be a way to make a slight adjustment without cutting it off and redoing.
 
Last edited:

Reach4

Well-Known Member
Messages
38,892
Reaction score
4,434
Points
113
Location
IL
I assume you want to see how the tail pipe aligns (or misaligns) with the drain pipe?
They want to see the area that includes the connection to the wall, the P-trap, and the bottom of the sink.
 
Messages
705
Reaction score
48
Points
28
Location
Montreal, Canada
It's all PVC...I was hoping there'd be a way to make a slight adjustment without cutting it off and redoing.
Think realistically what your choices are:

1. Move the sink.
2. Get an acetylene torch, cut out the sink hole, re-weld it accordingly (this is actually how you fix obscure engine mounting holes in cars).
3. Cut the soft PVC and re-do it.

Note: One of these three is easier than the rest.
 

DanW

New Member
Messages
7
Reaction score
0
Points
1
Location
Lexington, Massachusetts
Two sounds like the easiest!

I'm not really averse to redoing the pvc. My only issue is how to cut it. The p trap is close to the wall and in terms of alignment with sink hole front to back its fine.

First pic is left to right. Second pic is front to back. Third pic is the whole thing.
 

Attachments

  • image.jpeg
    image.jpeg
    45.4 KB · Views: 677
  • image.jpeg
    image.jpeg
    48.7 KB · Views: 705
  • image.jpeg
    image.jpeg
    50.6 KB · Views: 641

Jadnashua

Retired Defense Industry Engineer xxx
Messages
32,770
Reaction score
1,190
Points
113
Location
New England
WHile a glued up trap has some advantages, the tubular stuff works quite well, too, and would give you easy adjustability after the fact. On a glue-up, it has to be done right the first time and likely won't work should you need to replace something later. Plus a glued-up p-trap makes it nearly impossible to retrieve something that might have gone down the drain without starting over...the tubular stuff is easy.
 

Smooky

In the Trades
Messages
2,299
Reaction score
152
Points
63
Location
North Carolina
You need to cut the PVC pipe about 1 inch away from the wall and glue on a trap adapter. Then install an adjustable plastic p-trap like in Terry’s photo. You can adjust it so it lines up a lot easier that the PVC trap you have now. That type of trap might be used on a bath tub drain but not on a sink by somebody that knows what they are doing.
 
Last edited:

DanW

New Member
Messages
7
Reaction score
0
Points
1
Location
Lexington, Massachusetts
Normally we start with a new p-trap anyway. I never reuse an old trap.

p-trap_with_adapter.jpg
Oh now you're talking! I'd cut the whole damn glued up thing off at the first elbow. Put that puppy on the straight pipe that's left, cut accordingly. Rotate to the right position and tighten it up.
 

DanW

New Member
Messages
7
Reaction score
0
Points
1
Location
Lexington, Massachusetts
You need to cut the PVC pipe about 1 inch away from the wall and glue on a trap adapter. Then install an adjustable plastic p-trap like in Terry’s photo. You can adjust it so it lines up a lot easier that the PVC trap you have now. That type of trap might be used on a bath tub drain but not very often by somebody that knows what they are doing.
Thanks I should have known better than to look at what those bozo builders did, thinking that was the way it should be done. I'm off to lowes.
 
Messages
705
Reaction score
48
Points
28
Location
Montreal, Canada
Just in case you couldn't figure out what Terry wanted to tell you, this is what you do:

You cut off the entire trap and elbow, preserving as much horizontal 1.5" on the wall as possible.

You get a Pvc version of the black parts in Terry's pic, and purple glue that to the nub you just exposed.

The rest is all handtight parts. No more glue needed.

You need to select a trap that is 100% hand tight with no glue. Exactly as you see in Terry's pic, the elbow on traps should NOT be glued, and that is the cause of your problem from the start.

Enjoy!
 
Top
Hey, wait a minute.

This is awkward, but...

It looks like you're using an ad blocker. We get it, but (1) terrylove.com can't live without ads, and (2) ad blockers can cause issues with videos and comments. If you'd like to support the site, please allow ads.

If any particular ad is your REASON for blocking ads, please let us know. We might be able to do something about it. Thanks.
I've Disabled AdBlock    No Thanks