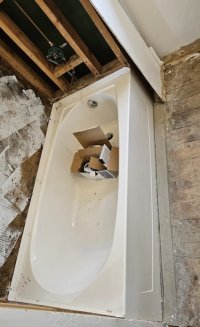
Is this a Sterling Performa tub mfg defect?

NameTaken2

New Member
Messages
21
Reaction score
1
Points
3
Location
New York
Plumber installed this Sterling Performa tub -said they normally don't install tubs, just make the connections.
Major concerns about the tub casting and the install as follows:

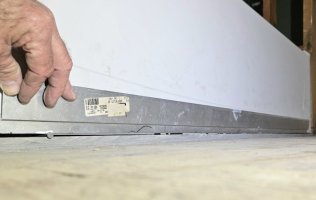
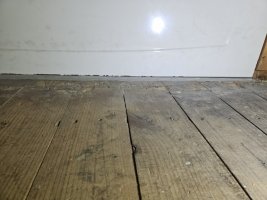
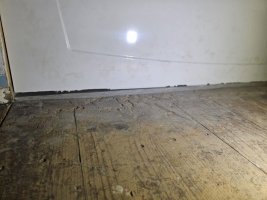
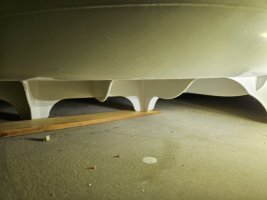
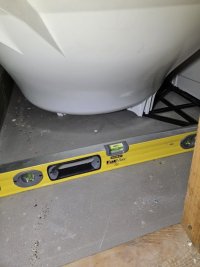
1. Bottom edge appears to be a mfg defect -sits proud in the middle, and not a true edge -see 3 related pics. In one pic, the straightedge sits on 2 nails stuck in gaps on either end to show how far out of whack the edge is.
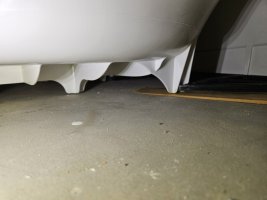
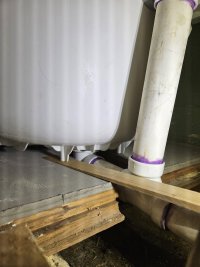
2. Appears that the edge not finished to proper height: tub sits high on front edge and feet along outside edge don't contact the floor -see 5 related pics.
Regarding legs -on either end they can be accessed to shim, but shimming the middle legs (likely highest stress area) would be a trick.
3. Instructions direct that tub be set in a 1-2" mortar bed. There's no mortar bed.
4. Instructions direct metal support clips be installed at each corner. There are 3 along the back, and 4th clip uninstalled -see pic.
5. Instructions direct that plastic attachment clips be installed. None installed.
6. Not familiar w/Vikrell, though apparently it's been around awhile. Aware that proper support/mortar is VIP to avoid acrylic tub cracks -apparently Vikrell is more crack resistant -enough so that mortar/leg support is not as critical?

Appreciate any responses regarding-
Correct that this tub is defective? Should the installer be asked to replace it?
What is your perspective on the mortar and clip concerns?
Thanks for your time!
 

Attachments

  • 20251116_194904.jpg
    20251116_194904.jpg
    46.5 KB · Views: 79
  • 20251116_193207.jpg
    20251116_193207.jpg
    75.5 KB · Views: 78
  • 20251116_193222.jpg
    20251116_193222.jpg
    78.8 KB · Views: 85
  • 20251114_184725.jpg
    20251114_184725.jpg
    53.7 KB · Views: 77
  • 20251114_184800.jpg
    20251114_184800.jpg
    55 KB · Views: 72
  • 20251114_185846.jpg
    20251114_185846.jpg
    66.2 KB · Views: 75
  • 20251115_105711.jpg
    20251115_105711.jpg
    68.1 KB · Views: 67
  • 20251116_195813.jpg
    20251116_195813.jpg
    73.8 KB · Views: 77
  • 20251114_130546.jpg
    20251114_130546.jpg
    75.2 KB · Views: 80
No Nothing wrong with it . coulda took a grinder to bottom edge but whats the problem ? definately not a defective tub
I set mortar underneath regardless of manufacture instructions well not every time because it is extra work but i prefer it .
definately is a differance between perfect world , perfect job and typical work or good enough. techniocally it dosent meet manufacture instructions , often i install a ledger board under the long wall as well but not so much on acrylic , fiberglas vikerel whatever you want to call it , installed dozens have had hundreds of figerglas set by manufacture crews and those guys do thier own thing but generally set them pretty solid .
I have had to or felt i needed to beef up the installation and cut blocks of wood on a taper and and slid them under tub to make a tight fit to avoid resetting tub pushed mortar under neath etc .
discuss the matter with your contractor / trademan
 
Jeff, thanks for your reply -I appreciate your expertise.

I do intend to discuss with the installer -came here for expert opinions before doing that.
Therefore request clarification, if you don't mind-
The tub sits on the middle of the bottom edge: pics show the left side 1/2" proud of the floor. Does "Nothing wrong with it" mean you normally/frequently see the bottom edge that far off?
Do you just scribe a line and grind it?
How do you know where to scribe the line, to ensure the edge sits true AND the legs contact the floor?

How much experience do you have installing Vikrell vs acrylic/fiberglass tubs?

Regarding your mortar comments-
Concern is long-term durability. With no mortar and the legs not contacting the floor along the outside edge, am I right that there's a greater (unacceptable) probability that cracks develop over time?

Do you agree:
Entire edge should contact the floor -whether the mfr should deliver that way or installer has to modify the edge.
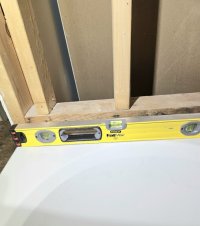
Instructions should have been followed to verify tub level.
Instructions should have been followed to install 4 metal clips as directed.
Instructions should have been followed to verify all legs in contact with the floor.

For any "no" replies, what do you consider acceptable?

THANKS
 
Anyone? Anyone?

Follow-up Q:
Installation instruction first option: A felt pad, if included, can be stapled to the floor then legs shimmed. If no felt, then mortar.

What magic is provided by a felt pad -does it help wedge shims?
Appreciate perspective from anyone who has done felt/shim installs.
How do you shim the middle legs -use a push stick to reach/slide shims in?
And if OK to shim the legs as a first option, apparently shims are considered as good or better than mortar?

Understanding that instructions are generic, is that the answer?
ie: More robust Sterling tubs have felt included -they are strong enough to forego mortar(?)
 
I am not a plumber and do not have 2% of the knowledge of other folks on here. I have installed 2 tubs in my own house, but not that brand. I would not be happy with that install. The instructions regarding mortar, attaching it to the wall, etc should be respected, if you want the manufacturer to honour your warranty. If the tub is not level (I don’t think yours is close), you may have trouble installing the walls, especially if using pre-fabbed walls. The tubs I installed only had 2 legs both of which needed to be supported. I would think all of your legs should be supported, but would suggest reaching out to the manufacturer regarding specific installation instructions for that model. Also, the bottom edge of the apron sure looks like a defect or jobs site damage to me, but that is not a brand I have used.
 
Weekend Handyman, thanks for your reply-
Good point regarding the surround could be a challenge if the tub is not leveled.
I did contact the mfr since posting -interesting conversation.
Noted that <12" of the apron is in contact with the floor at the center, and the wide gaps esp on left side.
Their response was that the apron is "not intended to be load bearing, but should not have been installed if the flooring can't cover the gaps". They didn't support my perspective that the apron edge, which also sits proud/raises the tub to prevent the outside row of legs contacting the floor, is defective.
Pushed back on "not load bearing": people sometimes sit on the edge of their tub, and suspect the edge is normally stood on by many installers when caulking the surround. Regardless, they stood by "not load bearing"!

I'm helping a relative with all this -doing the research/providing info -in the middle between them and installer.
Current perspective/plan -for anyone's feedback:

Spray foam appears reasonably acceptable as an EZ Button solution -many online noted using foam successfully. Obviously has flex vs mortar and there are "anti" comments, but many use it.
IDK tub warranty, but realize foam will void it if cracks ever develop: acceptable risk.
IMO, big advantage w/foam: can apply w/tub set/level, vs mortar that requires "beat the clock" setting/leveling as mortar cures.
3 clips along the back need to be reset to 3 corners, and add 4th clip. Notify installer that their support req'd to move tub to get 1 clip out, and clips at all 4 corners as directed by instructions and confirmed by mfr. telcon. Clips need to be in position but NOT screwed in until tub leveled.
Rest of proposed plan:
1. Since mfr. said apron is NOT load bearing, scribe a line. Support apron on either end w/shims, then cut w/oscillating tool. Goals: get front legs in contact w/floor, get more of apron in contact w/floor, and minimize gap between apron/floor to be hopefully small enough that a silicone bead can be run under it for support.
2. Use plastic shims as req'd to get all legs in contact w/floor AND tub level -best starting point before adding foam. Insurance for foam support.
3. With tub level and all feet shimmed/contacting floor, screw the 4 clips into the wall.
4. Weigh down tub with a couple 5gal buckets of water as precaution to ensure foam does not move it.
5. Spray Window/Door Foam (minimized expansion) from each end in layers. Attach 1/8" ID tubing cut 18" long and taped to approx 12ga wire to keep tubing straight.
6. Allow min 12hr to set, then install surround.
 
Back
Top