Is it possible to repair this Nibco shut-off valve?

Users who are viewing this thread

JasonM

Member
Messages
100
Reaction score
3
Points
18
Location
California
I the following Nibco shutoff valve and is 20 years old.

20150222_195730.jpg 20150222_195639.jpg

It has the 2 problems. It does not shut off water completely and is leaking at the stem when turning.
Is it possible to repair this in place or do I have to replace this?
By the way, what type of valve is this? Angle, gate, or globe?

Thank you very much.
 

Terry

The Plumbing Wizard
Staff member
Messages
29,942
Reaction score
3,459
Points
113
Location
Bothell, Washington
Website
terrylove.com
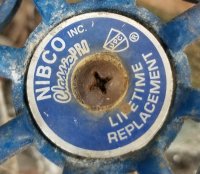
There is a label on the handle. What does it say there?

I think you have a new valve in your future. I'm guessing it's threaded.
 

Jeff H Young

In the Trades
Messages
8,893
Reaction score
2,221
Points
113
Location
92346
My fix would almost surely be cut out and replace. but if it was galvanized and I was already there on something else its possible I could purchase an Identical valve and exchange parts but not really worth my time or customers money . But I have successfully repaired that way . not real cost effective usually but if you can get it apart easily and find identical replacement it might be worth while
 

JasonM

Member
Messages
100
Reaction score
3
Points
18
Location
California
There is a label on the handle. What does it say there?

I think you have a new valve in your future. I'm guessing it's threaded.
Thank you Terry very much for the reply.

Are you referring to the letters below in the photo when you say a label on the handle? This is the only letters that I can see on the handle.
20201207_133704a.jpg

Thank you very much.
 

JasonM

Member
Messages
100
Reaction score
3
Points
18
Location
California
My fix would almost surely be cut out and replace. but if it was galvanized and I was already there on something else its possible I could purchase an Identical valve and exchange parts but not really worth my time or customers money . But I have successfully repaired that way . not real cost effective usually but if you can get it apart easily and find identical replacement it might be worth while
Thank you Jeff H Young very much for the reply.
I do not know yet how to cut it out and solder a new one into the copper pipe. So I would like to repair this in place if possible.

Thank you very much.
 

Jadnashua

Retired Defense Industry Engineer xxx
Messages
32,770
Reaction score
1,190
Points
113
Location
New England
The leak around the stem might just take tightening the packing nut slightly. The fact it doesn't shut off might be simply replacing a washer if it isn't a gate valve. If the valve seat is no longer flat, you might be able to replace it, if it's replaceable, or to cut it down slightly so it is now smooth again. A ball valve is a nicer shutoff.
 

DIYorBust

Active Member
Messages
749
Reaction score
94
Points
28
Location
Long Island, New York
I had a valve that looked just like this, a nibco. It leaked from the packing nut, and didn't close completely. The valve was copper sweat, and I needed to be able to isolate the line to do some work on a bathroom downstream. I considered re-packing and rebuilding the valve, but it was seemed easier to just cut it out and sweat in a ball valve where it was. If you don't have the skills or tools to sweat in a new valve, you could replace the valve with a compression type valve.

If you want to rebuild the valve, unscrew the packing nut and the bonnet nut and remove the stem. Examine the seat washer at the end of the and identify a replacement from your supplies, or purchase a the correct washer. You can buy a kit of washers online for not too much, or you can find the exact washer at a hardware store or big box.

For the packing, remove the packing washer under the packing nut, and then you have two choices. Identify a replacement packing washer, or use teflon valve packing. Make sure the packing you use is appropriate for potable water, unless this is area is seperated from the potable supply as required by the codes. PTFE packing usually is. Before you do this though, you could try just tightening the packing nut, as that usually buys you a few years unless the washer is really worn out.

Removing the stem may be difficult. Select a well fitting wrench that will not round off the bonnet nut easily, and expect you will need a lot of torque to break it loose. While I have rebuilt many valves, it's usually when it's a situation where it would be difficult to replace the valve, such as an original valve on 1920s threaded brass plumbing. Sometimes it works sometimes it doesn't. If it turns out the stem is broken, you need a plan to get the water back on.

Edit: Looking at Jadnashua's response, he is right, if it is a gate valve you cannot rebuild unless you have a new stem from an identical valve, and you can get the old stem completely out and the problem is with the stem. I also had one of these nibco gate valves I recently cut out, so that could be the case. When you're replacing it with a new valve it doesn't really matter.
 
Last edited:

Jeff H Young

In the Trades
Messages
8,893
Reaction score
2,221
Points
113
Location
92346
Its outdoors you could join pipe by compression fitting or Sharkbite. If you can't solder.
 

JasonM

Member
Messages
100
Reaction score
3
Points
18
Location
California
I found the part in my garage that seems to be for this shut-off valve. I forgot about the fact I requested the part to the manufacturer a long time ago when it leaked and did not shut off completely. Will I be able to unscrew that stem nut without much difficulty or breaking it? There are lots of mineral deposit. I cleaned it with CLR a little bit.
20201208_123532.jpg 20201208_123616.jpg 20201208_123351.jpg

The leak around the stem might just take tightening the packing nut slightly. The fact it doesn't shut off might be simply replacing a washer if it isn't a gate valve. If the valve seat is no longer flat, you might be able to replace it, if it's replaceable, or to cut it down slightly so it is now smooth again. A ball valve is a nicer shutoff.
Thank you jadnashua very much for the reply.
I tightened a little the packing nut, and the leak stopped, but if I turn the handle, I think it will leak again. I think it may be a globe valve, as the photo shows above. If the valve seat is no longer flat, then do I have to replace the whole shut-off valve even if I have a new part of the stem and handle?

I had a valve that looked just like this, a nibco. It leaked from the packing nut, and didn't close completely. The valve was copper sweat, and I needed to be able to isolate the line to do some work on a bathroom downstream. I considered re-packing and rebuilding the valve, but it was seemed easier to just cut it out and sweat in a ball valve where it was. If you don't have the skills or tools to sweat in a new valve, you could replace the valve with a compression type valve.

If you want to rebuild the valve, unscrew the packing nut and the bonnet nut and remove the stem. Examine the seat washer at the end of the and identify a replacement from your supplies, or purchase a the correct washer. You can buy a kit of washers online for not too much, or you can find the exact washer at a hardware store or big box.

For the packing, remove the packing washer under the packing nut, and then you have two choices. Identify a replacement packing washer, or use teflon valve packing. Make sure the packing you use is appropriate for potable water, unless this is area is seperated from the potable supply as required by the codes. PTFE packing usually is. Before you do this though, you could try just tightening the packing nut, as that usually buys you a few years unless the washer is really worn out.

Removing the stem may be difficult. Select a well fitting wrench that will not round off the bonnet nut easily, and expect you will need a lot of torque to break it loose. While I have rebuilt many valves, it's usually when it's a situation where it would be difficult to replace the valve, such as an original valve on 1920s threaded brass plumbing. Sometimes it works sometimes it doesn't. If it turns out the stem is broken, you need a plan to get the water back on.

Edit: Looking at Jadnashua's response, he is right, if it is a gate valve you cannot rebuild unless you have a new stem from an identical valve, and you can get the old stem completely out and the problem is with the stem. I also had one of these nibco gate valves I recently cut out, so that could be the case. When you're replacing it with a new valve it doesn't really matter.

Thank you DIYorBust very much for the reply.
I do not have enough skills and experience to solder in a new shut off valve. I think I can do compression, but I have no experience in sharkbite. I am not quite sure if the part that I got will fit correctly into the valve. Like you said, if the stem is hard to remove or if the new stem does not fit after the stem removal, then I am in trouble. Do you think the penetrating oil will help in unscrewing the stem nut? So, I am kind of nervous in doing this without the backup plan in case the worst things come to life. Because the shut-off valve is near the 90 degree angle, it may not be easy to put in the compression or sharkbite with my current skill and knowledge.

20201208_105658.jpg

Its outdoors you could join pipe by compression fitting or Sharkbite. If you can't solder.
Thank you Jeff H Young very much for the reply.
Yes, I am considering that also. But like I said above, because the shutoff valve is near the bend, with my knowledge and experience, I have to study more on how to do this.

Thank you very much.
 

Reach4

Well-Known Member
Messages
38,858
Reaction score
4,428
Points
113
Location
IL
I tightened a little the packing nut, and the leak stopped, but if I turn the handle, I think it will leak again.
Packing leaks can usually be fixed by pulling the packing nut, wrapping (adding) some packing cord around the shaft CW, and putting the nut back. The white PTFE kind worked for me, but some prefer the black graphite type.
 

DIYorBust

Active Member
Messages
749
Reaction score
94
Points
28
Location
Long Island, New York
Buy a compression or sharkbite valve as a backup so there's something you can do, you'll also want a tubing cutter and deburring tool for that scenario. Try to use a solid fixed wrench for the best chance of removing the stem without damage. Now it may come off easy with a pair of chanel locks, but if it doesn't, try to buy a wrench of the right size, take the replacement to the hardware store to fit the wrench. If you strip the original stem you might still be able to get it out with a big pipe wrench, but your life just got harder. Whatever you do, try to back wrench the valve body so you don't damage the pipe or joints.

Neither compression nor sharkbite will help you if the joints are threaded, and we can't see them, so check that. If they are you can cut out the pipe and redo it with a union and a new valve, but unless that's the case I won't get into it.
 

hj

Master Plumber
Messages
33,603
Reaction score
1,042
Points
113
Location
Cave Creek, Arizona
Website
www.terrylove.com
Nibco OFTEN uses the same model number but changes the pattern of the valve, usually making it thinner, so you will probably NOT be able to find new parts for it.
 

JasonM

Member
Messages
100
Reaction score
3
Points
18
Location
California
Packing leaks can usually be fixed by pulling the packing nut, wrapping (adding) some packing cord around the shaft CW, and putting the nut back. The white PTFE kind worked for me, but some prefer the black graphite type.
Thank you Reach4 very much for the reply.
For now, the leak from the packing nut has stopped. So, I want to make it shut off the water completely when closing.

Buy a compression or sharkbite valve as a backup so there's something you can do, you'll also want a tubing cutter and deburring tool for that scenario. Try to use a solid fixed wrench for the best chance of removing the stem without damage. Now it may come off easy with a pair of chanel locks, but if it doesn't, try to buy a wrench of the right size, take the replacement to the hardware store to fit the wrench. If you strip the original stem you might still be able to get it out with a big pipe wrench, but your life just got harder. Whatever you do, try to back wrench the valve body so you don't damage the pipe or joints.

Neither compression nor sharkbite will help you if the joints are threaded, and we can't see them, so check that. If they are you can cut out the pipe and redo it with a union and a new valve, but unless that's the case I won't get into it.

Thank you DIYorBust very much for the reply.

Since this is the 3/4" pipe hot water line from the heater into the house, there is no hurry. I think the shutoff valve joints are soldered, not threaded. When this was put in by a plumber 20 years ago, there were shrubs or ivy like plants on the wall. So, he could not run the pipe along the wall all the way because of the shrub stumps or stems near the wall. Now, the ivy or shrubs were gone, I want to reroute this existing pipe along the wall as the photos show below as a backup plan or plan B.

20201209_133518b.jpg 20201208_105658a.jpg

So, I have to think about how I can do this, practicing the soldering or compression fittings.
May I ask some more questions?

1. Can I do the rerouting completely with compression fittings only?
2. In case there is any leak in any joints, can I somehow use some temporary hose fitting with clamps?
3. I am going to use ball shutoff valve. Can I put the new shutoff valve on the pipe along the wall or should I put it away from the wall pipe line right after the pipe from white wall in the photo?

Nibco OFTEN uses the same model number but changes the pattern of the valve, usually making it thinner, so you will probably NOT be able to find new parts for it.
Thank you hj very much for the reply.
If the repair attempt does not work, as a backup plan, I am thinking of rerouting and install a new ball valve.

Thank you very much.
 

DIYorBust

Active Member
Messages
749
Reaction score
94
Points
28
Location
Long Island, New York
This actually seems like a good project for a novice solderer. It's outdoors and not too close to a flammable surface. It took me about 1 hour practicing on scrap pipe to be able to make an acceptable joint. Use good flux, people say tinning is easier. I also recommend a torch head that shuts off when you release the buttom, and I'd use propane rather than MAPP gas to start.
 

Jadnashua

Retired Defense Industry Engineer xxx
Messages
32,770
Reaction score
1,190
Points
113
Location
New England
The critical steps of soldering are:
- clean the pipe and the inside of the fittings properly - should be bright copper color
- if the cutter you used on the pipe made a lip, make sure you use the reamer tool to straighten it back out as that lip can cause turbulence and mess things up long term
- use a flux suitable for the use - must be listed as suitable for potable water
- apply heat primarily to the fitting and as much all around it as you can
- periodically apply the solder to see if it's hot enough to melt into the joint, and once it is, remove the torch and run the solder all around the joint
- while still hot, with a rag that won't melt, wipe the joint off (no synthetic cloths - ie., no polyester or synthetic stuff... pure cotton works)
- can't have any water in the pipes
- must have an escape path for the hot air created while soldering, or you can pressurize the pipe and blow that hot air through the solder, making a leak path in the fitting
 

JasonM

Member
Messages
100
Reaction score
3
Points
18
Location
California
This actually seems like a good project for a novice solderer. It's outdoors and not too close to a flammable surface. It took me about 1 hour practicing on scrap pipe to be able to make an acceptable joint. Use good flux, people say tinning is easier. I also recommend a torch head that shuts off when you release the buttom, and I'd use propane rather than MAPP gas to start.
Thank you DIYorBust very much for the reply.
You gave me a good motivation. Actually, I tried learning soldering in the past. I will work on this rerouting, learn and practicing soldering more. Maybe, you have some talents in doing this kind of work well. Thank you for the valuable tips.

The critical steps of soldering are:
- clean the pipe and the inside of the fittings properly - should be bright copper color
- if the cutter you used on the pipe made a lip, make sure you use the reamer tool to straighten it back out as that lip can cause turbulence and mess things up long term
- use a flux suitable for the use - must be listed as suitable for potable water
- apply heat primarily to the fitting and as much all around it as you can
- periodically apply the solder to see if it's hot enough to melt into the joint, and once it is, remove the torch and run the solder all around the joint
- while still hot, with a rag that won't melt, wipe the joint off (no synthetic cloths - ie., no polyester or synthetic stuff... pure cotton works)
- can't have any water in the pipes
- must have an escape path for the hot air created while soldering, or you can pressurize the pipe and blow that hot air through the solder, making a leak path in the fitting
Thank you jadnashua very much for the reply.

Actually, I dabbled into soldering pipes about 15 years or so ago. I did not have a good result when I tried a little. And then, I stopped maybe due to lack of real needs. So, I do not feel comfortable in using my poor soldering skill for the real problem. I will study, learn more, and then practice more, and see if I can have a good result.

--------------

May I ask 2 questions?
1. Is soldering a skill that DIYer's usually have to solve the plumbing needs at home even though there is no frequent need for soldering? Sometimes, I wonder if I really need to spend time learning how to do this.
2. If you put the ball shutoff valve in my case, is it a good idea to put it along the wall, or will it create some problems in the future?

Thank you very much.
 

DIYorBust

Active Member
Messages
749
Reaction score
94
Points
28
Location
Long Island, New York
Being able to solder pipe definitely solves a lot of problems. When a valve or something similar needs replacing, the job can be done before you could even schedule a plumber. Pipe leaking or broken? Same thing. If you call the plumber you have to schedule it, usually meet with them, and obviously pay the plumber. Not to mention, what do you do if there is a leak on Friday night. Do you shut off the water until monday, try to find a weekend plumber(often expensive), or just pull out the plumbing stuff from your garage and get the water back on in an hour?

That said you are working with a torch, flux, and solder and it would be possible to hurt yourself if you aren't careful, so you should read up on that. And clearly if the job is not done right, you could make a real mess. I'd say many DIYers do not know how to solder copper pipe, but I'd also say it's saved me 10s of thouands of dollars. Plumbers in my area charge about 200 an hour.

Also project you might not currently be able to do become feasible with this skill. Reroute a pipe, change a shower valve etc.

However there is now pex on the market which is much more DIY friendly. With pex, you can't burn down the house, fewer joints need to be made, and you can make all kinds of turns that would be a turn of work with copper. If you have copper in your house though, it's a great skill to have. Like I said, buy a pipe and some fittings and practice. Once you get the idea, it's pretty easy to make a few simple joints.

I mean you could use sharkbites and/or convert to pex for this project, but once you can solder you'd wonder why you considered that.

I don't see a problem with the valve being on the wall. If the pipe sweats, it could cause condensation on the wall. Not a huge deal on a block wall like that, but someone did insulate the existing pipe, so maybe there is a reason for controlling the condensate there.
 

JasonM

Member
Messages
100
Reaction score
3
Points
18
Location
California
Being able to solder pipe definitely solves a lot of problems. When a valve or something similar needs replacing, the job can be done before you could even schedule a plumber. Pipe leaking or broken? Same thing. If you call the plumber you have to schedule it, usually meet with them, and obviously pay the plumber. Not to mention, what do you do if there is a leak on Friday night. Do you shut off the water until monday, try to find a weekend plumber(often expensive), or just pull out the plumbing stuff from your garage and get the water back on in an hour?

That said you are working with a torch, flux, and solder and it would be possible to hurt yourself if you aren't careful, so you should read up on that. And clearly if the job is not done right, you could make a real mess. I'd say many DIYers do not know how to solder copper pipe, but I'd also say it's saved me 10s of thouands of dollars. Plumbers in my area charge about 200 an hour.

Also project you might not currently be able to do become feasible with this skill. Reroute a pipe, change a shower valve etc.

However there is now pex on the market which is much more DIY friendly. With pex, you can't burn down the house, fewer joints need to be made, and you can make all kinds of turns that would be a turn of work with copper. If you have copper in your house though, it's a great skill to have. Like I said, buy a pipe and some fittings and practice. Once you get the idea, it's pretty easy to make a few simple joints.

I mean you could use sharkbites and/or convert to pex for this project, but once you can solder you'd wonder why you considered that.

I don't see a problem with the valve being on the wall. If the pipe sweats, it could cause condensation on the wall. Not a huge deal on a block wall like that, but someone did insulate the existing pipe, so maybe there is a reason for controlling the condensate there.

Thank you DIYorBust very much for answering my two questions and explaining the advantage of having the soldering skills.
You convinced me, so I will practice the soldering slowly and when I am confident in my skill, I will work on this rerouting and adding the shutoff valve.

I am not sure of the plumber's going rate in my area, but I think it is at least $150 or so once they come out and do some small work. I am surprised that they charge $200 an hour in your area. I guess Long Island is an expensive area.

Thank you very much.
 

DIYorBust

Active Member
Messages
749
Reaction score
94
Points
28
Location
Long Island, New York
Long island is an expensive area. I have a plumber who is a super cool guy, and very good, and he gives me good prices, but it should be no suprise, he tends to be pretty busy.
 
Top
Hey, wait a minute.

This is awkward, but...

It looks like you're using an ad blocker. We get it, but (1) terrylove.com can't live without ads, and (2) ad blockers can cause issues with videos and comments. If you'd like to support the site, please allow ads.

If any particular ad is your REASON for blocking ads, please let us know. We might be able to do something about it. Thanks.
I've Disabled AdBlock    No Thanks