Install American Standard Princeton Bathtub w/Integral overflow on concrete slab

Users who are viewing this thread

Messages
16
Reaction score
1
Points
3
Location
Cupertino, CA
Hello, 1st time here.
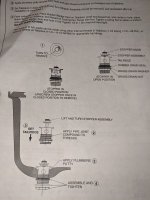
Have item above to install with no physical way to burrow or access below slab into original cut out for tub. Apt. Bldg. mid-60's vintage in San Jose, CA. Plan A is wanting to find a doable way to drop tub in place, much like what can be done with shower bases/pans. Already bought tub and have ample experience with this model on upper floors with access from below. But this is on slab. Lot's of hands on experience/knowledge, but not how to manage to get this done. Don't want to waste anyone's time so will say my plan B necessitates purchase of different style tub that doesn't have integral overflow to reproduce, but rather has typical overflow and shoe assembly, similar to what had been in place for 50 years+. My only thought here, as impractical as I know it will be and still hard and questionable as to ability to do so, is to jackhammer out 4" slab to extent that I could possibly reach in through exterior access panel from outside building on ground level parking/driving surface, and still logistically its a stretch unless I was tiny enough to crawl in (have to be 2 feet tall and strong) or had v. long arms. Not saying it might not be doable, sayin hell I don't want to go that route.

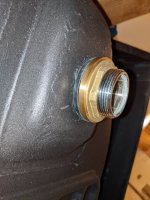
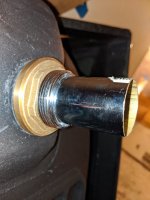
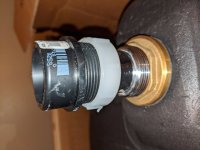
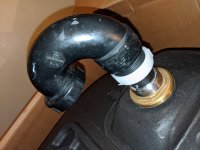
Anyone experienced with setting down this specific tub from above only, and properly setting into place and sealing (blindly) as needed. I'm looking to use 1.5" abs from cast fitting out thru p-trap and up to somehow transition to tub drain for Plan A. I understand practical reason why tub drains don't get installed like the shower drains.. cause they're only 1.5" dia so rubber bushing concept won't fly here, unlike 2" shower base drains. Still, maybe there is a standard tub designed/built with 2" drain, as that would be doable solution if available and within $3-500 price window.

Lastly, an earlier post dated June 2, 2018 entitled: Installation of American Standard Princeton Bathtub w/Integral overflow, was clearly not understood by those few that contributed to that post and/or williamk who initiated that thread misidentified his tub. Thanks in advance for any guidance.

Where's HJ.. perhaps engaged in manufacturing my standard size and priced tub with 2" drain. White please. Quality conscious too!

IMG_20210808_140819.jpg
IMG_20210808_140852.jpg
 
Last edited:

Tuttles Revenge

In the Trades
Messages
4,198
Reaction score
1,451
Points
113
Are you wanting to install the princeton with the integral overflow as your A option? If so, then you need the tub shoe without overflow. You should be able to line up the drain of the tub and the trap fairly well and dry fit that drain. Once you have it dialed in, glue it up and set your tub. The instructions call for setting the tub in lines of silicone, so if you're doing that, then let your drain set up for a bit and pull it one last time for the silicone.

Same lining up process goes for setting the tub with waste and overflow kit. but you have 2x the moving targets. But if you have access to the backside just not the shoe underneath, then you can build your overflow after the shoe is set..

I would also advise to use a no-hub band on the drain connection since MIP threads on abs are pretty weak. A no hub band on a nipple allows for up to 5° offset from straight so you can fine tune a bit that way.
 
Messages
16
Reaction score
1
Points
3
Location
Cupertino, CA
Yes, as plan A. And thanks much for the thoughtful ideas and approach.

OK.. first some pictures of what I assembled under tub, A F T E R reading your thoughtful reply. It got my gears going different direction so 1st I tried to apply back or tub shoe concept to this specific drain piece that came with tub. In case you've not had your hands on this specific tub, the thickness of tub from upper flange to what you see exiting bottom is ballpark 1 to 1.5", plus the length you can see at easily another inch or so, totals getting close to or all of 3". So that chrome threaded end to drain back up to flange is longer that is appears from below, to accommodate the internal drainage from integral overflow. So from what's revealed and protruding below from rubber seal/washer, thick brass washer and brass nut in place, tub shoe concept not happening and seems not able to be made to work for this configuration, as best I can tell thus far. However, read below..

Pictures illustrate drain in place, with step wise pieces added on to include 1st part of trap.. the rest I got figured out from last picture.

I still need to dry fit what you see in pics to ascertain just where and how much concrete to remove (hate having to do that) at the one corner to make cavity with drainage accessible to my arms from outside that access panel, once tub in place to tighten those two nuts, or actually just the white one as there should be no reason why the trap nut couldn't and shouldn't already be snugged up. With access, this non-cemented trap and the other abs piece with nut should be fine per code. The series of pictures, I hope, show in order how that will progress and to access when tub in place, I'll be left with having to remove enough concrete to be able to reach in and tighten the one white plastic nut after setting down tub directly, so the threaded 17 ga. brass tailpiece (I used the chrome piece in pictures just for show as it was short, but it too could work cut to proper length too, as its also 17 ga.) slides down and right thru that white plastic nut and into/on that abs fitting, already cemented into hub of trap. Other than the damn concrete limitations, let's call this the new plan C that you very much guided me towards & thanks so very much. Sometimes one can't see the possibilities, from so much bad (have chewed on this with a few sources locally) information and one's own limited knowledge/experiences. Blind chasing blind.
If I've missed something here, beyond knowing I can't lift damn tub and lower it like I likely could have easily 20-30 yrs. ago, and that I intend use blocks to gradually lower into place to control descent, please advise, comment, criticize or what the heck.. come on over and help. Best wishes.
 

Attachments

  • IMG_20210809_162526.jpg
    IMG_20210809_162526.jpg
    119.2 KB · Views: 215
  • IMG_20210809_162534.jpg
    IMG_20210809_162534.jpg
    83.6 KB · Views: 217
  • IMG_20210809_162543.jpg
    IMG_20210809_162543.jpg
    77.8 KB · Views: 215
  • IMG_20210809_162716.jpg
    IMG_20210809_162716.jpg
    76.2 KB · Views: 196
  • IMG_20210809_163336.jpg
    IMG_20210809_163336.jpg
    65.7 KB · Views: 214
  • IMG_20210809_163349.jpg
    IMG_20210809_163349.jpg
    78.6 KB · Views: 236
  • IMG_20210809_165519.jpg
    IMG_20210809_165519.jpg
    79 KB · Views: 237

Breplum

Licensed plumbing contractor
Messages
1,962
Reaction score
794
Points
113
Location
San Francisco Bay Area
Slip joint traps must be permanently accessible.
If not using slip joint, glue joints are allowed to be non-accessible.
I would not ever do what you are attempting to do.
I would go with a conventional glue joint tub waste/overflow and use a 1-1/2" no hub coupling for a final connection with adjust-ability. That way you can have the w/o in place and drop the tub on it.
We like to use 1-1/2 no hub couplings on the overflow part also to account for slight angle and height tweaks.
I would come to help but I don't leave Lafayette.
 
Messages
16
Reaction score
1
Points
3
Location
Cupertino, CA
1- Slip joint traps must be permanently accessible... [Agreed]. yet if they're reachable for tightening or removal purposes via exterior access panel, after engaging in some concrete removal that provides path for arm(s) to access trap area, isn't that considered "permanently accessible? The ABS fitting would be reachable/accessible too under this scenario. If not accessible, I wouldn't any longer contemplate going this route, and might instead do more like you suggested with a standard type tub that can accommodate overflow/back shoe and drain assembly, either of my own creation or store bought.

2- go with a conventional glue joint tub waste/overflow... [We may not be on same page here]. There is no external overflow piping running down exterior, plumbing end face of tub, down towards level of where horizontal tub shoe resides for a standard tub. The "integral" overflow eliminates all that, as the overflow water is channeled down within the tub wall and feeds into bottom drain in pics. There is no place or need for the overflow piping running down from overflow height at exterior face of front of tub, and the conventional tub shoe doesn't connect or install in same fashion on this tub, as with a standard tub drain.

3-That way you can have the w/o in place and drop the tub on it...[see item 2, re perhaps not being on same page.. I suspect]

4- not ever do what you are attempting to do...[assume you're speaking to practical reasons re additional time to attend to plan 3 approach & get it done, concrete, the unwieldy aspect of this approach, risk of damage to tub, the need to be spot on accurate with the bulk and weight, one's back, shins, etc.?]. Not a contractor having to move quickly or on another's clock, so not overly concerned re extra time/effort if plan C is workable. Still, planning in my head and measuring, ahead of any dry fit and determination re needed concrete removal.,

Lastly, I'm warming to your no hub coupling in conjunction with what tuttles revenge wrote above: advise to use a no-hub band on the drain connection since MIP threads on abs are pretty weak. A no hub band on a nipple allows for up to 5° offset from straight so you can fine tune a bit that way. So I'd go with galvi nipple into cast piece and no hub band to the 1.5" ABS. Some great points and advice.

Were we not on same page, per 2 and 3 above?
 

Tuttles Revenge

In the Trades
Messages
4,198
Reaction score
1,451
Points
113
I would get rid of the drain connection they supplied. Install an All Glue trap connected to the drain via a no hub band. The tub shoe I linked above goes directly atop your trap and is gasketed to the underside of the tub with the typical rubber gasket for a typical waste and overflow. Install as described and then you set it with a thread in strainer.. done. Easy as pie.. but as pain in the ass as setting a tub always is blind.

tub shoe.png
 
Messages
16
Reaction score
1
Points
3
Location
Cupertino, CA
Status.. checked with Westbrass (impressive gentleman on phone- (perhaps the owner). The part recommended, 442 A no one carries so may default to online.

from Tuttles Revenge: "I would get rid of the drain connection they supplied" (?) I think you're speaking to the two parts I cobbled together for dry fit and for picture purposes and to wrap my head around a possible assembly configuration, immediately below bottom end of chrome drain that was supplied with tub purchase. Those two pieces in picture (call it plan 1), the chrome tubular brass and the abs adapter with white nut, were my initial thinking/version vs. (plan 2) your suggestion to utilize the Westbrass 442A screwed onto bottom end of chrome drain ahead of setting down tub, to be no hub coupled to top of short 1.5" dia abs pipe stub prewelded in at front end or upper trap hub. I'm still chewing on this.. thinking my plan 1 is also clean, firm and doable, particularly given the next paragraph..

At back end of trap, will substitute in short galvi nipple for brass waste connector and weak abs MIP fitting in picture, as was suggested. Nipple had been in that place for past 50+ yrs. Will use recommend no hub coupling to attach nipple to ABS pipe stub welded into hub at back end of trap, providing some maneuverability and flexibility for drop down nightmare fit, per suggestion above.

Though I'm no fan of over use of no hub couplings, preferring where doable to erect solid, firm piping, I agree re weak linkage of ABS MIP fitting vs. solid galvi nipple. No comparison. I do however still think my original configuration (see plan 1 above) may be the way to go or at least try for first go round. All this depends on removing adequate concrete for arms to access.

*Have to procure few different parts for dry fit and further thought, then will post picture of dry fit parts set in place as described above. Not yet convinced about benefit or the need to go Westbrass 442A route vs. my plan 1. Thanks to all- will take couple days. Any further fine tune direction/criticism out there very welcome, as would prefer to incorporate anything additional into early on planning to save back/forth, delays, etc. Most sincerely, thanks again to all
 
Messages
16
Reaction score
1
Points
3
Location
Cupertino, CA
How would using just the bottom portion of those units in PVC (or even abs- like the westbrass 442A) screwed over exterior bottom threads on bottom of my chrome drain, represent any improvement over (plan 1) brass tube fine male threads/sealed into inside of female threads at drain bottom?

I'm not seeing or understanding deficiency in plan 1 (my last post) vs. any benefit if going the route of your last post, whether it be ABS or PVC.(?) inside dia same at 1.5", still need to drop in place and have access to tighten, I'd be going from 17 ga. brass to plastic (ABS or PVC), and plan 1 solid connection doesn't necessitate 2nd band in configuration.
 

Tuttles Revenge

In the Trades
Messages
4,198
Reaction score
1,451
Points
113
I didn't catch this earlier..
Westbrass 442A screwed onto bottom end of chrome drain ahead of setting down tub,
No.. The tub shoe i suggested rests against the buttom of the tub w/ a rubber gasket that is the actual Seal of the tub. A typical straight threaded tub strainer (many variety) would thread into the shoe after the tub is set and verified level etc and lines up with the drain.

The no hub band is what I would connect the All Glue trap to the existing drain.. in order to get rid of the ABS male adapter. The secondary advantage of the band is that the manufacture allows up to 5° of deflection from straight.. if you find your fittings don't line up by a fraction you can fudge it and still be within spec.
 
Last edited:

wwhitney

In the Trades
Messages
6,567
Reaction score
1,847
Points
113
Location
Berkeley, CA
A typical straight threaded tub strainer (many variety) would thread into the shoe after the tub is set and verified level etc and lines up with the drain.
Second this. Sequence of events:

Ideally, remove the galvanized san-tee and replace with plastic. Otherwise, screw a short brass nipple into the existing threaded entry and use a banded coupling (e.g. Proflex 3000-150 for 1.5") to adapt from brass to plastic.

Test set and level the tub to determine the exact location and elevation the bottom of the tub drain opening will be.

Glue up an ABS or PVC trap arrangement with the above drain shoe that puts the top of shoe in exactly the correct place in all 3 dimensions (and level).

Put down the included washer, set the tub on top, put plumber's putty on the underside of the interior strainer of your choice whose threads match your drain shoe, and screw down the strainer through the tub into the shoe.

Cheers, Wayne
 
Messages
16
Reaction score
1
Points
3
Location
Cupertino, CA
Re: A typical straight threaded tub strainer (many variety) would thread into the shoe.
You do understand that type strainer can't be used for this type tub, right? [i.e. integral overflow built into tub]. The drain in picture, that came with tub, must be of that type design with port up above bottom of tub, to inside tub accommodate and pass through over flow water down into that singular drain channel.

I've been thinking, by utilizing trap in picture vs. all glue type trap, it enables me to undo, redo as needed from side access and it may provide comparable or perhaps even more fudging room, as or if needed, than just having coupling ahead of trap under drain. And inclined towards minimum use of couplings where doable. Additionally, at back/downstream end of trap, I'd already have one coupling in place providing benefit of deflection you've highlighted, on top of flexibility provided by non-glue type trap. Given prior two sentences, and setting aside type trap issur/decision for moment, are you seeing any benefit to using westco 442a and no hub coupling vs. my plan 1 (brass tube and abs male adapter without need for 2nd coupling here)? Remember, I'll already have in place what's set out in first two sentences of this paragraph.

Short of what you'll say, me thinking you no like abs male adapter, you favor couplings for faster work, you know the couplings can work, and you want to glue it and forget it, where I am focused on present task and perhaps more important to me going forward, how the hell am I gonna access and be able to repair, adjust or attend to changing something without tearing out everything $$$ above and around tub and the tub too. Don't you dare write.. well at that point just could just call a plumber.
 
Messages
16
Reaction score
1
Points
3
Location
Cupertino, CA
to Wwhitney who wrote: Otherwise, screw a short brass nipple into the existing threaded entry and use a banded coupling (e.g. Proflex 3000-150 for 1.5") to adapt from brass to plastic. We're on same page their accept I see no reason for brass 1.5" nipple vs galvi. Brass seems overkill for drain.

See most recent post, re type of drain in tub- the 1st paragraph.
 

Tuttles Revenge

In the Trades
Messages
4,198
Reaction score
1,451
Points
113
You do understand that type strainer can't be used for this type tub, right? [i.e. integral overflow built into tub].

Drill/saw some holes in the strainer to act as overflow. I had a sink with the same issue with the strainer provided. The overflow holes were too high, so I used the angle grinder to lengthen the overflow holes.
 

Tuttles Revenge

In the Trades
Messages
4,198
Reaction score
1,451
Points
113
Its been a number of years since I've installed that particular tub. Forgot about how the integral overflow works. Would the provided drain still theread into a regular tub shoe and not bottom out?

Don't buy sinks from that outfit any more.. you should have returned it
Someone's gonna visit you soon and take those power tools away for safe keeping

I only noticed the sink problem because water was seeping from the porcelain where water shouldn't seep.. And sometimes you gotta just get shit done with what you have on hand. And there wasn't a chance I was taking that sink off the wall with the crazy mounting system and it being set on fragile custom made wall paper that tears when you look at it funny.
 

Tuttles Revenge

In the Trades
Messages
4,198
Reaction score
1,451
Points
113
OK.. totally different tack here.. What about one of these designed for blindsetting freestanding tubs?

You use the Am Std drain but use a fine threaded tubular tail piece to slide into this receiver..
signature-hardware-446540-979426.jpg


This model from Sig Hdwr
 
Messages
16
Reaction score
1
Points
3
Location
Cupertino, CA
Nope.. for flat like concrete only with pre set or arranged, straight down drainage.. I think. Not applicable for my post. Tripped across that when it was briefly brought up by gentleman at Westco earlier this am. Before he knew of the specific application, he brought that type item up. Picture looks similar. I have zero experience (or interest) in that.
 
Top
Hey, wait a minute.

This is awkward, but...

It looks like you're using an ad blocker. We get it, but (1) terrylove.com can't live without ads, and (2) ad blockers can cause issues with videos and comments. If you'd like to support the site, please allow ads.

If any particular ad is your REASON for blocking ads, please let us know. We might be able to do something about it. Thanks.
I've Disabled AdBlock    No Thanks