I Need to Vent

Users who are viewing this thread

Thomas K

Member
Messages
353
Reaction score
16
Points
18
Location
Opelika, al
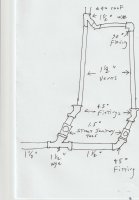
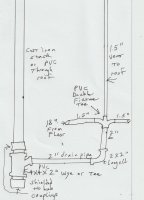
This is configuration I will be going with. Either that or cut cast iron and install 2" sanitary tee lower.

I have this irrational obsession with wanting to cut that cast iron stack below the 1.5" drain tee we've been discussing and replace everything from there through the roof with PVC.

Someone please tell me what a mistake I would be making and how I would destroy the vent stack flashing on the roof by dropping that cast iron through it. Besides the fact I would have to remove it in 4-5 cut up sections.
 

Attachments

  • solution 3 001.jpg
    solution 3 001.jpg
    47.6 KB · Views: 131
  • IMG_1686.JPG
    IMG_1686.JPG
    90.8 KB · Views: 130
Last edited:

Reach4

Well-Known Member
Messages
38,888
Reaction score
4,434
Points
113
Location
IL
Someone please tell me what a mistake I would be making and how I would destroy the vent stack flashing on the roof by dropping that cast iron through it. Besides the fact I would have to remove it in 4-5 cut up sections.
I don't know what you have on the roof. If it is lead or a rubber/plastic boot, I don't see how the roof would be hurt if you can bring the pipe straight down.

If you have real lead boot up top, that would be folded over the top of the pipe and into the pipe a big.

You might have a roofer check things out when done.
 

wwhitney

In the Trades
Messages
6,567
Reaction score
1,845
Points
113
Location
Berkeley, CA
This is configuration I will be going with.
That should work. I'm curious to ask why you selected that configuration over the original configuration shown in the OP (with the fittings corrected and the vent added).


I have this irrational obsession with wanting to cut that cast iron stack below the 1.5" drain tee we've been discussing and replace everything from there through the roof with PVC.
Recognizing it may be irrational is a good first step. I suggest that for efficiency you stick to the work that is actually required or good preventive maintenance. If the cast iron looks good for another 20 years, leave it be. Conversely, any cast iron that you are going to be covering up that doesn't look good for another 20 years, replace it now.

Cheers, Wayne
 

Thomas K

Member
Messages
353
Reaction score
16
Points
18
Location
Opelika, al
That should work. I'm curious to ask why you selected that configuration over the original configuration shown in the OP (with the fittings corrected and the vent added).


Recognizing it may be irrational is a good first step. I suggest that for efficiency you stick to the work that is actually required or good preventive maintenance. If the cast iron looks good for another 20 years, leave it be. Conversely, any cast iron that you are going to be covering up that doesn't look good for another 20 years, replace it now.

Cheers, Wayne

I do wish there was a 2" drain lower on that 4" cast iron stack, though. Drain for sinks really needs to be 2" if you ask me. I chose the two-sanitary tee design because I feel better about having a vent over each trap. I would use a double fixture tee if the drain line were lower and 2".
 
Last edited:

Thomas K

Member
Messages
353
Reaction score
16
Points
18
Location
Opelika, al
I do wish there was a 2" drain lower on that 4" cast iron stack, though. Drain for sinks really needs to be 2" if you ask me. I chose the two-sanitary tee design because I feel better about having a vent over each trap. I would use a double fixture tee if the drain line were lower and 2".

I really want to fix it like in double lav rough. A PVC 2" x 1 1/2" x 1 1/2" x 1 1/2' double fixture tee (not ABS) is available. I could cut into the cast iron, install a 4 x 4 x 2" PVC sanitary tee or long radius tee down lower than present one with Fernco shielded couplings and run 2" drainpipe over to sanitary tee.
 

Attachments

  • fixture tee.jpg
    fixture tee.jpg
    9.7 KB · Views: 124
  • double_lav_rough_1.jpg
    double_lav_rough_1.jpg
    106.8 KB · Views: 126

Reach4

Well-Known Member
Messages
38,888
Reaction score
4,434
Points
113
Location
IL
I do wish there was a 2" drain lower on that 4" cast iron stack, though. Drain for sinks really needs to be 2" if you ask me. I chose the two-sanitary tee design because I feel better about having a vent over each trap. I would use a double fixture tee if the drain line were lower and 2".
What you drew looks good to me.
 

Thomas K

Member
Messages
353
Reaction score
16
Points
18
Location
Opelika, al
This looks even better. Will have to cut stack with Diablo cast iron blade, but this minimizes vent runs and horizontal pipes. And gives me the 2" drain I wanted.
 

Attachments

  • schematic 1a 001.jpg
    schematic 1a 001.jpg
    56 KB · Views: 134

Reach4

Well-Known Member
Messages
38,888
Reaction score
4,434
Points
113
Location
IL
Remember to support the pipe above, before cutting below the support. A riser clamp may help supporting that pipe.

Is the blade on your reciprocating saw blade going to poke through the wall on the other side of the cast iron?
 

wwhitney

In the Trades
Messages
6,567
Reaction score
1,845
Points
113
Location
Berkeley, CA
This looks even better. Will have to cut stack with Diablo cast iron blade, but this minimizes vent runs and horizontal pipes. And gives me the 2" drain I wanted.
That would work, but your previous iteration would be noticeably easier to execute, and I wouldn't say that your latest version has any performance advantages over the previous version. So save yourself the hassle of cutting the cast iron, and go with the previous iteration.

Cheers, Wayne
 

Thomas K

Member
Messages
353
Reaction score
16
Points
18
Location
Opelika, al
Remember to support the pipe above, before cutting below the support. A riser clamp may help supporting that pipe.

Is the blade on your reciprocating saw blade going to poke through the wall on the other side of the cast iron?

I have several riser clamps, and wall is gutted on both sides.
 

Thomas K

Member
Messages
353
Reaction score
16
Points
18
Location
Opelika, al
That would work, but your previous iteration would be noticeably easier to execute, and I wouldn't say that your latest version has any performance advantages over the previous version. So save yourself the hassle of cutting the cast iron, and go with the previous iteration.

Cheers, Wayne

Still undecided on routing, Wayne. It would be easier to fabricate previous version, leaving cast iron intact and undisturbed, but screw in fitting at cast iron pipe makes the drain connection seem to be
1 1/4" there (?).

To top that off, plumber completely cut out about 2 feet of wall stud where left pipe exits wall. Re-measured pipe, and although it is centered in sink where it is, I believe it could've been moved right just enough to clear that stud. Sink trap arms are adjustable enough to account for a slight deviation in pipe routing.

Pipe runs through wall notches, as well, which are wider than allowed by code, near end of right pipe. I am not sure if that wall is load bearing; it has no roof supports on it, but it does support ceiling joists. Plumber may have notched there to keep run straight; I'm not sure. What's done is done, though, unless I remove those studs and replace them (one at a time!) or add stud shoes for support.
 

wwhitney

In the Trades
Messages
6,567
Reaction score
1,845
Points
113
Location
Berkeley, CA
I am not sure if that wall is load bearing; it has no roof supports on it, but it does support ceiling joists.
With narrow rooms like bathrooms, ceiling joists often end up with multiple supports, not all of which are needed. So the question is, if you removed the wall, would any of the ceiling joists either (a) fall down (because they end on the wall) or (b) end up overspanned? If no, it's not load bearing (but still worth doing a decent repair on the studs, particularly important if any of them will be supporting a tiled wall).

To determine the allowable span between supports for your ceiling joists, you can compare to other rooms on the floor, or you can check the allowable span tables in the IRC.

Cheers, Wayne
 

Jeff H Young

In the Trades
Messages
8,929
Reaction score
2,229
Points
113
Location
92346
Sound logical Wayne . Thomas should be able to get this done now with this info. not just one way to do it but got good options. just gotta do it now
 

Thomas K

Member
Messages
353
Reaction score
16
Points
18
Location
Opelika, al
Thomas Just want to let you know Ive never heard of anyone pulling a permit to get advice on how to do the job thats pretty unconventional . Another thing cutting the cast iron aint that big a deal its all opened up . Id likely cut the stack put a tee low and replace that pvc to the two lavs . Id bee done with that with out the proper tool to cut the cast in an afternoon. I gotta go back through all these posts but this sounds like an empty house that you just tinker with here and there? Since your a mechanic I suppose DIY might work I was assuming you werent too handy with tools guess you been working on other stuff besides the plumbing when you pull permit they expect you to make progress , or they cancel permit at least threaten to make you pay again

You've cut cast iron, Jeff. I watched a plumber with a battery-powered Sawzall (mine is corded) saw through 4" cast iron in 38 seconds flat with a good diamond cast iron blade. Or so it went in the video. Now, being a mechanic, I doubt it is that easy. The biggest concern is that say, estimating weight of around 21 lbs per foot, there is 14' or so of cast iron above the spot that needs to be cut out. In my book, that amounts to supporting around 300 pounds with riser clamps, or replacing entire pipe from roof, supporting it with rope and cutting it out in sections as it's lowered through wall.

I'm not scared to tackle the cutting, I just don't want to rip the rubber boot on the roof if I replace vent pipe. I've replaced a couple of the galvanized roof vents with pvc with no problems, but this is a 4" cast iron pipe. So I guess I'm asking how difficult it would be to cut that pipe, and if so, how difficult it would be to fit the new pvc piece 4 x 4 x 2" in between. Do the shielded hub connectors just slide up the iron pipe and then back down on the pvc once fitted into place?
 
Last edited:

Thomas K

Member
Messages
353
Reaction score
16
Points
18
Location
Opelika, al
I do have one more question...if I did add the 4" x 4" x 2" fitting, would it need to be a sanitary tee, or all hub long radius tee?
 

wwhitney

In the Trades
Messages
6,567
Reaction score
1,845
Points
113
Location
Berkeley, CA
Sanitary tee = tee with medium radius bend
Combo = tee with long radius bend

Drains going from horizontal to vertical = medium radius or greater
Drains going from vertical to horizontal or horizontal to horizontal = long radius
Drains going from horizontal to vertical while also having the vent taken off = combo not allowed

So in your case, you could use either.

Cheers, Wayne
 

Reach4

Well-Known Member
Messages
38,888
Reaction score
4,434
Points
113
Location
IL
Do the shielded hub connectors just slide up the iron pipe and then back down on the pvc once fitted into place?
Slide greatly understates the effort to move the rubber along the cast iron. It even overstates the effort with pvc that has been lubricated with dishsoap. On cast expect some struggle and prying.
 

wwhitney

In the Trades
Messages
6,567
Reaction score
1,845
Points
113
Location
Berkeley, CA
Do the shielded hub connectors just slide up the iron pipe and then back down on the pvc once fitted into place?
No, they have a stop in the middle. So the typical procedure when operating between fixed ends is to install one side onto one pipe, slide the shield farther back on that pipe, and then fold the rubber for the open end back over the outside of the rest of the connector. Then you have clearance to put the pieces in place, and finally unroll the rubber over the other pipe end.

For a normal weight cast iron to plastic connection in 3" or 4", the cast iron has a slightly smaller diameter than the plastic, so the rubber walls are thicker on the cast iron side. That make it easier to install the coupling on the cast iron and roll back the rubber on the plastic side.

Cheers, Wayne

PS (Edit) The rubber stop is 1/8" thick, so you need at least that gap between the two pipe ends. Where you need to use the rolling back procedure, it's easier with a 1/4" gap between the ends.
 
Top
Hey, wait a minute.

This is awkward, but...

It looks like you're using an ad blocker. We get it, but (1) terrylove.com can't live without ads, and (2) ad blockers can cause issues with videos and comments. If you'd like to support the site, please allow ads.

If any particular ad is your REASON for blocking ads, please let us know. We might be able to do something about it. Thanks.
I've Disabled AdBlock    No Thanks