How to remove and replace rusted toilet flange?

Users who are viewing this thread

GreenPride32

New Member
Messages
3
Reaction score
0
Points
1
Location
Boston
I discovered that a 4 inch section of my toilet flange is rusted. After removing the 4 securing screws, I wasn't able to lift the flange right up - didn't apply too much force just to be safe. It does seem like the outer lip of the white piping is larger than the opening of the flange, and is holding it down. Or perhaps it's just stuck by the wax ring residue which seems to be everywhere.

It looks like I might have some similar to what's shown in the video at 2:16 -


Will I be able to remove and replace the flange section only? Just an FYI - what prompted me to lift the toilet was because I discovered ants had been coming in from the toilet.

Please advise; thanks.

IMG_2549.jpg
 

Reach4

Well-Known Member
Messages
38,882
Reaction score
4,433
Points
113
Location
IL
You want a repair ring. This will probably require drilling thru the tile for the screws. Drilling through ceramic can be a little difficult. Drilling through porcelain is more difficult. The repair ring goes over the top of the existing ring.

Sioux Chief 886-MRM is a split repair ring
Sioux Chief 886-MR is not split.
http://www.siouxchief.com/products/drainage/residential/closet-flanges/spacer-repair/ringer

Superior Model # 21015 repair ring has mounting tabs outside.
PASCO 21013 is similar in red
 

Sylvan

Still learning
Messages
2,765
Reaction score
694
Points
113
Location
New York
Wow anyone notice the following ?

1- He used a claw hammer with a chisel instead of a ball pein as Claw hammers can cause the hammer to chip (shrapnel)

2- If the bathroom had an alteration what kind of idiot would not strongly suggest relocating the steam supply valve to radiator as why have an air vent that can spew very hot condensate to someone sitting on the bowl

3- Why would anyone want to take a chance of reinstalling a toilet with a crack at the base?

I am working as an expert witness where two toddlers perished because of a radiator air vent supposedly started spewing live steam As master plumbers we are supposed to notice these things

http://www.nydailynews.com/new-york/bronx/bronx-radiator-explosion-kills-toddlers-article-1.2901985
 

WJcandee

Wise One
Messages
3,181
Reaction score
170
Points
63
Location
New York, NY
To the original poster:

The DIY video is garbage. Ignore.

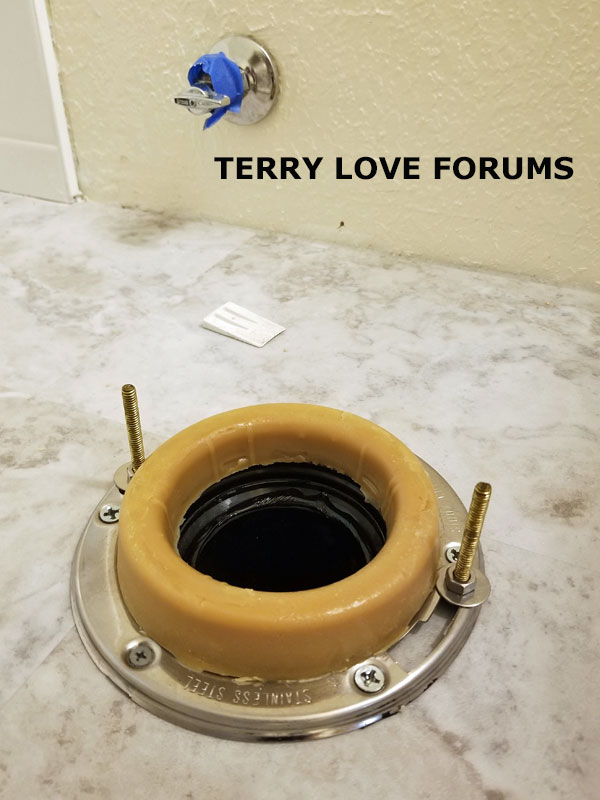
And you don't have anything like what's in the video. There is no cast iron anywhere in your photo.

Your "flange" isn't rusted. The metal ring surrounding (and incorporated in) your flange is rusted. That in and of itself isn't a huge deal. The "plastic" part of the flange and its seal against the pipe is what matters. From your photo, it appears that it is intact and just fine. It also appears that the slots for the closet bolts in the flange ring are intact and usable. Depending on your skill set, I'm not sure I would screw with it. If it bothers you, then, as Reach suggests, use a repair ring.

The reason you can't just "pull up" on the flange after you take the screws out of the floor is that the "plastic" part of the flange has been chemically-welded to the closet bend pipe when it was installed. The ring holds it in position in terms of lateral motion and provides a means to secure the toilet to the floor, but the connection of the pipe to the flange is done by applying chemicals to the "plastic" and sliding it into place so it welds together. I'm glad you didn't try to apply too much force.

The repair ring, if you go that route, just fits over the existing one. The Sioux Chief stainless one won't rust. You really only need the half, but you could also use the full one. Screw it to the floor, install your closet bolts, drop a wax ring (or SaniSeal or Korky Wax Free Toilet Seal) on top, and replace the toilet.

In terms of replacing the toilet: (1) Use TWO nuts on the closet bolt. The first one bolts the bolt to the flange, the second one (with a washer) bolts the toilet to the bolt/flange. Closet bolts with two nuts are available in better places. Or just buy a suitable extra nut for each bolt. Real solid brass or stainless is what you want. (Something like this.) (2) Your flange sits on top of the floor like Code requires, so you only need one regular wax ring. (3) We recommend putting the ring on the floor and smushing the toilet down on top of it, like professional plumbers do, rather than trying to put the ring on the bowl, as some manufacturers inexplicably recommend. (4) If you use wax, you can smush down once; if you move the toilet up or laterally after that, you can break the wax seal; an advantage of the wax-free SaniSeal or Korky is that you can pull and replace the toilet a bunch of times without needing to scrape off the wax to start again, an advantage for newbies.

Good luck. Come back with any more questions.
 
Last edited:

GreenPride32

New Member
Messages
3
Reaction score
0
Points
1
Location
Boston
Thanks for the responses thus far. Just to clarify - I was not following the video I linked at all. I already had the toilet off by the time I found the video. The only purpose of linking the video is it's one of the few sources where I found the metal top piece (which I was calling the flange) attached to the piping. In my research, it seemed much more common you could just unscrew, lift up, and replace the metal piece.

So just to confirm - the suggestions are to leave the rusted piece in place, and fit a repair ring over it (Reach4) or leave it alone (wjcandee)? In the latter case, I agree the slots are okay and would hold today. But the rust is already over the top side of one of the slots and eventually going to spread to the under side as well. With the pressure of holding the toilet down I figure it won't be long before the slot compromises.

Going to look into the spacer repair. It would be wonderful if the screw holes line up with what's already there. Would it be worthwhile to apply a rust inhibitor to the existing piece before covering it up?

BTW - I had already purchased a Danco Next Perfect Seal kit in anticipation of lifting the the toilet.
 

WJcandee

Wise One
Messages
3,181
Reaction score
170
Points
63
Location
New York, NY
If it's more-damaged than it appears, just use the repair ring that Reach suggested.

I did understand that you weren't following the video; just making clear that what it covers is a whole different setup than what you have (and it has a fair amount of mediocre advice).

You don't need a spacer. The flange is mounted on top of the floor, which is where it is supposed to be. Repeat: No Spacer.

new-closet-flange-terrylove-04.jpg
 
Last edited by a moderator:

GreenPride32

New Member
Messages
3
Reaction score
0
Points
1
Location
Boston
Just by luck I found this - Oatey 42777 Moss Bay Replacement Flange. Will need to do some more reading - but it appears to be designed to replace the metal ring entirely and best of all it clips under the pipe lip - same as the original - http://411plumb.com/a-great-toilet-flange-repair-for-a-rusted-painted-steel-ring/

As a general rule of thumb I just don't like to leave corroded parts around - in this case no adjoining metal so a bit safer - but would still rather avoid if possible.

Now I'm just not sure how difficult it would be to decouple of the metal ring and pipe without damaging the pipe...
 

WJcandee

Wise One
Messages
3,181
Reaction score
170
Points
63
Location
New York, NY
Even with the Dremel, for a newbie to do it without cutting into the plastic part of the flange will be a challenge. And it's pointless.

I feel like we're turning a quickie toilet-resetting into a majorly-overthunk project that has the potential to go sideways. I try to follow the Hippocratic approach: "First, do no harm." That would lead me to install a repair ring, drilling that tile (itself not the easiest to do) and installing all the screws to make it nice and tight to the floor. Since it ain't really broke, why "fix" it?

But if the original poster wants to go for it, then do! Heck, if he really wants to renovate the flange (which isn't remotely-necessary), he could buy the special cutting tool, cut away the old flange from down in the closet bend, then properly-prep and "glue" a new flange in there, which requires a different level of skill and has the potential to end up with the homeowner calling a plumber to redo the work.

To me, the things we normally-mention, like double-nutting the closet bolts, using stainless or solid brass closet bolts and nuts, properly-smushing the toilet onto the wax (or using a waxless seal), resealing with Polyseamseal instead of regular caulk, etc., are a thousand times more important to yield a long-lasting, quality installation.

Let us know how you make out, preferably with some photos!!
 
Last edited:
Top
Hey, wait a minute.

This is awkward, but...

It looks like you're using an ad blocker. We get it, but (1) terrylove.com can't live without ads, and (2) ad blockers can cause issues with videos and comments. If you'd like to support the site, please allow ads.

If any particular ad is your REASON for blocking ads, please let us know. We might be able to do something about it. Thanks.
I've Disabled AdBlock    No Thanks