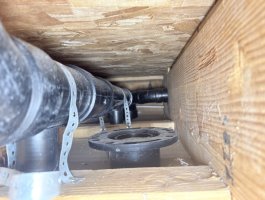
How do you extend this drain line for washer, when fittings are tight to each other?

Rossn

Member
Messages
473
Reaction score
23
Points
18
Location
Denver, CO
I have a situation, where I have drains in-place for a bar and bathroom, but didn't include a clothing washer drain at the time and need to add it. You can see a schematic, below, with the drains in blue.

How do I replace the 3" elbow to extend the downstairs drain for the washer with minimal rework?

Background:
The primary 3" drain line was run near the ceiling of the first floor, and will receive a soffit.

Currently, downstairs (see pic), it ends at a long sweep elbow, before poking through drywall to the upstairs bath. There is only 1-5/8 between the two elbows that serve as a riser.

I think a fitting like this will allow me to extend the 2" washer line, but I'll end up about 1-1/2" shy of bridging the vertical gap (I have about 5-1/2" from CL of the horizontal drain to the tiny section of vertical pipe where it needs to join. Once in the midfloor + another elbow, it goes straight into a wye for the shower. Does anyone make a short (like 1-1/2") ABS extension?

1790972371474.png


1790972493070.jpeg


1790972627849.jpeg


1790972557005.jpeg


1790971918991.jpeg
 

Attachments

  • 1790972534632.jpeg
    1790972534632.jpeg
    90.3 KB · Views: 0
First, I assume those vertical smaller black pipe segments in the first picture are just pieces of pipe used as spacers, and do not connect to the 3" horizontal drain.

Second, the fitting you pictured is fine, but you could also just use a 3" combo with a 3x2 reducer in the barrel inlet for the same effect.

When seen in plan (i.e. horizontally projected, ignoring the vertical coordinate), what is the angle between the "midfloor" horizontal 3" line and the below ceiling horizontal 3" line? If they are in line, then it seems to me you could replace the upper quarter bend and lower LT90 with a pair of 45s (unless that's there's too little clearance in the direction the camera is facing in the last photo), and then replace the lower 45 with a wye so that you have the desired inlet. But I expect they are more likely perpendicular.

I take it the bathroom group is using wet venting, so the separately vented laundry standpipe will need to connect to the 3" line downstream of the shower wye? Can you just widen your future soffit, so the 2" laundry drain can run below the ceiling alongside the 3" horizontal line, and then connect in an "upright wye" configuration? [That's say a 2" street 45 going into the branch of a 3x3x2 wye, where the 2" 45 inlet and the 3" wye barrel inlet are parallel.]

Cheers, Wayne
 
I'd go with what Wayne said — cut it back a little and use a 3x2 combo instead of fighting the tight fittings. One thing to watch down there is height: make sure the standpipe still ends up tall enough above the trap and that it's vented on its own. A washer pumping into an unvented or under-vented standpipe will gurgle and burp every load.
 
Hi Wayne - thanks for your help here.

Yes, those are spacers the original plumber put in with strapping, and after they fell out, I replaced with hangers. That said, there is one drain to the right, shown below.

I did look at the 3" combo, but it was 7"+ CL to inside of collar, and I need to hit around 5-1/2" (I could go slightly less).

In plan view, the angle between mid-floor 3" and garage 3" is a degree or two less than 90, as you suspected. There are 2 90's back to back with 1-5/8" between. If you look at the cad drawing, we are talking about the change in direction shown just downstream of the wye feeding the shower drain.


I take it the bathroom group is using wet venting, so the separately vented laundry standpipe will need to connect to the 3" line downstream of the shower wye?

For the bathroom group, upstream of the shower wye there is a 2" wye and 1/8" that goes through a joist, then turns vertical and goes up the wall. It continues vertical as a vent, but maybe 18" up, wye's to feed the lav drain. So, part of it is a wet vent.

1791033181929.jpeg


When you mention the laundry standpipe needs to connect to the 3" downstream of the wye are you saying that is required? I was thinking the laundry was far enough away (probably 18'+ of 2" pipe) it would require its own vent?

I could widen the soffit. I measure that yesterday that yesterday, as I was thinking of putting another combo inline, rotating it outwards slightly, and adding a 1/8 bend reversed to it could continue parallel, just grazing the elbow headed upstairs. However it's not the cleanest, and will require the soffit to extend out further.

Originally, I thought the easiest solution was to run from the toilet North to the washer. However, I ran into a fall issue when using a combo wye and reducer. Relative to the underside of the subfloor, I have 1-5/8" of clearance above the 3" drain, about 1' downstream of the toilet. From there, I have about 11' to run the pipe before I could rise into a wall. I figured with a wye and then a reducer that would give me about 9' of run.

Thinking about this in the moment, I could eek a little more elevation headroom if I could find a 3x2 eccentric ABS reducer to use after the combo, except now that I think about it, the combo would be too tall. With the 1/4 bend for the toilet, the lip of the fitting is actually 5/8" proud of the subfloor... I don't think you could cut it closer. In fact, I don't know why he left that ABS toilet flange, as it can't be installed unless I make my floor assembly a few inches thick. I think the plumber didn't do the right thing here and will have to figure how to fix it.

Thinking further, I could put a 3" wye inline between the wet vent and the shower, as from what I can tell I have 16-7/8" between those fittings. Then do a 1/8" bend to make it run parallel + an eccentric fitting, but that assumes it can fit into the ~8-1/2" space I have between CL of the 3" and the joist (and that that the existing 3" runs parallel to the joist).

That said, I'd really like to not rework either the wet vent of the shower, and I don't think I'll have enough to wiggle those for installing the new wye.

Thoughts?


1791032073537.jpeg
1791044730137.jpeg
 
Note actual answer to the question in the OP at the end of this post.

In plan view, the angle between mid-floor 3" and garage 3" is a degree or two less than 90, as you suspected.
So if it's close enough to 90 degrees, and if there are no obstructions at the bottom of the joists, then you could roll the quarter bend (the upper ninety between the floor joists) 45 degrees around its inlet towards the direction the lower 3" horizontal line runs, and then replace LT90 in the garage with a 45 degree bend, or rather a wye so that you have the desired additional connection for the clothes washer.

For the bathroom group, upstream of the shower wye there is a 2" wye and 1/8" that goes through a joist, then turns vertical and goes up the wall. It continues vertical as a vent, but maybe 18" up, wye's to feed the lav drain. So, part of it is a wet vent.
To clarify the terminology, the lav drain should have its own dry vent in this configuration. From that dry vent takeoff (which should be via a san-tee rather than a wye), the drain is a wet vent until the shower joins at its 3x3x2 wye.

When you mention the laundry standpipe needs to connect to the 3" downstream of the wye are you saying that is required? I was thinking the laundry was far enough away (probably 18'+ of 2" pipe) it would require its own vent?
Yes to both. The clothes washer stand pipe has a trap above the floor, and it needs a dry vent (or AAV) connected to its trap arm at that elevation (before the trap arm falls more than one pipe diameter or 2"). Then, when the washer drain connects as we are discussing, that connection has to be downstream of the 3x3x2 wye where the shower joins the WC/lav. That is, the washer drain can't run through the wet vent, the wet vent has to only carry bathroom group fixtures.

Originally, I thought the easiest solution was to run from the toilet North to the washer.
Prohibited as discussed above. I did not go over the elevation measurements you provided, as hopefully the idea in the first paragraph will work. If not, I will revisit the rest of your post.

Executing that idea above will be a little tricky as rework, it looks like there's basically no exposed pipe between the 3x3x2 shower wye and the 3" quarter bend in the joist space. If you had access, you could cut off the quarter bend and use a fitting saver type reamer to restore the outlet hub on the 3x3x2 wye, but access appears to be unavailable. So I think you'd have to cut out the 3x3x2 wye and add couplings to the 3" lav/WC drain and the shower/tub trap arm upstream of that fitting.

Of course, to answer the question in the OP, if there is 1-5/8" of pipe exposed between the hubs of the quarter bend in the floor system and the LT90 in the garage, you could just cut out the LT90 without taking any of that 1-5/8" of exposed pipe. After you clean up that stub, that's sufficient to glue on a new fitting like your low heel inlet LT90, the hub depth on a 3" hub is only 1-1/2". That will raise your 3" line in the garage approximately 1-1/2", but you could make that up by just increasing the slope over the 6'+ you appear to have between the existing LT90 and the next fitting on that line (so increasing the slope by 1/4" per foot or less). Or if that is really a problem for some reason, you could get 1.2" of vertical fall on a 3" line by using a street 22.5 bend into a regular 22.5 bend in an offset configuration, and make up the remaining ~0.3" in increased slope.

Since the idea in the last paragraph is much easier and can be executed entirely from within the garage, I'd go with that.

Cheers, Wayne
 
Last edited:
Thanks, Wayne
To clarify the terminology, the lav drain should have its own dry vent in this configuration. From that dry vent takeoff (which should be via a san-tee rather than a wye), the drain is a wet vent until the shower joins at its 3x3x2 wye.
Yes to both. The clothes washer stand pipe has a trap above the floor, and it needs a dry vent (or AAV) connected to its trap arm at that elevation (before the trap arm falls more than one pipe diameter or 2"). Then, when the washer drain connects as we are discussing, that connection has to be downstream of the 3x3x2 wye where the shower joins the WC/lav. That is, the washer drain can't run through the wet vent, the wet vent has to only carry bathroom group fixtures.

I see, appreciate you straightening me out on the wet vent and allowable fixtures. I should have clued in and looked into that closer.

I had planned to vent (probably via a real vent) the washer separately.
Executing that idea above will be a little tricky as rework, it looks like there's basically no exposed pipe between the 3x3x2 shower wye and the 3" quarter bend in the joist space. If you had access, you could cut off the quarter bend and use a fitting saver type reamer to restore the outlet hub on the 3x3x2 wye, but access appears to be unavailable. So I think you'd have to cut out the 3x3x2 wye and add couplings to the 3" lav/WC drain and the shower/tub trap arm upstream of that fitting.

You're right - those joints are tight, but it was entirely an idea I had not thought of. I actually was just learning about those reamers yesterday, though curious about how reliable they are. By my calculation, I might have 5" to work with, and then the 3-1/2" deep joist space between the up and downstairs stud walls. I'm not sure I'd be able to get a reamer and drill in there, and I feel I might not get it straight with a right angle drill.

Of course, to answer the question in the OP, if there is 1-5/8" of pipe exposed between the hubs of the quarter bend in the floor system and the LT90 in the garage, you could just cut out the LT90 without taking any of that 1-5/8" of exposed pipe. After you clean up that stub, that's sufficient to glue on a new fitting like your low heel inlet LT90, the hub depth on a 3" hub is only 1-1/2". That will raise your 3" line in the garage approximately 1-1/2", but you could make that up by just increasing the slope over the 6'+ you appear to have between the existing LT90 and the next fitting on that line (so increasing the slope by 1/4" per foot or less). Or if that is really a problem for some reason, you could get 1.2" of vertical fall on a 3" line by using a street 22.5 bend into a regular 22.5 bend in an offset configuration, and make up the remaining ~0.3" in increased slope.

These are some great ideas, Wayne! I don't work enough with ABS to know if I get into a pitch issue (and inserting the fitting), raising it up another 1-1/2". But, if that isn't looking good, I like the 22.5 combination option.

I suppose a third option would be using a reamer from below, but I fear that being that tight in the corner and without practice I might end up with a joint that isn't as straight or tight as it should be.

Clearly I couldn't have gotten through this without your insights, so thanks for taking the time to help.

Can I ask you a question about the remaining washer drain? After I traverse the joist bay, I have to go up and over a 2' step of sorts, and want to make sure that doesn't lead to a code violation.
 
I suppose a third option would be using a reamer from below, but I fear that being that tight in the corner and without practice I might end up with a joint that isn't as straight or tight as it should be.
Yes, this would let you change your 1-5/8" exposed pipe spigot to be 1-1/2" longer so that the replacement LT90 with heel inlet has its outlet at the same elevation as the existing LT90.

However, reaming ABS is harder that PVC. It generates a lot of heat. I've done it only once, on 2" ABS, and it was a bit of a bear. I recommend avoiding reaming 3" ABS if possible. Or maybe if you used a very slow drill it would be OK.

Can I ask you a question about the remaining washer drain? After I traverse the joist bay, I have to go up and over a 2' step of sorts, and want to make sure that doesn't lead to a code violation.
What's your concern? Once your fixture drain is vented, you can route it however you like, as long as all sections have at least the minimum slope (1/4" per foot).

Cheers, Wayne
 
However, reaming ABS is harder that PVC. It generates a lot of heat. I've done it only once, on 2" ABS, and it was a bit of a bear. I recommend avoiding reaming 3" ABS if possible. Or maybe if you used a very slow drill it would be OK.
Thanks for that context. I will avoid at all costs :)

What's your concern? Once your fixture drain is vented, you can route it however you like, as long as all sections have at least the minimum slope (1/4" per foot).

Cheers, Wayne

No particular concern, just making sure I am not missing something, given it's funky.

The washer alcove would be on the opposite side of the wall shown. The area shown above the step is becoming a bedroom closet, so that end (left of the door) will have to be a reverse soffit.

1. I would mount this on the sidewall of the alcove containing the washer (within arm's reach of the front). I assume code doesn't prohibit.
2. There are a lot of 90's. If I do end up with a 45 ahead of the trap as shown (versus another 90), do you think I should move the cleanout to downstream of the 45's, given how many 90's there are?
3. See anything else of concern?


1791059225120.jpeg
 
Presumably you've drawn the cleanout backwards? I'd place it wherever you can get the best physical access to the cleanout opening when you need to use it, whether that's before or after the 45. (Or at the 45 via making it a wye).

No other comments, no particular reason to think there's anything of concern in your proposed routing, although I'm not 100% confident, just as it is a bit unusual.

Cheers, Wayne
 
Presumably you've drawn the cleanout backwards?
By backwards, I assume you mean into the alcove where the washer will be, versus from within the new closet (what you're viewing in the pic). Since I have to traverse a stud with the 2" drain, I assumed I'd be better to go just beyond the stud (blue tape in the pic), maybe notch it, and fur it out. It is not load bearing stud, just don't want to get flagged for exceeding 60% of the stud. I figured when the cleanout almost flush with the drywall in the alcove, the 300lb all-in-one washer would have to be removed, but that it would be closer to the face of that drywall than being 3" away from the other drywall.

BTW, are you still liking your heat pump dryer? As I recall you had one of those. I think they are improving with time, but eventually we will get one.
 
By backwards, I assume you mean into the alcove where the washer will be, versus from within the new closet (what you're viewing in the pic).
I just meant that it looks like a wye with the branch pointed towards the trap rather than downstream.

Cheers, Wayne
 
With fittings that tight together, I wouldn't try to make up the missing 1-1/2" with a random short piece of pipe. ABS pipe can be cut to whatever length you need, so a short section can be made, but you need enough straight pipe engagement for the fitting connections.

The better approach may be to remove and rework the existing elbow/riser arrangement rather than trying to squeeze another fitting into that small space. A street elbow or another compact fitting may also give you the extra room you need, depending on the exact layout.

I'd post a photo of the actual piping along with the schematic and measurements. The exact fitting combination matters here, especially for maintaining the required slope and proper drainage/venting.
 
Im glad you have IPC and not UPC code our inspectors would bash us for trap height i never will understand why upc mandates the p trap height from floor . the stand pipe length I understand is to prevent siphoning
 
Instead of a separate cleanout, you could replace the 45 with a wye. Then put a 45 into the high port on the wye, and put the AAV 4 inches or more above that 45. Then to clean out the drain line, unscrew the AAV and rod through there. I expect it unlikely the standpipe drain line will ever have a blockage.

The AAV does not have to be higher than the input to the standpipe. 4 inches or more above the trap arm is OK. So you could pick the height for easier access.
 
Back
Top