You are using an out of date browser. It may not display this or other websites correctly.
You should upgrade or use an alternative browser.
You should upgrade or use an alternative browser.
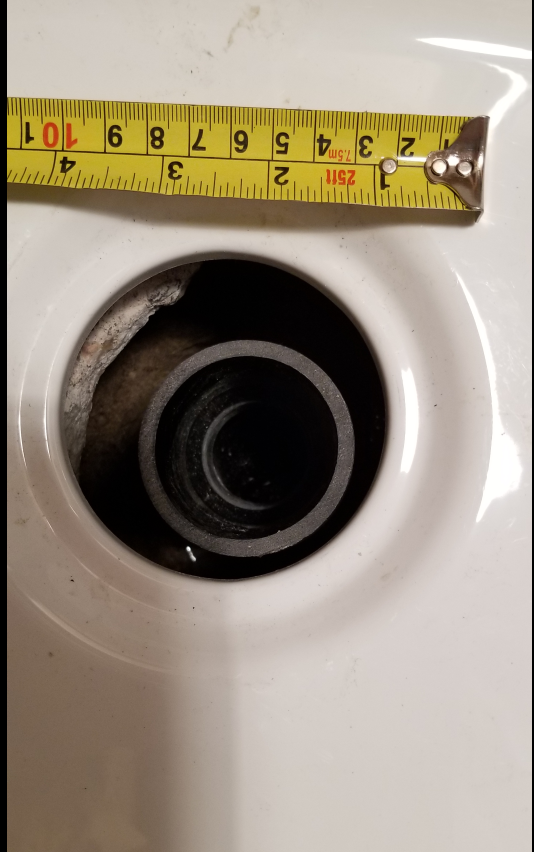
How badly aligned are my drain and my shower drain? (picture attached)
- Thread starter Mini Me
- Start date
Users who are viewing this thread
Total: 5 (members: 0, guests: 5)
wwhitney
In the Trades
Can you push the riser to be centered in the opening with minimal hand pressure? If so, I would expect that to be fine.
If not, looks like you'd only have to move the base a smidge to get it centered over pipe, and then you can just deal with whatever shimming/notching etc you need to do to make that happen.
Cheers, Wayne
If not, looks like you'd only have to move the base a smidge to get it centered over pipe, and then you can just deal with whatever shimming/notching etc you need to do to make that happen.
Cheers, Wayne
Sponsor
Paid Advertisement
So is it ok if it is off and not centered and perfectly vertical?
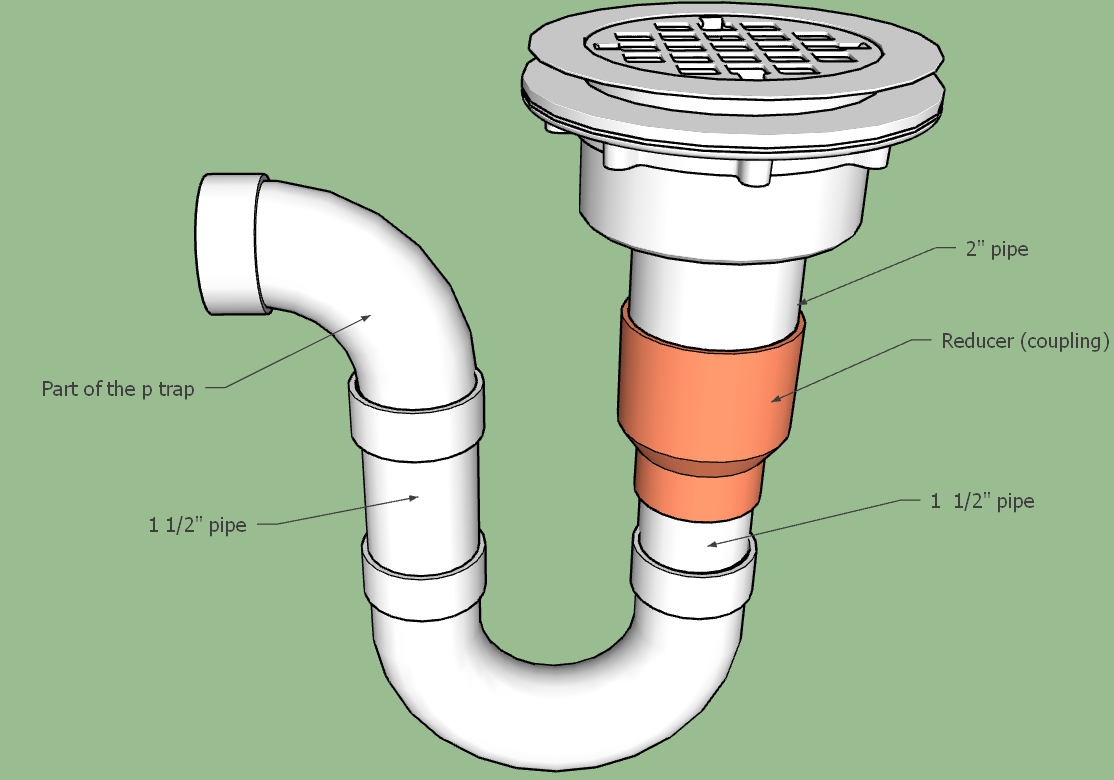
Pullong it a little bit will get it off its vertical position and the gasket wont equally press around the 2" pipe. I could chose to bent the 2" pipe a little bit? that is still unwelded. If you remember I have a 2" to 1.5" reducing coupler and that one is also not glued yet
Pullong it a little bit will get it off its vertical position and the gasket wont equally press around the 2" pipe. I could chose to bent the 2" pipe a little bit? that is still unwelded. If you remember I have a 2" to 1.5" reducing coupler and that one is also not glued yet
Jeff H Young
In the Trades
your framing might alloy fudging the pan say an 1/8 or 3 /16 inch can't you push the trap over with a wedge or something? the lower you can push it over the more plumb that will be and giving you a better fit up
Breplum
Licensed plumbing contractor
It really must be completely aligned and vertical.
The existence of this guy contradicts the aboveIt really must be completely aligned and vertical.
In my case I could solve the problem by bending the 2" piece that you see below
The elements that are above the P trap on the left side are not glued in place yet so I still have time and the option to adjust them
Here is what my configuration looks like the 2" pipe is not visible in the picture below because the shower drain is inserted all the way in order to see what would be the minimum distance above the slab where the drain will sit. The below is a left over that I first built and I did it wrong
")
Dj2
In the Trades
Not glued yet?
- you're in a better situation than I thought.
- you're in a better situation than I thought.
I figured out I will need some adjustments. The shower base is very heavy (Kohler Ballast very well built!) and I was using a template to make sure the hole is where it should be and the drain should be where it should be.Not glued yet?
- you're in a better situation than I thought.
What I did not account for was that the shower base and the framing will not align perfectly
PS I still have the option to use a jointer to make the base align better with the framing or notch it the frame a little (I had that plan in order to better align the cement board at the bottom when it overlaps the shower base flange)
Last edited:
Tughillrzr
In the Trades
Hum. Seems like if not glued your all set to shift to center. Only problem I see is that a shower is required to be a 2 inch trap/drain pipe at least where I’m located. Tub is 1.5”
Yes I got that but I have no alternatives as the rest of the pipe is well under the slab and I did not want to break the floor to dig it out. I am all for following the code as long as the code is there to mitigate problems and not for corner cases or low risk/probability situations. There will be no inspection here and as far as I understand the 2" requirement is there becauee the pan cant hold lots of water till it drains unlike the tub. Tthe pplumbing that I am reusing was for a tub and sink...The same is now used for a shower and a sink. I count on the fact that the user will turn the tap off if by any chance the drain gets clogged or overloaded and it cant cope with the colum of water that comes to it. So I believe that this is anrasonable risk to take ....besisdes that for the first two three inches my pipe will be 2" which should make the problem milder.Hum. Seems like if not glued your all set to shift to center. Only problem I see is that a shower is required to be a 2 inch trap/drain pipe at least where I’m located. Tub is 1.5”
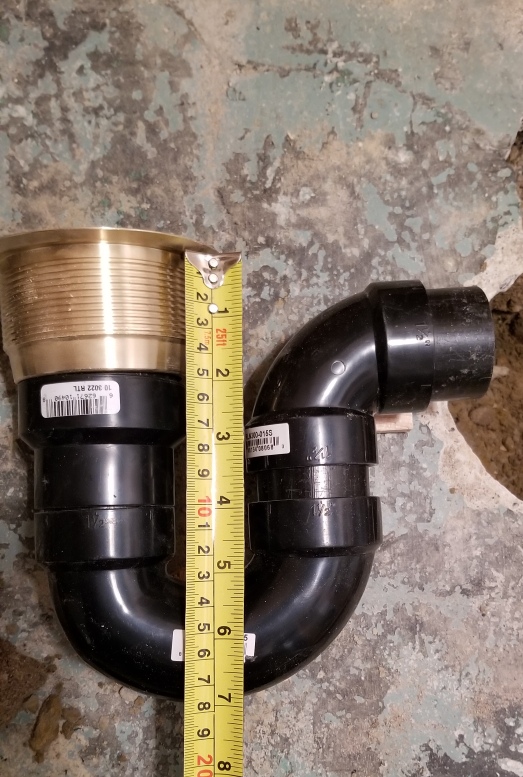
OK the offset drain that I mentioned above is not a solution (because unlike the brass this is not a no caulk one and it adds a hub and the collector cassette is also 4" all the way down for like 2" below the shower base
I will have to bend a piece of 2" ABS pipe to compensate for the offset I am having problems with
I will have to bend a piece of 2" ABS pipe to compensate for the offset I am having problems with
Jeff H Young
In the Trades
if its tweaked , cocked and stress on the connection you've got trouble if you have movement it might be ok . kind of a judgement call on your part . no matter if we say its fine or tell you tear it out and redo its on you, that said I THINK you can make it work just fine, the closer you can get it to perfect the better
As for an 1 1/2 instead of a 2 inch drain . In my Code its always been 2 inch and I recommend 2 inch but I've seen many tubs changed to shower like that with no problem. again not my recommendation but don't think you'll be turning off water to let it the pan drain half way through your shower . if drains are clear it should function normal.
As for an 1 1/2 instead of a 2 inch drain . In my Code its always been 2 inch and I recommend 2 inch but I've seen many tubs changed to shower like that with no problem. again not my recommendation but don't think you'll be turning off water to let it the pan drain half way through your shower . if drains are clear it should function normal.
wwhitney
In the Trades
Looks like the Ontario Code allows 1-1/2" for a shower drain for a shower with 1 shower head.
http://www.buildingcode.online/1063.html
IPC allows 1-1/2" for shower heads up to 5.7 gpm (if I recall). UPC requires 2".
Just move the shower base slightly and adjust the framing as required. Or cut out and start over, using your first attempt as a reference point for how long you have to make the critical pipe section, see below.
If you dry fit everything perfectly, then you may not have accounted for the fact that a dry fit does not usually fully seat the pipe in the socket, while the solvent cement lubricates/melts the mating surface to allow you to fully seat the pipe. So what I do, for each size I'm using, is carefully measure a piece of pipe and glue up a test joint or a joint where I don't need perfect accuracy. Then I carefully measure final hub to hub distance; the difference from the pipe length is joint take-up. When I have a critical joint, I position my fittings with the desired hub to hub distance, measure that, and add the take-up to get my pipe length.
Cheers, Wayne
Jeff H Young
In the Trades
Dry fit and the final glue up are often 2 different things indeed as Wayne says. that's why I often just go for it glue it up and check quickly if doesn't fit pull it apart before glue dries. Same as Wayne said I mentioned earlier fudging the pan pull it away from wall a tiny amount if possible every job a little different.
Didn't know about IPC and Canada codes allowing 1-1/2 for showers seen them here illegal but functioning
Didn't know about IPC and Canada codes allowing 1-1/2 for showers seen them here illegal but functioning
I need to move the pan toward the wall and into the framing not away of it.
I have a 9mm offset that I need to compensate by bending a piece of 2" ABS pipe
Speaking of quickly pulling out the glued fittings immediately after just being cemented how reliable are the parts after you do that ? Can you still reuse them ? Or even later after then are well cemented and the joint cured ?
Here is a video showing 4 ways to do it but I would not trust a recycled fitting ....should I ?
James Henry
In the Trades
Just sand the old glue off as best you can.
wwhitney
In the Trades
Notching wood framing 3/8" is no problem structurally, and not so hard to execute. And for the wall tile board to properly lap the base flange, you'll need to either notch the framing for the base or fir out all the framing.I need to move the pan toward the wall and into the framing not away of it. I have a 9mm offset . . .
Cheers, Wayne
Jeff H Young
In the Trades
pull pan and start over if necessary. you should know where center of trap needs to be by now. just one of those things happens to all of us . you'll get it!
Similar threads
- Replies
- 1
- Views
- 139
- Replies
- 2
- Views
- 102
- Replies
- 0
- Views
- 189