Help identify copper purpose

Users who are viewing this thread

Rdura

New Member
Messages
21
Reaction score
1
Points
3
Location
California
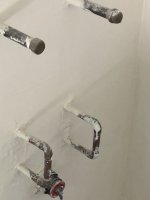
My plumber installed interior copper as seen in photo 1, and external copper in photo 2. Internally there will be a sink with a wall mount hot/cold faucet. I'm hoping someone can explain the purpose of the lower 1/4 inch pipes ... do they remain as perhaps a water hammer mitigation design?

Externally, I will have an electric h/w heater, but not sure what to make of the pipes making a "U" shape. Is it just a convenient way to cap off the copper until the heater is plumbed, and if yes, can someone let me know which pipe is "water in" to the heater and which on is "water out" of the heater. I am guessing the pipe on the right feeds the heater, and the pipe of the left is the hot water feeding the shower and sinks,

I'm hoping to plumb the hw heater myself. For perspective, the space of this tiny structure is 120 sq ft.

IMG-3286.jpeg
IMG-3287.jpeg
 

Jeff H Young

In the Trades
Messages
8,893
Reaction score
2,221
Points
113
Location
92346
correct pic 2 water heater cold on right hot on left pic 1 for sink the pipes on top are for faucet. the loop on left is hot loop on right is cold 1/2 inch lines my guess not 1/4? those loops were meant to have valves in them purpose of shutting off water to service or change wall faucet in future can be my only guess Id ask my plumber but pretty sure that's what he did.
120 sq foot is good reason for w/h outside
 

Rdura

New Member
Messages
21
Reaction score
1
Points
3
Location
California
Thank you! So for the external plumbing, un-do the welds so that I've got two uncapped copper pipes sticking out of the wall. From there, do the connections to the Stiebel.

For the interior, do I (precisely, not much room for error there as everything is in a fixed position) insert some type of inline valves?
 

Rdura

New Member
Messages
21
Reaction score
1
Points
3
Location
California
Should I be looking to install one of these on the interior wall mounted faucet supply lines.

It's a 1/2 in. Compression Inlet x 1/2 in. Compression Outlet Multi-Turn Angle Valve.

If I'm lucky I can use those two short pieces of copper once I take them off and clean them up? When all is done, I have four desoldered elbows and two new valves.

Thank you for your help. Obviously not a plumber, every dollar saved counts.
 

Attachments

  • valve.jpg
    valve.jpg
    38.2 KB · Views: 132

Reach4

Well-Known Member
Messages
38,862
Reaction score
4,430
Points
113
Location
IL
I
the space of this tiny structure is 120 sq ft.
That is like an 11 ft square or 10x12. Those California codes must be really loose. Planning to rent that out on Airbnb?

I was intially thinking it was maybe a provision for a water softener, but not for something that small.
For the interior, do I (precisely, not much room for error there as everything is in a fixed position) insert some type of inline valves?
There is enough length that the pipes could be cut rather than unsoldered. Somebody either solders, or uses compression fittings, or maybe even Sharkbites after you clean stuff off. That outdoor piping looks pretty old. Compression take more torque than you may think. Many undertighten thinking they will crush the pipe.

Measure your pipes. 1/2 inch copper is 5/8 OD.
 

wwhitney

In the Trades
Messages
6,559
Reaction score
1,843
Points
113
Location
Berkeley, CA
Compression take more torque than you may think.
Read the instructions that come with the compression valve. The ones I've been installing say "put a drop of oil on the threads, hand tighten, and then wrench tighten 1/2 turn." That has worked well for me for 7 valves so far.

Cheers, Wayne
 

Rdura

New Member
Messages
21
Reaction score
1
Points
3
Location
California
I

That is like an 11 ft square or 10x12. Those California codes must be really loose. Planning to rent that out on Airbnb?

I was intially thinking it was maybe a provision for a water softener, but not for something that small.

There is enough length that the pipes could be cut rather than unsoldered. Somebody either solders, or uses compression fittings, or maybe even Sharkbites after you clean stuff off. That outdoor piping looks pretty old. Compression take more torque than you may think. Many undertighten thinking they will crush the pipe.

Measure your pipes. 1/2 inch copper is 5/8 OD.


I don't think I'll rent it, it's more of a place for a friend or relative to stay. Because of no rental income, I'm trying to save money building it out. Maybe (big maybe) it helps someday with resale value. Thank you for the measurement tip, I will definitely put a caliper on it.
 

Rdura

New Member
Messages
21
Reaction score
1
Points
3
Location
California
Read the instructions that come with the compression valve. The ones I've been installing say "put a drop of oil on the threads, hand tighten, and then wrench tighten 1/2 turn." That has worked well for me for 7 valves so far.

Cheers, Wayne

Thank you for this tip
 

wwhitney

In the Trades
Messages
6,559
Reaction score
1,843
Points
113
Location
Berkeley, CA
The usual questions:

[I see from the other thread that you used Redguard to waterproof the Hardibacker.]

What did you use for a sloped waterproofing layer on the floor?

Cheers, Wayne
 

Rdura

New Member
Messages
21
Reaction score
1
Points
3
Location
California
OK ... so starting w/the slab. Thinset slurry, deck mud presloped to drain base. Then on top of this preslope, redgard and laticrete felt at all changes of plane, also redgarded. From there another inch of deck mud going to drain grate. Then thinset, and tile.
 

Jeff H Young

In the Trades
Messages
8,893
Reaction score
2,221
Points
113
Location
92346
rdura , using an anglestop would be one way . I would have likely sweated a ballvalve on at rough. anglestop works too , but its tight almost need an adapter and short flex for easy hook up .
A comment to reach 4 on these small living units. a few years ago they started a program I believe called a ADU . adult dwelling unit. Anyway they permit these I think for family members but may be allowing them as separate rentals. I wouldn't know whether to call our zoning loose or tight. they have reasons for all the silly rules just gotta know which ones you like or don't. As huge as ca is we aren't all urban dwellers, though many things seem to be pushing us that way. like how can you live far away from work when we are trying to outlaw gasoline? a whole ton of politics going on and whole state is controlled by those with a D next to their name so If you are happy you know who to thank and if you aren't you got someone to blame too. Happy Fathers Day to Dads!
 

Rdura

New Member
Messages
21
Reaction score
1
Points
3
Location
California
Assuming I unsolder the elbows, and I cleaned up the ends of the copper, could I simply replace the lower two copper elbows with this valve? My thinking is: all of the existing copper is sized by length to insert into a fitting, and the depth of insert for the 1/2 inch compression valve would be the same depth as inserting into a copper elbow. Thus: unsolder top two and bottom two elbows. Insert compression valve when bottom two elbows used to be. Clean up and re-use top elbows and short piece of copper. Or ... cut the copper running vertically making for an easier removal of the elbows. Use valve at bottom, use new copper and new elbow to join into the top.
 

Attachments

  • IMG-3286.jpg
    IMG-3286.jpg
    37.6 KB · Views: 118
  • valve.jpg
    valve.jpg
    38.2 KB · Views: 126

Jeff H Young

In the Trades
Messages
8,893
Reaction score
2,221
Points
113
Location
92346
Assuming I unsolder the elbows, and I cleaned up the ends of the copper, could I simply replace the lower two copper elbows with this valve? My thinking is: all of the existing copper is sized by length to insert into a fitting, and the depth of insert for the 1/2 inch compression valve would be the same depth as inserting into a copper elbow. Thus: unsolder top two and bottom two elbows. Insert compression valve when bottom two elbows used to be. Clean up and re-use top elbows and short piece of copper. Or ... cut the copper running vertically making for an easier removal of the elbows. Use valve at bottom, use new copper and new elbow to join into the top.
whatever way you choose is fine .
 
Top
Hey, wait a minute.

This is awkward, but...

It looks like you're using an ad blocker. We get it, but (1) terrylove.com can't live without ads, and (2) ad blockers can cause issues with videos and comments. If you'd like to support the site, please allow ads.

If any particular ad is your REASON for blocking ads, please let us know. We might be able to do something about it. Thanks.
I've Disabled AdBlock    No Thanks