Fixing a slight toilet wobble?

Users who are viewing this thread

SternJ

New Member
Messages
6
Reaction score
0
Points
1
Location
DC
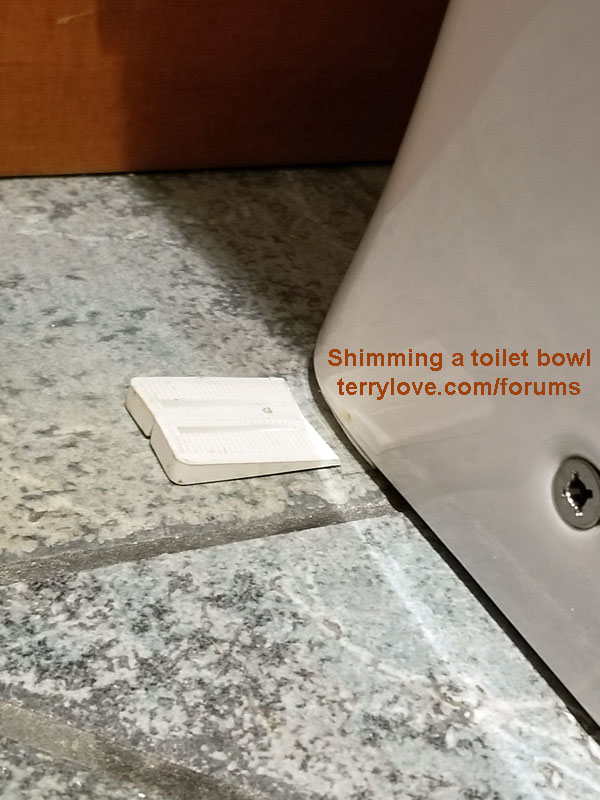
I just installed a new Ultramax II and noticed some very slight wobble while caulking (~1/32 of an inch in the very front). Is this something the caulking will fix as it cures or do I need to remove the toilet, get a new wax seal, and start over? Thanks for the advice and this great forum!

P.S. Lesson learned, the "Danco Perfect Seal" wax ring does NOT seem to work with a 1/2" high flange on the Ultramax II :-( . I may have just be doing something wrong, but the toilet wouldn't even make contact with the floor. I threw it out and used a normal wax ring instead.
 
Last edited:

Reach4

Well-Known Member
Messages
38,846
Reaction score
4,427
Points
113
Location
IL
https://www.danco.com/product/perfect-seal-toilet-wax-ring/ says
Depending upon the height of the floor flange and the toilet horn, there may be instances when the toilet may not sit flush to the floor. In these situations, the black plastic ring that is inside the gray rubber casing of the Perfect Seal can be removed. The removal of this hard plastic ring will allow the Perfect Seal to be fully compressed and the toilet should then sit flush with the floor.​

I have never used one of those, and I don't know where the black ring is. But did you remove that?
 

SternJ

New Member
Messages
6
Reaction score
0
Points
1
Location
DC
https://www.danco.com/product/perfect-seal-toilet-wax-ring/ says
Depending upon the height of the floor flange and the toilet horn, there may be instances when the toilet may not sit flush to the floor. In these situations, the black plastic ring that is inside the gray rubber casing of the Perfect Seal can be removed. The removal of this hard plastic ring will allow the Perfect Seal to be fully compressed and the toilet should then sit flush with the floor.​

I have never used one of those, and I don't know where the black ring is. But did you remove that?

Yeah, even with no ring it was still floating above the floor. I threw it out and got a normal wax ring instead.
 

Reach4

Well-Known Member
Messages
38,846
Reaction score
4,427
Points
113
Location
IL
You need to lift the toilet, and remove most of the the wax. Place shims where they will go to prevent rocking. Leave the shims or mark the position if they don't want to stay in place as you lift again. Place the new wax, and set the toilet on the shims. Sit on the toilet to squish, and tighten the closet bolt nuts.

Trim the shims at the edge if needed. Then caulk.


toilet-shims-terrylove-01.jpg
 
Last edited by a moderator:

SternJ

New Member
Messages
6
Reaction score
0
Points
1
Location
DC
Thanks! Any advice on the best way of shimming such a small movement? It is moving about the the width of a piece of paper (or two) that I can mostly only see due to the light bouncing off the caulk differently. I haven't noticed the back of the toilet moving at all and am not entirely sure this is not the result of the underlying tile flexing a bit. (The very front of the toilet is on a tile that is slightly lower than the main tiles.)
 

Jadnashua

Retired Defense Industry Engineer xxx
Messages
32,770
Reaction score
1,190
Points
113
Location
New England
Personally, I find an assortment of coins work for me as shims rather than the tapered plastic ones you can buy. And, I don't have to make a run to the store to buy shims! But, if say a dime is too thick, I'd have to rethink. Most of the plastic shims I've seen don't taper to a point, so they may not work either. You want something that won't compress over time, so some softwood shims may not work well. Got an expired credit card you can cut up? Those are usually thinner than the dime. Usually, a dime, penny or maybe a nickel have worked for me. Some people look for coins minted in the year you set the toilet as a marker of when it was installed.
 

Dana

In the trades
Messages
7,889
Reaction score
509
Points
113
Location
01609
Plaster of paris (instead of caulk) is sufficiently incompressible, will flow into even the thinnest of cracks with a bit of pressure, and won't introduce pressure points on the porcelain the way shims will. It sets up quickly so you have to work fast, but cleans up easily with water & sponge or cloth while working it. It's adhesion is lower than caulk, and won't glue the toilet to the floor.
 

Reach4

Well-Known Member
Messages
38,846
Reaction score
4,427
Points
113
Location
IL
I have tapered door shims on a belt sander. That was not for a toilet, but it was not for a window or door either.

Whether your tiny wobble has already fissured the wax enough to bother with, I don't know. Maybe the wax could heal that. It may be that some shims stuck into the toilet now without much force, and then getting somebody to sit on the toilet while you tighten might be sufficient to keep smells out.
 

SternJ

New Member
Messages
6
Reaction score
0
Points
1
Location
DC
Thanks for the advice everyone! I took the toilet back off (woohoo for following Terry's advice and using loctite instead of silicon!!!) and think I found the underlying issue. My closet flange is one of the TKO style from Sioux Chief with the notches (not the slots) parallel to the wall. At the same time, from what I can tell the (my) UltraMax II mounting holes are slightly off from the center of the horn. As a result, if the bolts are perpendicular to the floor the toilet does not fit into the flange and if leave the bolts at a slight angle, I seem to be pulling the toilet off the flange as I I tighten the bolts???!??! In the image below, I cannot position the toilet successfully such that the nuts will fit through the mounting holes. :(

The flange appears to have been place 12 inches from the baseboard and not the wall, but I presume that doesn't affect mounting and just means there will be slight gap behind the toilet and the wall.

IMG_0168.JPG
 

Reach4

Well-Known Member
Messages
38,846
Reaction score
4,427
Points
113
Location
IL
1. Are you saying that the slots are equi-distant from the wall, but the top of the flange tilts toward or away from the wall?

If your bolts are 5/16, try 1/4 inch bolts. If your bolts are 1/4, put a drill with a 5/16 or 3/8 inch drill bit into each slot. Twist the drill to modify the slots to let the bolts sit vertically.

You could also sand or rasp off the high edge of the flange. A portable belt sander would be the tool of choice if handy, but 5 minutes with course sandpaper or a rasp could do the job.

2. How about using a "Flange-Off" or "Pipe Parana" 3 inch tool to remove the existing flange?
https://terrylove.com/forums/index.php?threads/toto-ultramax-ii-and-flange-height.61757/
https://www.plumbingsupply.com/pipe-fitting-removal-tool.html

Not cheap. Maybe you could sell it used when done.


3. Finally, you could cut away that outside flange and put in a 3 inch inside flange. If you glue the new flange into place, get a flange with a stainless steel ring. You could try a 888-GPM Push-Tite flange. It uses gasketing rather than glue. However I suspect your 3 inch pipe is tilted, and that is another flange that has those thick plastic flanges. At least if it does not work out, it is easy enough to remove -- unlike the glued flanges.
 
Last edited:

SternJ

New Member
Messages
6
Reaction score
0
Points
1
Location
DC
The notches are equi-distance to the wall and the flange seems to drop vertically.

IMG_0171.JPG

Not being a plumber, the only thing that really seemed out of place to me is the notch instead of the slot. (I looked at the bottom of the toilet and there was no excess material from the factory. ) When I did a test fit (no wax), the 1/4" bolts just barely fit in the corner of the Ultramax II mounting hole. There was no room for a nut to help hold up the bolt or even one of those Johni quick bolt washers.
IMG_0169.JPGl

However, I think I solved my issues by shimming the toilet just slightly out of level, but still well within the bubble lines. This caused the mounting hole to be angled slightly forward and gave the bolt some breathing room. I'm a little concerned that the back of the toilet is just sitting on shims, but the wobble appears to be gone and I threw in some extra shims before caulking out of paranoia. The caulk is drying now, so I'm keeping my fingers crossed I don't discover any other issues.

Thanks again for the help and advice!
 

Jadnashua

Retired Defense Industry Engineer xxx
Messages
32,770
Reaction score
1,190
Points
113
Location
New England
FWIW, the notches are stronger than the slots. But, most plumbers do not recommend an all-plastic toilet flange because regardless of whether you use the slots or the notches, they are much more prone to breaking than one with a metal rim (prefer SS so it can't rust).

The horn on the toilet usually has enough slop in it to be slightly off from centered on the flange, and that should allow the bolts to sit vertical.

Do you get the same result if you try to dry fit the toilet on the flange without the wax? If some of those all-plastic flanges are not tight to the flooring (i.e., a gap underneath it), they can sit too high and prevent the toilet from sitting flat.
 

SternJ

New Member
Messages
6
Reaction score
0
Points
1
Location
DC
FWIW, the notches are stronger than the slots. But, most plumbers do not recommend an all-plastic toilet flange because regardless of whether you use the slots or the notches, they are much more prone to breaking than one with a metal rim (prefer SS so it can't rust).

The horn on the toilet usually has enough slop in it to be slightly off from centered on the flange, and that should allow the bolts to sit vertical.

Do you get the same result if you try to dry fit the toilet on the flange without the wax? If some of those all-plastic flanges are not tight to the flooring (i.e., a gap underneath it), they can sit too high and prevent the toilet from sitting flat.

There seemed to be less tolerance when dry fitting the toilet and a little more room once shimmed with the wax ring was inserted. The flange sat at exactly 1/2 inch above the finished floor, so given how low the Ultramax base is my installation didn't seem very forgiving or tolerant towards anything but a plain wax ring and bare bolts snug against the mounting holes. I was JUST able to get everything put together in a manner that seems even remotely sane and am keeping my fingers crossed that I didn't screw anything up. :)

Thanks for the info!
 
Top
Hey, wait a minute.

This is awkward, but...

It looks like you're using an ad blocker. We get it, but (1) terrylove.com can't live without ads, and (2) ad blockers can cause issues with videos and comments. If you'd like to support the site, please allow ads.

If any particular ad is your REASON for blocking ads, please let us know. We might be able to do something about it. Thanks.
I've Disabled AdBlock    No Thanks