You are using an out of date browser. It may not display this or other websites correctly.
You should upgrade or use an alternative browser.
You should upgrade or use an alternative browser.
DWV Revised need input
- Thread starter Casman
- Start date
Users who are viewing this thread
Total: 3 (members: 0, guests: 3)
View attachment 73099 1st floor bathroom, wide open from basement to 1st level roof. 1890’s farm house. Very small 5 1/2 x 5 1/2. Sorry for my 2nd grade drawing. Bathroom to have wall hung toilet, shower, and sink. So far here’s my plan. The second long sweep 90 is to get under the floor joist. I plan to tie in to the original horizontal drain line near the floor. The original stack minus the vent is still there just on the diagonal corner from the new toilet location. Any advice greatly appreciated. I haven’t figured out shower drain situation yet but considered utilizing the original stack and if necessary running another 2 inch vent up and tying in before through the roof.
Attachments
Sponsor
Paid Advertisement
wwhitney
In the Trades
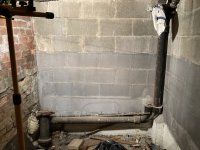
The collection of fittings in the upper right corner of your first photo, it's hard to tell what they are. Are any other drains coming into area, or can you just remove all of those and use the vertical drain for just the 3 bathroom fixtures? If other drains are coming in, we'd need to know about those and get a close up picture of what's going on there.
On a floor plan (or the last photo), how about drawing the locations of the in-wall toilet drain connection, the lavatory, and the shower and drain?
The connectivity in your drawing looks OK, but obviously you need to add the shower in. And that's an awful lot of 90 degree bends, hopefully there's a solution that would use fewer or change some to 45 degree bends.
Cheers, Wayne
Wall 1. Starting at shower with a 3 inch pipe and adding a 3 3 2 wye to pick up the shower drain. Next is a long sweep 90 to turn the corner. I picked the long sweep 90 vs just a 90 as I thought less prone to clogs. Onto wall 2.
Wall 2 picking up with that 90, the 3 inch pipe the adds a 3 3 2 wye for a 2 inch vent up and through the roof. Next the 3 inch line picks up the toilet with a 3 3 3 San T, before entering a long sweep 90 (turning the corner) to get to wall 3.
Wall 3 runs 3 inch to a 3 3 1.5 to pick up the sink. The sink drain enters the 3 inch pipe straight on with a reducer bushing 3 to 1.5. The 1.5 also serves as the sink vent up and out through the roof. Below the 3 inch pipe goes straight down and out the drain line.
Hope this makes sense.
Good grief. It’s been a long time since I did a remodel but looking at this this looks fairly stupid. Now I think I should just reconfigure the original stack in the corner to accept the sink, shower and toilet and vent accordingly
wwhitney
In the Trades
Yes, starting fresh sounds like a good idea. So how about a floor plan (not an elevation) showing the fixtures, the drain below you need to tie into, and the location of any existing vents above that you can make use of?
Cheers, Wayne
Cheers, Wayne
Tuttles Revenge
In the Trades
- Messages
- 4,178
- Reaction score
- 1,440
- Points
- 113
Looks like you have the room in that tiny crawler to put the plumbing anywhere you want. Draw your best layout for the bathroom design that you want and work to that goal. Anything is possible.. just time and money.
Tuttles Revenge
In the Trades
- Messages
- 4,178
- Reaction score
- 1,440
- Points
- 113
What is the walking distance between your toilet and the sink? That seems kinda narrow to me without knowing your overall dimensions. Is there room to put the sink and toilet on the same wall?
If it were me.. I think I would place the toilet between the sink and the shower. That is how I see most bathrooms designed.
If it were me.. I think I would place the toilet between the sink and the shower. That is how I see most bathrooms designed.
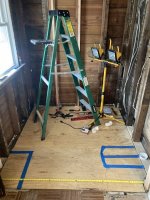
This bathroom is very small. Width is 69” total x 7’2 Wall hung toilet projects 20”, and sink only projects 12”, approx 3 feet between front of toilet to sink edge. The placement was basically decided once the room was demolished. Built in 1890 and somebody made a mess over the years by removing several load bearing studs. I had to replace the floor joists as well as they’d chopped them up to near nothing. The shower will be at the back, approx 34 deep by 69 wide. The window is being moved and replaced with an awning window. Can’t have part of a window in the shower. I did extend the room a bit see pic below, also going with a pocket door to save space
Attachments
Last edited:
Tuttles Revenge
In the Trades
- Messages
- 4,178
- Reaction score
- 1,440
- Points
- 113
Right on! Looks like the toilet carrier fitting next to the shoes. Make sure the frame of the carrier is FLUSH with the rough wall surface or the toilet will smoosh through the finished wall whatever gap there is. What carrier / toilet combo are you using?
Right on! Looks like the toilet carrier fitting next to the shoes. Make sure the frame of the carrier is FLUSH with the rough wall surface or the toilet will smoosh through the finished wall whatever gap there is. What carrier / toilet combo are you using?
Brand is FineFixtures complete combo. I think they’re outta Europe. Had great reviews and just have to figure out the height. I replaced and doubled up the wall, true 2x4’s, but the mounting bolts are now too short so going with lag bolts. The Wedi shower kit is on the way, heated floor, components for a lighted niche, but lots more to do. I decided to just use original stack as I don’t know wtf I was thinking, got fittings all over the place. I capped the top of the unused stack vent using a 5.5 inch. Fernco cap. I think I’m ok to glue up a few fittings. The new 2 inch vent will be shared by the toilet and shower with the sink drain on its own 1.5 vent tying into the 2 in the roof area.
Tuttles Revenge
In the Trades
- Messages
- 4,178
- Reaction score
- 1,440
- Points
- 113
Looks good. Looks like most carrier manufactures have moved cross bars behind where the toilet will cantilever and crush through the finished wall now, so you're good on that aspect. I would mount the toilet to the frame before you sheetrock to test if or how it bounces. After the sheetrock crushing behind the toilet, a bouncing carrier is the biggest complaint I've experienced. That old growth should be super sturdy tho!
Thank you I will definitely do that. I think you’re right on the old growth. The farm carpenters had no issues removing lots of load bearing studs, sometimes 2 in a row. Seems this house was floating. I’m not surprised as 20 years ago I went to replace upstairs toilet and noticed a doubled joist cut all the way through. Did some investigating and they cut out both joists, on both sides to apparently fit plumbing on one end and duct work on the other. That forced the remodel. I forgot 1 question. Can the shower drain share the 2 inch vent which exists on the 3 inch toilet line?Looks good. Looks like most carrier manufactures have moved cross bars behind where the toilet will cantilever and crush through the finished wall now, so you're good on that aspect. I would mount the toilet to the frame before you sheetrock to test if or how it bounces. After the sheetrock crushing behind the toilet, a bouncing carrier is the biggest complaint I've experienced. That old growth should be super sturdy tho!
Tuttles Revenge
In the Trades
- Messages
- 4,178
- Reaction score
- 1,440
- Points
- 113
No drains can use another fixtures vent unless its properly wet vented. The original fitting you have, those are all drains entering horizontally and the toilets vent is taken off the top of where the drains enter it. The other branches would need to be vented indvidually.
Tho I suppose that fitting would work in a horizontal wet venting system as long as trap arm lengths are maintained. Not sure what code you're under, but the UPC (except for washington state) require the toilet to the the most downstream fixture (some dumb idea that you need other fixtures upstream to help wash down waste) in which you could argue that fixture complies with that.
Tho I suppose that fitting would work in a horizontal wet venting system as long as trap arm lengths are maintained. Not sure what code you're under, but the UPC (except for washington state) require the toilet to the the most downstream fixture (some dumb idea that you need other fixtures upstream to help wash down waste) in which you could argue that fixture complies with that.
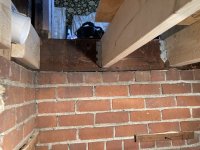
Thank you. I will add another vent off the shower. I don’t suppose there’s a way to add back in a 2 inch vent from the top of the original stack? It had a 3 inch pipe vent but it was in the room. See pic, I put a fernco cap on

I think I have a new idea, if I put a fernco donut on the top of that stack, with a short 3 to 2 reducer, then I can 45 to get inside the wall then up. This would serve as the vent for the shower?
The top pic is the sink drain w/ vent, the in wall toilet with 2 inch vent then vent the shower near the top left where the original 3 inch vent was.
Similar threads
- Replies
- 3
- Views
- 261
- Replies
- 1
- Views
- 188
- Replies
- 9
- Views
- 500
- Replies
- 12
- Views
- 317