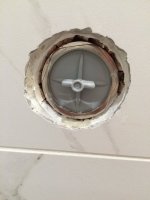
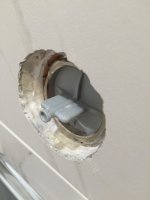
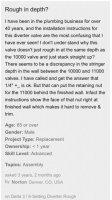
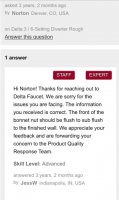
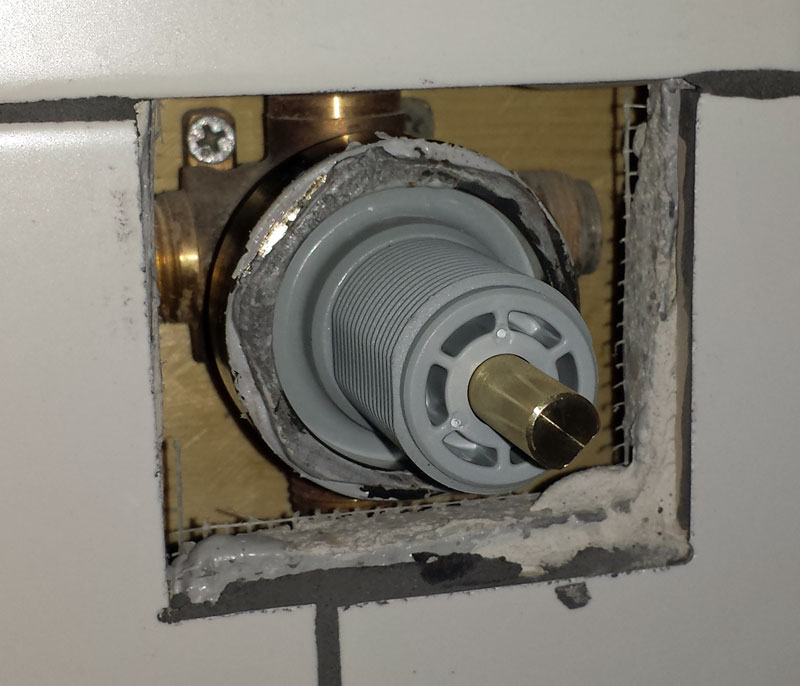
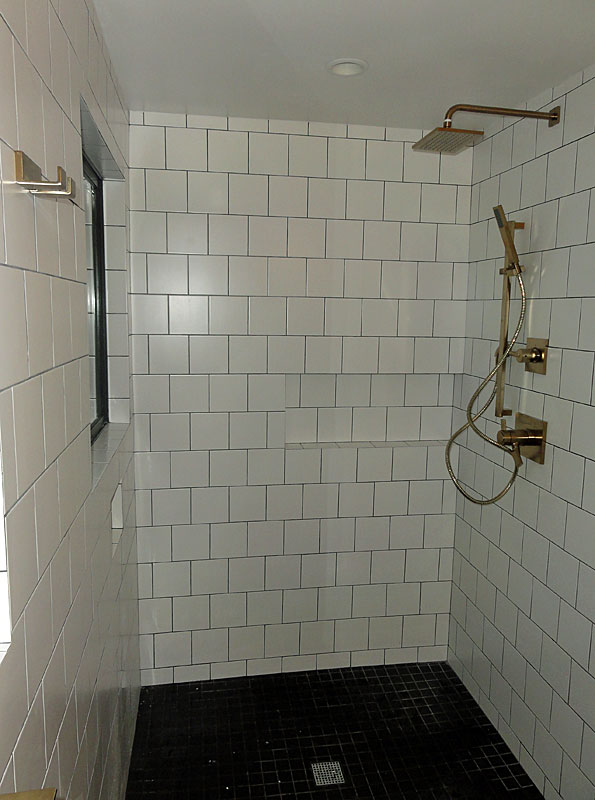
At trim out stage for shower and the Delta diverter valve (R11000 3/6 diverter) bonnet nut is sub-flush with the tile wall. This is how Delta installation instructions said to do it and their support maintains it should be done. How are you supposed to get the bonnet nut off when it's recessed behind the wall tile? I cannot get channel locks, a pipe wrench, or adjustable wrench on it. Is the only way to buy a big socket? Seems like it would be expensive for a ~2" deep socket for one time use. Any other suggestions? Is this problem common? I've attached pictures of my rough in and screen shots of the install instructions and a conversation between someone and Delta on Delta website support regarding this issue.
You are using an out of date browser. It may not display this or other websites correctly.
You should upgrade or use an alternative browser.
You should upgrade or use an alternative browser.
Delta R11000 Diverter Valve Bonnet Nut Removal
- Thread starter mschoenn
- Start date
Users who are viewing this thread
Total: 3 (members: 0, guests: 3)
hj
Master Plumber
- Messages
- 33,603
- Reaction score
- 1,042
- Points
- 113
- Location
- Cave Creek, Arizona
- Website
- www.terrylove.com
Well, obviously the engineer who designed it NEVER tried to actually install one, which is very common with engineers. He probably thought it was the greatest thing he ever did.
Sponsor
Paid Advertisement
That seems pretty deep for "flush to sub-flush". I expect you would need to make the hole in the shower bigger. I suspect the trim you have would cover more without having to get a bigger trim plate.
For a tool, a "claw wrench"/"gear wrench" made for oil filters looks interesting.
 You would want to measure the size of the nut with a caliper before tool shopping. A 9LN Vice-grip plier might be able to grab two flats.
 My comments are not based on experience.
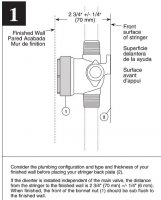
the distance from the stringer to the finished wall is 2-3/4" +/- 1/4".
I guess that suggests that the surface of that big nut might be recessed 1/2 inch.For a tool, a "claw wrench"/"gear wrench" made for oil filters looks interesting.
Last edited:
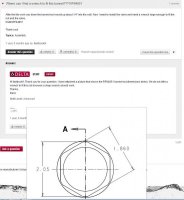
I found the size of the nut on a Delta support discussion about this issue. It's 1.86", for which a 1-7/8" tool or socket could maybe work? They suggest using a strap wrench, but I don't think I have enough material for the strap wrench to grab on to.
Attachments
A strap wrench would not do it. I searched for 1-7/8 thin walled socket, and found references to use for a trailer hitch equalizer. Maybe a trailer supply store would rent the tool. Six point sockets are better, but they usually come with heavier walls and significant chamfer . It would be nice to have a socket with little chamfer.
To make a hole bigger with a hole saw, if the material is soft enough, drill a hole through a piece of wood . One person holds that wood over the existing hole, and the other cuts with the hole saw. You can remove the pilot bit with many hole saws.
If that is tile, which on a second look, it is, that is not going to let you use a hole saw, of course. Maybe there is still enough room to clear the tile if you can cut out the softer material behind to let you fit a tool.
Last edited:
Standardairconditioner
HVAC'ker
No socket tool will work for this scenario. Bigger sockets are very thick, and the homeowner will have to remove even more tile just to allow the socket to sit in.
This is a trick we use when we remove seized automotive lug nuts off tight studs on breaking discs.
Dremel a notch in the pointy part of the nut, which has the most material, and here you will chisel it counter clockwise. If that seems stubborn, make another same notch exactly on the other 180° side of it, and chisel it counter clockwise from there too, alternate. There isn't a lot of torque holding in it, the tapping will eventually free it.
If you can get a new replacement nut, you can also keep cutting little notches all around the nut, and then using a chisel or screwdriver to widen the nut's diameter more and more.
Thanks for the replies Reach4 and standardac. I'll look into both. The jaw oil filter could be an option if they make one small enough to fit this nut. The dremel notch idea seems like a good idea and I have those tools on hand. Either way, this just seems like a bad design by Delta to have the nut recessed into the wall. Are other manufacturer's (Moen, Kohler, etc.) diverters the same way, just curious?
Standardairconditioner
HVAC'ker
No and never.The jaw oil filter could be an option if they make one small enough to fit this nut.
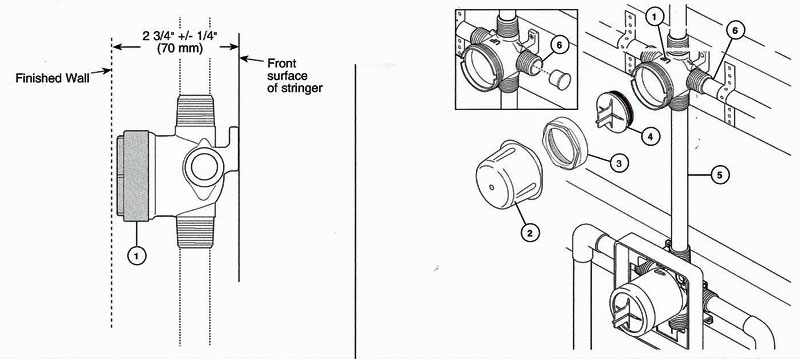
Instructions for Delta R11000 diverter rough in indicate 2 3/4" to the finished wall. In the instructions, this appears to be to the backside of the sheet rock or backer board of the shower wall as shown in this photo:

Is this correct? I ask because others have indicated in the thread that getting the bonnet nut off with this installation is hard and I do not want to have problems after the tile is installed. Thanks for the help.
Is this correct? I ask because others have indicated in the thread that getting the bonnet nut off with this installation is hard and I do not want to have problems after the tile is installed. Thanks for the help.
I spoke directly with Delta. Subflush to finish wall is just short of tile surface of shower and not just short of back of sheet rock or backer board as shown in this photograph.
When I attached my exterior parts, distance from mount surface on diverter value to bottom of wall plate is 2 3/4" just like in diagram in directions.
When I attached my exterior parts, distance from mount surface on diverter value to bottom of wall plate is 2 3/4" just like in diagram in directions.
FullySprinklered
In the Trades
I'm pulling my hair out here. That part of the valve body should be sticking out of the wall. Done right, you could remove the "nut" with a pair of channel locks. As usual, the plumber and the tile guy don't know each other and have never spoken. Tile people as a rule, care little about learning anything about plumbing fixtures. Not only can't you get a grip on the "nut", but you'll have to nip all around the valve body to get the trim on and the screws into the holes in the valve body flange to tighten the escutcheon up to the tile before you install the handle. Shoot me in the freaking head. Just pray that they have a long screw kit for that.
I've installed them, but I left the cover on for the tile guy and there was enough space to put pliers on it when I came back to trim.
The diverter in place.
And with the trim installed.
Last edited:
FullySprinklered
In the Trades
Diverter? Oops. Never mind. PWI.
jcy110
New Member
This might be better 11.00 vs 50.00 since you only have to snug the bonnet nut not torque it..... https://www.amazon.com/gp/product/B00IWT0TU2/ref=oh_aui_detailpage_o02_s00?ie=UTF8&psc=1
I know this thread is old but never hurts to update it.... https://www.bonnetsocket.com/b-bio

I know this thread is old but never hurts to update it.... https://www.bonnetsocket.com/b-bio
Last edited:
Similar threads
- Replies
- 7
- Views
- 749
- Replies
- 7
- Views
- 2K
- Replies
- 7
- Views
- 1K
- Replies
- 2
- Views
- 998