Users who are viewing this thread

Gsmith22

Active Member
Messages
239
Reaction score
52
Points
28
Location
Central NJ
If you do tear out the concrete, I would replace it with fiberglass reinforced mix.

https://www.homedepot.com/p/SAKRETE-80-lb-Crack-Resistant-Concrete-Mix-65201090/100390848

I'm not sure which "concrete" you are referring to for tear out, but under no circumstance should any more of the precast concrete slab forming the floor structure (with the tendons) be removed. If you are talking about the topping slab that he placed over the thin metal sheet, that all has to come out anyway back to the top of the structural slab. No topping slab is going to span that hole. Whatever spans the whole needs to be structural - and a topping slab is not. Thinnest materials are plywood or steel plate (as Reach4 suggested).

It seems to me that plumbing in this building needs to be done through the drop ceiling of the unit below.

There has been structural damage to the building IMO.

If I were to try to cover this up and support a shower, I would think at least 1/4 inch steel plate would be called for-- certainly nothing that would be described as sheet metal.

But it best for the building if the building management were to get this looked into.

Reach4 is right here. If the existing structural slab had large cracks and/or deflections, I would probably agree that there is a structural issue to be investigated immediately before any work was to be done. That didn't seem to be the case. But, the problem is the existing hole was enlarged (for access) and then a second hole was added nearby for the new drain essentially making one big large hole the size of the shower/old bathtub (functionally the slab was made into swiss cheese in this area). Certainly any hole through the slab is not ideal and whoever dreamed up the concept of access to the plumbing through an adjacent unit should probably not be designing buildings, but putting a hole through slabs for utilities is common and when done with the overall structure in mind isn't detrimental. I'm not sure any consideration was given to the structure when enlarging the hole and adding the second hole so it would be wise to have a structural engineer analyze the condition to verify that the end result (larger existing hole+new hole functionally making one big hole the size of a tub) is in fact not a problem. Look to post #9 for what will likely be the way in which you repair a hole in structural concrete slab.
 

Interior Designer

New Member
Messages
7
Reaction score
0
Points
1
Location
Florida
Hello Sound Advice,

GSMITH22: Wow! Thank you so much. Your reply holds some weight, if you are a structural engineer. If a structural engineer looks at it, to determine the fix of the hole, who does the work of filling it? Who do I hire? A GC who specializes in concrete? Yes, that is what I have! Pre-fabricated concrete slabs that fit together at a "V" groove joint. No sleeve on cable so it is a pre-tensioned cable. (I am learning all these terms.) They are about 6" thick. If the hole is fixed, do you think I still need a plywood base in the shower? No, we will not be making the hole any bigger. LOL! The hole has been this way a long time and there are no issues. In your opinion, is it worth fixing the hole or just build a rigid, stable base over it? Yes, waterproofing will be a major part of this re-build.

WORTHFLORIDA: Interesting, Thanks. Never heard of fiberglass mix.

REACH4: Yes, plumbing in entire building is done through unit below. Sorry for my inaccurate description. The "sheet metal" is a sheet of steel. Maybe 1/8" Thick?

JADNASHUA: We plan to use a vinyl liner and Red Guard over the wall cement board and poured pan. ( Pre-slope debunked video:
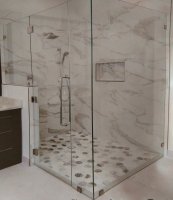
) We will rip-out and re-do. We will build a rigid and secure shower pan base. I was thinking the new base could be a platform with glass on outside (see image below). What do you think? Have you ever done a shower like this?
IMG_20200930_091342 (1).jpg


Thanks to all!
 

Jadnashua

Retired Defense Industry Engineer xxx
Messages
32,770
Reaction score
1,190
Points
113
Location
New England
Plumbing code requires the waterproofing to be sloped...the tile is not the waterproofing, so to get a sloped waterproof layer (the liner), you need a preslope.

There are two classes of cement board:
- fiber-cement (like HardieBacker)
- non-fiber cement boards

There are two entirely different procedures in the TCNA handbook (the industry bible) on how to build a successful shower with each class of cement board (cbu). You CANNOT put a fiber-cement board into the setting bed, it must terminate above it. That presents some issues in physical construction as code also calls for no penetrations in the waterproofing lower than 3" above the top of the curb...so, that means the bottom edge of the cbu cannot be anchored. With a non-fiber cbu, the handbook calls for running it down to just above the liner, and then, when you pack the setting bed on top of it, that locks it in place against the wall. All cbu panels will wick some moisture. The issue with a fiber-cement one is that the setting bed of a conventional shower WILL get damp. The fiber in Hardie is listed as cellulose in their data sheet (i.e., wood fiber is a common source of cellulose).

In a conventional shower, the setting bed is supposed to be a mud bed. When mixed with the proper sand:cement ratio, it is quite porous, and will let any of that moisture flow through it to the weep holes of the drain (assuming the installer ensured they stayed clear, a common mistake). If done right, there is no buildup. With no preslope, the water will accumulate over time and not flush through, and it can start to smell like a swamp, keep the tile/grout wet, and promote mold growth.

A topical waterproofing on the walls with a conventional pan will prevent moisture from evaporating out, and could trap it into the cbu if it can wick it from the bottom. As I said, my preference is to use a topical sheet waterproofing membrane that makes the pan and walls one continuous waterproof layer, so the manufacturers even allow regular drywall as the wall covering...and, have the test data and approvals to support it. Done right, it works. If I was going to do cbu walls, I'd just use a moisture barrier behind it to protect the wooden studs, and use something like RedGard in a niche, if I was going to include one, but not the entire wall.

My philosophy is pick one industry standard method, do it right, and don't try to mix and match, or build secondary layers that can create issues you haven't thought about.

If the width of the holes in the slab aren't larger than the typical gaps between joists in a wooden construction, a suitable plywood panel should provide more than adequate support for your shower to bridge those gaps. Since you're going to do a mud bed on top of it, you don't need to countersink the screws (Tapcons would be my choice, just don't drill into any cables!) as you would just pack the deck mud over them - it's not like you're going to be bonding the mud bed like a tile. Unless there's a plumbing leak, a properly built shower should not introduce moisture into that ply. If it did, you'd have other problems to deal with.

Actually, a quality OSB board like Advantec is about 10% stiffer than the equivalent thickness plywood, and with the adhesive, withstands moisture better. Now, particle board and some chip board is junk and does not have much structural strength, and can be destroyed if it gets wet. With Advantec, instead of the 5-7 layers of ply, it's more like twenty oriented, alternating layers all saturated with the adhesive.
 
Last edited:

Interior Designer

New Member
Messages
7
Reaction score
0
Points
1
Location
Florida
Thank you! Because of all of your responses, I made the decision to rip-out and re-do.

I removed everything (the poured pan, the liner, the pre-slope, and the steel metal sheet). It was easy. Took about an hour. Everything came out clean. Even the linear drain and weep hole collar are reusable.

IMG_20201001_134128.jpg


IMG_20201001_140805.jpg


JADNASHUA: You are right. The pan is porous and will allow water to flow through it to the weep holes. Be careful not to use too much caulk between the vinyl and the bottom flange. I know the objective is to get a good seal so it doesn't leak, but the caulk had oozed into all of the weep hole channels (and down into the drain!), preventing the poured pan from draining through the weep holes.

IMG_20201001_152551.jpg


JADNASHUA: Thank you for all of your time. You are very knowledgeable. Exactly! Make the walls and the pan one continuous waterproof layer.
HOLE: Have structural engineer advise on proper way to fill 6"W x 12" L hole. Even though I think it is fine (the original tub hole has
been there for 55 years with no signs of cracks), for peace of mind I will have a structural engineer recommend the proper way
to fill it. Who does the work? A cement guy?

BASE: I agree. The OSB board is much stronger than plywood. (I can barely drill through it.) It should never be getting wet (under
both the vinyl liner and the Red Guard). It can span the entire shower floor, giving support over the filled hole. Anchor down.
I wanted to counter-sink the Tapcons, so the vinyl liner does not rub against the screw heads.

NO PRE-SLOPE: The pan is never getting wet. If it does, the cement/sand mixture will wick water in every direction. (Imagine wetting a paper
towel from the bottom. It wicks up. Defies gravity. Gravity has no effect. Water continues to wick in every direction, toward
the dry porous areas.) If waterproofing failed and pan somehow, became totally saturated, it would drain out the weep holes.
However, if waterproofing fails, at this point, mold would start to grow, with or without a pre-slope.

VINYL LINER: Wrap shower area. No screws below 3 ".

PAN: Pour and pitch to drain. Cure 5+ days. Red Guard. I do not want the setting bed to ever get wet. If there is an unknown leak
penetrating the Red Guard waterproofing, into the poured pan, then I have the vinyl liner under the pan with weep holes.

WEEP HOLES: Use weep hole collar. I have read and seen installers using pebbles around the weep holes, but a pebble is more likely to fit into
and partially fill the weep hole. The sand and mortar mix is tiny and completely porous, never restricting the water's flow. (Like
sand at the beach.)

WALLS: Installed AFTER pan. No wallboard touching the pan and wicking up water. Leave 1" clearance. No issue securing the board to
the wall, because it is screwed 3" above the base of the vinyl liner. (It does not matter what wall board is used, because it will
never get wet if waterproofed. Red Guarded.)

WATERPROOFING: Red Guard all walls, pan, niche, 1" liner in between wall and pan. Because grout is porous.

THIN SET TILE ADHESIVE: Filling the gap between wall and pan.

TILE: Shower floor first, then walls.

GROUT: Filling the tiny gap between wall tile and pan tile.

WAYNE: Could the code be different in Florida? My job is permitted. My (experienced and licensed) tile guy of 40+ years, has never used a pre-slope, ever. Mine was his first and it failed. After removing our pan, I would say the thickness of the pre-slope, caused us to pour a thinner pan. I believe (in addition to the flexing base) the thinness contributed to the bed cracking easier.
 

wwhitney

In the Trades
Messages
6,563
Reaction score
1,844
Points
113
Location
Berkeley, CA
For the pan/curb, you want to have ONE sloped waterproofing layer. Not two.

If the water proofing layer is a liner, you need to slope the liner. So you build a pre-slope out of appropriate materials of your choice (doesn't have to be porous). Then tile won't stick to the liner, so you build a porous mud bed on top of the liner, likely a constant thickness, so the tile is sloped on top of the mud bed just like the liner is sloped beneath the mud bed. Water that penetrates the tile/grout can migrate through the mud bed, to the liner, to the drain. That's it, no other waterproofing.

Or you can use a surface applied waterproofing to which tile will stick. That could be a fluid applied membrane like Red Guard, or a sheet applied membrane, like Kerdi. You build a sloped pan of a material to which your waterproofing will adhere. Then you adhere the tile directly to the waterproofing layer. That's it, no liner.

Either way, the water proofing layer has to tie into the drain. So if you are using a liner, you use a drain type compatible with a liner (clamping type). If you are using a sheet or fluid applied waterproofing method, you use a different type of drain compatible with that.

Cheers, Wayne
 

Breauxnut

New Member
Messages
1
Reaction score
0
Points
1
Location
Alabama
This is a curbless shower; there’s no platform.
 

Attachments

  • 210F77CE-B8C7-443E-A99F-139CBC179AD8.jpeg
    210F77CE-B8C7-443E-A99F-139CBC179AD8.jpeg
    74.8 KB · Views: 197
Last edited:

Gsmith22

Active Member
Messages
239
Reaction score
52
Points
28
Location
Central NJ
Hello Sound Advice,

GSMITH22: Wow! Thank you so much. Your reply holds some weight, if you are a structural engineer. If a structural engineer looks at it, to determine the fix of the hole, who does the work of filling it? Who do I hire? A GC who specializes in concrete? Yes, that is what I have! Pre-fabricated concrete slabs that fit together at a "V" groove joint. No sleeve on cable so it is a pre-tensioned cable. (I am learning all these terms.) They are about 6" thick. If the hole is fixed, do you think I still need a plywood base in the shower? No, we will not be making the hole any bigger. LOL! The hole has been this way a long time and there are no issues. In your opinion, is it worth fixing the hole or just build a rigid, stable base over it? Yes, waterproofing will be a major part of this re-build.

WORTHFLORIDA: Interesting, Thanks. Never heard of fiberglass mix.

REACH4: Yes, plumbing in entire building is done through unit below. Sorry for my inaccurate description. The "sheet metal" is a sheet of steel. Maybe 1/8" Thick?

JADNASHUA: We plan to use a vinyl liner and Red Guard over the wall cement board and poured pan. ( Pre-slope debunked video:
) We will rip-out and re-do. We will build a rigid and secure shower pan base. I was thinking the new base could be a platform with glass on outside (see image below). What do you think? Have you ever done a shower like this?
View attachment 66602


Thanks to all!

I would recommend a structural engineer look at it because then they can see the local issue created by all the holes in one area as well as if there is a larger structural issue like the precast plank's ability to span got destroyed because of hole size, orientation, layout, debonding of strand, etc. It may have also created larger issues where the individual plank is now useless and if load is shedding into adjacent planks (that they weren't designed for). This isn't meant to scare you but there are so many things that can go wrong punching a random (ie not designed for) hole in a pretensioned precast plank.

Should you decide to fill in the hole with concrete, you wouldn't need the plywood base. the plywood was merely a substitute for the concrete. both would be the structure. whatever you put above would be part of the finish.
 

Jadnashua

Retired Defense Industry Engineer xxx
Messages
32,770
Reaction score
1,190
Points
113
Location
New England
Filling in the suspended slab hole will be tricky, as otherwise, you could easily impact the drop ceiling below. It may not be necessary. If you decide to have an engineer look at it, get his notes signed and the process certified by him, then, should something go wrong, he's on the hook. I did call in one when I did some remodeling in my home, but I did not really need that signature, only his advice, and that was much less expensive.
 

wwhitney

In the Trades
Messages
6,563
Reaction score
1,844
Points
113
Location
Berkeley, CA
For 12" x 18" x 6" of concrete, the weight would only be ~120 lbs. Seems like the work could all be done from above, including an underside form that could remain in place.

The underside form could be held against the bottom of the surrounding slab via a vertical threaded rod (or two) that goes to a spreader on the top side of the slab that is supported on either side of the hole. This support mechanism could either be used just while some appropriate construction adhesive between the underside form and the bottom of the concrete slab cures, or it could be used for the placement itself, with a small sleeve around the rod, resulting in a small remaining hole to be filled after the rod is removed.

Cheers, Wayne
 
Top
Hey, wait a minute.

This is awkward, but...

It looks like you're using an ad blocker. We get it, but (1) terrylove.com can't live without ads, and (2) ad blockers can cause issues with videos and comments. If you'd like to support the site, please allow ads.

If any particular ad is your REASON for blocking ads, please let us know. We might be able to do something about it. Thanks.
I've Disabled AdBlock    No Thanks