Converting small garage to utility room / plumbing

Users who are viewing this thread

Jerry44

New Member
Messages
10
Reaction score
1
Points
3
Location
pennsylvania
Hi there,
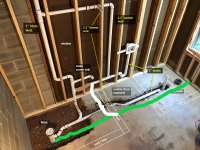
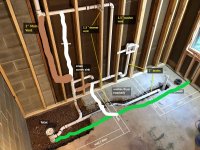
We are converting a small 1-car garage into a utility room, adding a ½ bath, stacked washer/dryer and “dog shower” along the back wall. Was wondering if any of you could take a look at the plumbing layout and point out any red flags or major problems. Any suggested changes are appreciated. Thank you.

overhead_view.jpg
front.jpg
 

Stuff

Well-Known Member
Messages
1,221
Reaction score
130
Points
63
Location
Pennsylvania
That way it is set up the toilet isn't vented. When you do laundry it will cause your toilet to gurgle. Need to wet vent the toilet before the washer drain joins it.

I don't see a shower but there is a vent for it? What fittings are at the wall?
 

Jerry44

New Member
Messages
10
Reaction score
1
Points
3
Location
pennsylvania
That way it is set up the toilet isn't vented. When you do laundry it will cause your toilet to gurgle. Need to wet vent the toilet before the washer drain joins it.

I don't see a shower but there is a vent for it? What fittings are at the wall?

Thanks for the feedback Stuff. I suppose I can add a vent going off the back of the toilet - above the inlet for the sink/washer/shower drain - and run it up the cinder block wall on the left. Does that solve the problem?

My image is mislabeled, the “shower vent” is for the dog wash area on the right – which might also serve as an open “shower” with a circular shower curtain. That vent will run up through the bathroom wall and connect over to the washer vent.
 

wwhitney

In the Trades
Messages
6,567
Reaction score
1,844
Points
113
Location
Berkeley, CA
Another issue you have is that the IPC requires a drain that carries a washer standpipe and another fixture to be 3".

If you were able to keep the 2" washer drain separate from the lav/shower and bring it to a new san-tee directly below the san-tee where the lav/shower joins the WC, that would take care of both issues.

I take the building drain is directly below the WC?

Cheers, Wayne
 

Jerry44

New Member
Messages
10
Reaction score
1
Points
3
Location
pennsylvania
Another issue you have is that the IPC requires a drain that carries a washer standpipe and another fixture to be 3".

If you were able to keep the 2" washer drain separate from the lav/shower and bring it to a new san-tee directly below the san-tee where the lav/shower joins the WC, that would take care of both issues.

I take the building drain is directly below the WC?

Cheers, Wayne

Thanks for that information Wayne. Yes, the WC is directly over the 4” drain that goes out to the septic as you can see in this image. Unfortunately there’s no room for the additional fitting below the current san-tee as it connects directly to that wye + 1/8. I would have to make another cut into the main drain and tie in separately for the washer drain. Alternatively – if I can make room for it – how about this 3 x 3 x 3 x 1.5 directly under the toilet with the 1.5 inlet for the vent off the rear and the 3” reducing to 2” for washer drain off the side. Would that work?

IMG_1408.jpg
right-side-inlet_2.jpg
 

wwhitney

In the Trades
Messages
6,567
Reaction score
1,844
Points
113
Location
Berkeley, CA
The problem with the above is that dry venting needs a vertical takeoff (at most 45 degrees from plumb) and has to stay vertical until above the flood rim of the fixture (6" above).

I think the following would be OK, not sure if it actually provides enough separation between the washer and the shower/lav connections to satisfy the wet venting rule that the washer needs to come in downstream of the bathroom group (but is clearly more compliant that what you have now):

Use a 3x3x3x2 san-tee with left side inlet. [Make sure the side inlet has the proper curvature and isn't straight; I think they most/all do, but haven't verified it.] You can put a 2" bushing into the 3" inlet, and bring the laundry drain into that one (from the top of the page in your drawing). Then the shower/lav drain comes into the 2" side inlet. The laundry ends up just a bit lower than the shower/lav.

Cheers, Wayne
 

Stuff

Well-Known Member
Messages
1,221
Reaction score
130
Points
63
Location
Pennsylvania
Also the height of the horizontal portion of the sink vent likely needs to be raised a bit. Can't tell from picture but it needs to be 6" above the rim of the sink.

P.S. Corner pedestal sinks are a pain. Drain and supplies are hard to get in the right place.
 

Tughillrzr

In the Trades
Messages
105
Reaction score
21
Points
18
Location
New York
This is the direction of flow towards septic?
I’d bust a little more concrete and add the lines down stream of flow. You would have more options with drainage and venting.
 

Attachments

  • 1BB3B16D-3287-46F9-9B8F-834F59497400.jpeg
    1BB3B16D-3287-46F9-9B8F-834F59497400.jpeg
    83.5 KB · Views: 196

Jerry44

New Member
Messages
10
Reaction score
1
Points
3
Location
pennsylvania
The problem with the above is that dry venting needs a vertical takeoff (at most 45 degrees from plumb) and has to stay vertical until above the flood rim of the fixture (6" above).

I think the following would be OK, not sure if it actually provides enough separation between the washer and the shower/lav connections to satisfy the wet venting rule that the washer needs to come in downstream of the bathroom group (but is clearly more compliant that what you have now):

Use a 3x3x3x2 san-tee with left side inlet. [Make sure the side inlet has the proper curvature and isn't straight; I think they most/all do, but haven't verified it.] You can put a 2" bushing into the 3" inlet, and bring the laundry drain into that one (from the top of the page in your drawing). Then the shower/lav drain comes into the 2" side inlet. The laundry ends up just a bit lower than the shower/lav.

Cheers, Wayne

OK, this makes sense. Seems I’ve gotten myself into a bind, but I’ll see if there is enough height to make it work. And by separating the washer drain from the sink/shower drain, and setting its inlet lower, this solves the vent problem for the toilet, correct? (the sink/shower drain vents the toilet above the washer inlet and washer will not siphon toilet). Thank you for taking the time to give this some thought.

I’m sure this is an annoying question for a pro plumber to hear, but I have to ask anyway. Aside from the code requirement that a drain carrying a washer standpipe and another fixture to be 3" would this set up still work if I added a vent with a 45 degree inlet just below the toilet, and made sure the shower or sink is not in use when the washer is in use? In other words, is the code for the correct pipe size just a volume issue? Sorry again for the dumb question…
 

Jerry44

New Member
Messages
10
Reaction score
1
Points
3
Location
pennsylvania
Also the height of the horizontal portion of the sink vent likely needs to be raised a bit. Can't tell from picture but it needs to be 6" above the rim of the sink.

P.S. Corner pedestal sinks are a pain. Drain and supplies are hard to get in the right place.

OK thanks for pointing that out. I'll make that change. As far as the corner sink, I'll think back on your comment when I'm struggling to make the connections and knocking myself in the head for going with a corner sink. It was my wife's idea, but there's still time to argue against it.
 

Jerry44

New Member
Messages
10
Reaction score
1
Points
3
Location
pennsylvania
This is the direction of flow towards septic?
I’d bust a little more concrete and add the lines down stream of flow. You would have more options with drainage and venting.

Yes, you have it right. That is the direction of the drain. Not looking forward to digging that all out again, but I may end up doing that if necessary. Thanks for the suggestion; seems like it would solve everything. Chalk it up to poor planning and moving ahead too fast.
 

wwhitney

In the Trades
Messages
6,567
Reaction score
1,844
Points
113
Location
Berkeley, CA
And by separating the washer drain from the sink/shower drain, and setting its inlet lower, this solves the vent problem for the toilet, correct? (the sink/shower drain vents the toilet above the washer inlet and washer will not siphon toilet).
That's the idea. Certainly it would be true with stacked san-tees. The san-tee with side inlet is the boundary case between OK/not OK. I think it would fall on the "OK" side, not 100% certain.

if I added a vent with a 45 degree inlet just below the toilet
I don't see how you can do that, and keep the vent vertical (at most 45 degrees from plumb) without the vent emerging through the slab exposed into the space behind/next to the WC, which I'm sure you don't want.

But if you have vertical height to add a vent takeoff, can't you stack another san-tee above your current san-tee? The order going down would be WC flange, 3x3x1-1/2 (or 2) san-tee for the lav drain only, and 3" san-tee for the combined shower/washer. The pipe between the 3" san-tee and the combo where the washer and shower join would also get upsized to 3" (i.e. use a 3x3x2 combo with a 3x2 bushing to make a 3x2x2 combo).

As in the drawing below (red is 3"). You can avoid some elbows by rotating the san-tees as required.

Cheers, Wayne

front.jpg
 

Jerry44

New Member
Messages
10
Reaction score
1
Points
3
Location
pennsylvania
That's the idea. Certainly it would be true with stacked san-tees. The san-tee with side inlet is the boundary case between OK/not OK. I think it would fall on the "OK" side, not 100% certain.


I don't see how you can do that, and keep the vent vertical (at most 45 degrees from plumb) without the vent emerging through the slab exposed into the space behind/next to the WC, which I'm sure you don't want.

But if you have vertical height to add a vent takeoff, can't you stack another san-tee above your current san-tee? The order going down would be WC flange, 3x3x1-1/2 (or 2) san-tee for the lav drain only, and 3" san-tee for the combined shower/washer. The pipe between the 3" san-tee and the combo where the washer and shower join would also get upsized to 3" (i.e. use a 3x3x2 combo with a 3x2 bushing to make a 3x2x2 combo).

As in the drawing below (red is 3"). You can avoid some elbows by rotating the san-tees as required.

Cheers, Wayne

View attachment 74078

Brilliant Wayne. Thank you. I think I could manage this if there is enough vertical room (If necessary, I suppose I could raise the floor with some additional concrete or backerboard in just the bathroom area to add a little more height?). The only remaining question I have is with adding the 3” pipe in your plan. I’m assuming this means I need to cut out the current 3 x 3 x 2 san-tee and replace with a 3 x 3 x 3 san-tee to accommodate the 3” pipe, correct? The current san-tee sits right on top of the wye + 1/8 that ties into the main 4" drain (see sketch). If I cut it out, there is no pipe to glue the new one on to (?) I’m sure there is a solution to this that I’m not aware of. (With
IMG_1330.JPG
each message I reveal the true depth of my DIY status, ha ha…)
 

wwhitney

In the Trades
Messages
6,567
Reaction score
1,844
Points
113
Location
Berkeley, CA
Given your drawing and what I can see of the top of the san-tee in your picture, I'm not convinced you actually have room to add another san-tee in there. Maybe you do if both san-tees are street.

The most elegant solution to redoing this area would be just to dig down to your rubber couplings and start again from there. And that's a fine fall back if something goes wrong.

If you want to reduce digging, you can look at "fitting saver" type tools that let you remove the pipe remnant out of a glued hub connection so you can reuse the hub. You cut just above the hub you want to save (e.g. the upper end of the 45), then ream out the hub.

Using a street 45 instead of a 45 in your wye would save you some height, but it would move your vertical towards the shower, so it would no longer be directly under your desired WC location.

Sounds like you have several different options now: redig and a separate building drain connection for the washer; redig and redo the wye for stacked san-tees; fitting saver for stacked street santees; fitting saver for san-tee with side inlet. You can figure out which way is easiest/best.

Cheers, Wayne
 

Jerry44

New Member
Messages
10
Reaction score
1
Points
3
Location
pennsylvania
Given your drawing and what I can see of the top of the san-tee in your picture, I'm not convinced you actually have room to add another san-tee in there. Maybe you do if both san-tees are street.

The most elegant solution to redoing this area would be just to dig down to your rubber couplings and start again from there. And that's a fine fall back if something goes wrong.

If you want to reduce digging, you can look at "fitting saver" type tools that let you remove the pipe remnant out of a glued hub connection so you can reuse the hub. You cut just above the hub you want to save (e.g. the upper end of the 45), then ream out the hub.

Using a street 45 instead of a 45 in your wye would save you some height, but it would move your vertical towards the shower, so it would no longer be directly under your desired WC location.

Sounds like you have several different options now: redig and a separate building drain connection for the washer; redig and redo the wye for stacked san-tees; fitting saver for stacked street santees; fitting saver for san-tee with side inlet. You can figure out which way is easiest/best.

Cheers, Wayne

My back did not like the elegant solution – will save that as a final remedy. Just ordered new street san-tees, street 45 and 3” ram bit. I’ll bore out the 45 just to gain the extra inch or so. It’s not a problem if the toilet moves forward a bit as I can build out the wall behind it to whatever it has to be. The current slab is 4” thick. If it comes to it, is 2” of concrete over that portion of the sink drain/vent (your blue line) a problem? Seems like it would be fine.
 

James Henry

In the Trades
Messages
1,578
Reaction score
403
Points
83
Location
Billings, Montana.
Unless I'm not seeing something. Why couldn't you just go under the shower drain and tie the washer in down stream?
 

Attachments

  • overhead_view 1.jpg
    overhead_view 1.jpg
    145.5 KB · Views: 240
  • overhead_view 1.jpg
    overhead_view 1.jpg
    145.4 KB · Views: 261

Reach4

Well-Known Member
Messages
38,884
Reaction score
4,434
Points
113
Location
IL
It’s not a problem if the toilet moves forward a bit as I can build out the wall behind it to whatever it has to be.
There are good offset flanges that can offset in 1.0 or 1.5 inches in any direction from a vertical pipe.
 

Jerry44

New Member
Messages
10
Reaction score
1
Points
3
Location
pennsylvania
Unless I'm not seeing something. Why couldn't you just go under the shower drain and tie the washer in down stream?

Thanks for the plan James. Your image shows exactly what I'll do, if I have to. I'm just trying to save myself another fun day with the jack hammer and shovel. But as a last resort, that’s what I’ll do. The vent going up the wall turns because we are thinking of putting a window in that bay.
 
Top
Hey, wait a minute.

This is awkward, but...

It looks like you're using an ad blocker. We get it, but (1) terrylove.com can't live without ads, and (2) ad blockers can cause issues with videos and comments. If you'd like to support the site, please allow ads.

If any particular ad is your REASON for blocking ads, please let us know. We might be able to do something about it. Thanks.
I've Disabled AdBlock    No Thanks