Convert single drain into 2 standalone vanities

Users who are viewing this thread

Mark Kessler

Member
Messages
34
Reaction score
0
Points
6
Location
Vermont
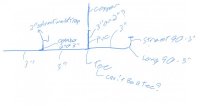
Hello again, would like to double check on my plan for the toilet and shower drain, i have attached a drawing and some pictures.

Couple questions I have is I am assuming I can’t change the 3” pvc vent at the tee to 2” pvc to connect to the 3” copper vent can I? And can I use a tee from the drain to the vent or does it need to be a sanitee? Thanks!

9B8E2699-DB24-4796-AC6C-E700883A0C69.jpeg

6660C811-B39D-4498-BEE0-4CF570E27156.jpeg
E7D95C7C-1BBA-4EF7-9B45-6A9A81EDF83B.jpeg
 

Attachments

  • 06D63C75-DF5B-4D56-AFE6-357C602D03D4.jpeg
    06D63C75-DF5B-4D56-AFE6-357C602D03D4.jpeg
    25.2 KB · Views: 101
  • C7978077-911D-4F2E-BB4F-83239A08036D.jpeg
    C7978077-911D-4F2E-BB4F-83239A08036D.jpeg
    25.2 KB · Views: 92

wwhitney

In the Trades
Messages
6,559
Reaction score
1,842
Points
113
Location
Berkeley, CA
(1) The WC only needs a 1-1/2" vent under the IPC (but 2" is fine and some would say better), and the IPC doesn't have any rules on minimum vent area through the roof. It also allows (requires?) expanding the vent at the roof for cold climates, to reduce the risk of frost closure. But that vent expansion is usually done just inside the thermal envelope. What I'm unclear on is whether you can just upsize the vent lower down. I don't see the harm but I'm not sure.

(2) The best fitting for the vertical vent takeoff from a horizontal drain is an upright combo. But if you don't have room for that, a san-tee on its back is commonly accepted under the IPC. I'm not clear on whether a vent-tee would be allowed under the IPC, but would it really fit any easier than a san-tee?

Cheers, Wayne
 

Mark Kessler

Member
Messages
34
Reaction score
0
Points
6
Location
Vermont
(1) The WC only needs a 1-1/2" vent under the IPC (but 2" is fine and some would say better), and the IPC doesn't have any rules on minimum vent area through the roof. It also allows (requires?) expanding the vent at the roof for cold climates, to reduce the risk of frost closure. But that vent expansion is usually done just inside the thermal envelope. What I'm unclear on is whether you can just upsize the vent lower down. I don't see the harm but I'm not sure.

(2) The best fitting for the vertical vent takeoff from a horizontal drain is an upright combo. But if you don't have room for that, a san-tee on its back is commonly accepted under the IPC. I'm not clear on whether a vent-tee would be allowed under the IPC, but would it really fit any easier than a san-tee?

Cheers, Wayne

Thanks Wayne, on #1 do you mean downsize to the 2” from the 3”copper?, on #2 i think the upright combo might work, in either case combo or san-tee) would curve up from the toilet direction or the shower drain which is past the vent.
 

wwhitney

In the Trades
Messages
6,559
Reaction score
1,842
Points
113
Location
Berkeley, CA
On (1) I'm talking about having the lower portion of the vent smaller than the upper portion, which I believe is what you asked about. [If, for example, this is on the top story and the ceiling is insulated with the attic unconditioned, and you have 3" copper going through the roof with nothing else connected to it, and the whole wall is open, then you certainly are allowed to cut the 3" copper a few inches below the top plate of the wall, and use a 3x2 vent takeoff with 2" PVC rising to meet the 3" copper.]

On (2) the idea is to direct waste downstream if there's ever a clog and the vent fills up. So the curved path should point downstream.

Cheers, Wayne
 

Mark Kessler

Member
Messages
34
Reaction score
0
Points
6
Location
Vermont
On (1) I'm talking about having the lower portion of the vent smaller than the upper portion, which I believe is what you asked about. [If, for example, this is on the top story and the ceiling is insulated with the attic unconditioned, and you have 3" copper going through the roof with nothing else connected to it, and the whole wall is open, then you certainly are allowed to cut the 3" copper a few inches below the top plate of the wall, and use a 3x2 vent takeoff with 2" PVC rising to meet the 3" copper.]

On (2) the idea is to direct waste downstream if there's ever a clog and the vent fills up. So the curved path should point downstream.

Cheers, Wayne

Thanks, it is a Cathedral roof, I will cut the copper close to the inside of the ceiling, I would use a shielded fitting from the copper to PVC correct? I can’t seem to find one on Ferco’s site.

#2 Makes total sense now that you pointed it out.
 

wwhitney

In the Trades
Messages
6,559
Reaction score
1,842
Points
113
Location
Berkeley, CA
Fernco 3006-32 or Mission KC-32 connects 3" copper to 2" plastic.

I'm assuming the 3" copper is fixed up-down as you don't want to disturb the roof boot. So if your 2" plastic riser is tall enough, and you stop it 1/8" to 3/16" below the bottom of the copper stub, you should be to able push the plastic off to the side to make up the last glue connection. And then push it off to the side to install the rubber coupling onto the plastic, roll the other rubber side down over the coupling, move the coupling back in line with the copper (a tight squeeze), and unroll it over the copper stub.

If the 2" plastic will not deflect sufficiently to the side, then you'll need to use another shielded rubber coupling, a Fernco 3000-22 or Mission CP-200 to connect 2" plastic to 2" plastic.

Cheers, Wayne
 

Reach4

Well-Known Member
Messages
38,859
Reaction score
4,429
Points
113
Location
IL

Mark Kessler

Member
Messages
34
Reaction score
0
Points
6
Location
Vermont
Thanks for all the help so far, am in overdrive as the tile guy starts Monday and I thought it was a week from Monday…

couple questions
1. The 3” line is for the toilet and shower, the slope should be 1/4” per foot correct?

2. The 2”trap for the shower, tried to fit a combo but it wont fit so is a sani tee the right fitting?
- does this shower trap setup look correct?
- also should their be a slight slope from the top of the trap to the sani tee?

kessler-wrong-02.jpg
kessler-wrong-01.jpg


1/4" per foot and 2% are the same.
 
Last edited by a moderator:

Reach4

Well-Known Member
Messages
38,859
Reaction score
4,429
Points
113
Location
IL
- does this shower trap setup look correct?
- also should their be a slight slope from the top of the trap to the sani tee?
Not right.

If wet vent is OK (I did not review the thread) then you want to feed the trap arm into a wye on the horizontal (but with the slight slope. You don't want to come in high.
 

wwhitney

In the Trades
Messages
6,559
Reaction score
1,842
Points
113
Location
Berkeley, CA
Reach4's got the right solution: put a horizontal wye farther downstream, turn the trap outlet elbow 45 degrees to line up with the wye, and gouge the drywall ceiling or raise the 3" pipe as required to lower the trap to line up. [Actually your trap arm is so short you could roll your horizontal wye up 5 or 10 degrees if required. To do that use a street 45 on the wye inlet to point parallel to the 3" line, and turn the trap outlet to also be parallel to it.]

To expand on the reasons: (1) you can't use a san-tee on its back, the combo is the only option for that connectivity, so since it doesn't fit, you switch to a wye and (2) the trap weir rule as shown in the picture below. [The trap weir rule is why the horizontal wye could only be rolled up a little, and only because your trap arm is so short, as that allows you to burn a little of the 2" allowed drop on the trap arm to keep the trap from hitting the drywall.]

Cheers, Wayne

A0F6174F-8C56-4EB0-9B9A-8C38D4C32239.jpeg
 

wwhitney

In the Trades
Messages
6,559
Reaction score
1,842
Points
113
Location
Berkeley, CA
This look better? Still need to move it back…
Looks good, as long as the red line is now below the blue line, which it appears to be but the view is a little obstructed.

also do the toilet fittings look right?
If the lower (in the photo) 90 is a long turn 90, that's fine. But you could use a 45 instead by turning the closet bend 45 degrees from above. Which would be better as it's less total bend.

and looks like about 3/8” per foot slope , that good?
That's always fine except for a trap arm that you are trying to push the length limit on, which doesn't apply here.

Cheers, Wayne
 

Mark Kessler

Member
Messages
34
Reaction score
0
Points
6
Location
Vermont
Looks good, as long as the red line is now below the blue line, which it appears to be but the view is a little obstructed.


If the lower (in the photo) 90 is a long turn 90, that's fine. But you could use a 45 instead by turning the closet bend 45 degrees from above. Which would be better as it's less total bend.


That's always fine except for a trap arm that you are trying to push the length limit on, which doesn't apply here.

Cheers, Wayne

yes redline is below blue about mid poit or a little above 3”pipe.

ahh, so like this on the toilet.. don’t have a reg 45 so i will have to get one tomorrow

96265B94-FB8D-40C9-8740-BE3CA9C7784A.jpeg
AC809243-A872-44F5-A275-E50C468D2D66.jpeg
 

Mark Kessler

Member
Messages
34
Reaction score
0
Points
6
Location
Vermont
Not totally clear on the red,blue line and if i got it, does this look right? Or does the trap need to be lower
3415D9FD-E4ED-4AB8-836F-B96796E55A67.jpeg
 

wwhitney

In the Trades
Messages
6,559
Reaction score
1,842
Points
113
Location
Berkeley, CA
That looks good.

One way to think about it: if you start filling the (empty) trap, at the water height when water first starts to drain out of the trap (spills out over the highest point of the bottom of the trap elbow), that's the red line, the trap weir. If you run that horizontal line across to your vent pipe (the 3" pipe in this case) and assumed everything below that line was filled with water, there needs to still be a continuous air pathway from the vent back to the trap.

Cheers, Wayne
 

Reach4

Well-Known Member
Messages
38,859
Reaction score
4,429
Points
113
Location
IL
Consider using a 4x3 closet bend under the toilet, rather than the 3 inch, but 3 inch is ok.

When doing a 45, you will need to plan and measure well to get the closet flange in the ideal spot.
 

Mark Kessler

Member
Messages
34
Reaction score
0
Points
6
Location
Vermont
That looks good.

One way to think about it: if you start filling the (empty) trap, at the water height when water first starts to drain out of the trap (spills out over the highest point of the bottom of the trap elbow), that's the red line, the trap weir. If you run that horizontal line across to your vent pipe (the 3" pipe in this case) and assumed everything below that line was filled with water, there needs to still be a continuous air pathway from the vent back to the trap.

Cheers, Wayne
That looks good.

Glad it looks good cuz I glued it, i think I actually got it even a little lower as I dug out some drywall as you suggested. Thats a really good description, I was having a hard time imagining it in the configuration that i had
 

Mark Kessler

Member
Messages
34
Reaction score
0
Points
6
Location
Vermont
Consider using a 4x3 closet bend under the toilet, rather than the 3 inch, but 3 inch is ok.

I had a closet bend but returned it because it wouldn’t fit with the 90 90 config that I had, , ,, yy

When doing a 45, you will need to plan and measure well to get the closet flange in the ideal spot.

I got 8’ of 3” left if I can’t get it with that then I quit…
 

Mark Kessler

Member
Messages
34
Reaction score
0
Points
6
Location
Vermont
Ok so the toilet flange (bottom of metal ring) sits on top of the finished floor correct? In my case that would be the tile, the top of flange should not be flush with the tile right?
 

wwhitney

In the Trades
Messages
6,559
Reaction score
1,842
Points
113
Location
Berkeley, CA
Both of those are fine options. The conventional wisdom is for the metal ring on top of finish floor (whatever the WC will sit on). But I ran into a situation once where a modern WC had the outlet close enough to the bottom that there wasn't enough clearance that way for a non-wax toilet seal solution, and I had to switch to wax. I think flush would leave you with a small enough gap for a single wax ring but a large enough gap for alternatives.

However, if you are going to be tiling the floor, and want to set the height now before tile, I suggest splitting the difference. It can be hard to estimate the build up exactly, and that will give you a little leeway either way. I would say that the metal ring on top of the finish floor is the highest you want.

Cheers, Wayne
 
Top
Hey, wait a minute.

This is awkward, but...

It looks like you're using an ad blocker. We get it, but (1) terrylove.com can't live without ads, and (2) ad blockers can cause issues with videos and comments. If you'd like to support the site, please allow ads.

If any particular ad is your REASON for blocking ads, please let us know. We might be able to do something about it. Thanks.
I've Disabled AdBlock    No Thanks