Convert single drain into 2 standalone vanities

Users who are viewing this thread

Mark Kessler

Member
Messages
34
Reaction score
0
Points
6
Location
Vermont
Hello,
I have searched the forum and cannot seem to find what I am looking for, I am sure it is here somewhere!

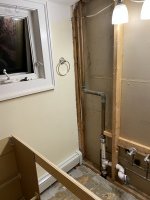
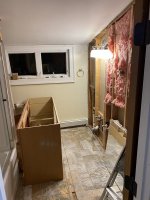
I am remodeling a bath and have removed a 60” vanity that had 2 sinks I plan on using 2 standalone 30” vanities so I need to re-plumb the drains.

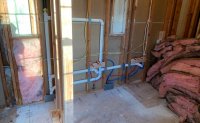
the vent is only servicing these sinks, I am planning to cut the bends out of the copper and replace with PVC and the coupling below the santee is connected to a short piece of copper that 90’s that connects to PVC that goes to the drain (I don’t know why they would leave shuch a short piece and not have replaced it)

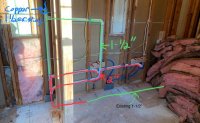
So I think I need to do something like what is in the third photo that I found minus the PEX as I will use copper. Can anyone confirm correct? If it matters I am in Vermont and there is no inspection only permit so they can update the property tax that I will owe (lol)… and obviously just because there is no inspection doesn’t mean I don’t want to do it correctly…

Thanks in advance!
 

Attachments

  • C78A6434-682D-486F-B404-DBF060F46D05.jpeg
    C78A6434-682D-486F-B404-DBF060F46D05.jpeg
    76.7 KB · Views: 144
  • 03834731-6DD1-46D6-9871-05063A7215C7.jpeg
    03834731-6DD1-46D6-9871-05063A7215C7.jpeg
    88.8 KB · Views: 145
  • 343D6225-867F-4C91-8915-65875E3B399D.jpeg
    343D6225-867F-4C91-8915-65875E3B399D.jpeg
    81.1 KB · Views: 150

Terry

The Plumbing Wizard
Staff member
Messages
29,942
Reaction score
3,459
Points
113
Location
Bothell, Washington
Website
terrylove.com
Are you working with 1.25" or 1.5" copper DWV?
Normally two lavs would start with 2.0" and then break down to 1.5"
Older homes sometimes used 1.25". I have run two lavs with 1.5", it will work. Code calls for 1.25" for each lav, and either a 1.5" or a 1.25 trap will work. I don't even carry the 1.25" traps with me, as most roughs have been done with 1.5" for decades.

The third picture would work.
 

Mark Kessler

Member
Messages
34
Reaction score
0
Points
6
Location
Vermont
Are you working with 1.25" or 1.5" copper DWV?
Normally two lavs would start with 2.0" and then break down to 1.5"
Older homes sometimes used 1.25". I have run two lavs with 1.5", it will work. Code calls for 1.25" for each lav, and either a 1.5" or a 1.25 trap will work. I don't even carry the 1.25" traps with me, as most roughs have been done with 1.5" for decades.

The third picture would work.


Thanks for the quick reply, I just opened the floor, the copper and PVC is 1-1/2” . So I should do the two lav’s drain and traps in 2” and the 1-1/2” vent will work ? 1st pic floor opened up…Second is the plan…
 

Attachments

  • 075DD6C1-12A1-402E-989B-A7FD066949D8.jpeg
    075DD6C1-12A1-402E-989B-A7FD066949D8.jpeg
    116.5 KB · Views: 144
  • BC8EA93D-D98A-4E79-B912-9775864B742C.jpeg
    BC8EA93D-D98A-4E79-B912-9775864B742C.jpeg
    87.7 KB · Views: 145

Terry

The Plumbing Wizard
Staff member
Messages
29,942
Reaction score
3,459
Points
113
Location
Bothell, Washington
Website
terrylove.com
Your line is running under the vanities. I would bring the waste up as soon as possible. You want short runs for waste.
The venting, since it's only air doesn't matter so much.
 

John Gayewski

In the Trades
Messages
4,348
Reaction score
1,343
Points
113
Location
Iowa
I don't think I'd leave the copper in there. No reason for it.

I like to run 1.25" traps with 1.5" drains for lavs. Personally I find the smaller the pipe the faster it's runs and keeps the line clean. I used to have a vanity that would back up from time to time, once I changed from 1.5" trap to 1.25" I haven't had any trouble.

Running 2"for the common drain is very common and 1.5" traps are very common.
 

Mark Kessler

Member
Messages
34
Reaction score
0
Points
6
Location
Vermont
Thanks for the reply’s,
Yes they are low, the vanities will be 36” I have read 18” to 20” is a standard what would be recommended for a 36” vanity? I will be building the vanities… gona ditch all the copper up to about 5-6 feet.

also looks like I have bigger issues framing wise, will post that in a few to see if I can get any feedback
 

Mark Kessler

Member
Messages
34
Reaction score
0
Points
6
Location
Vermont
Thanks for the reply’s,
Yes they are low, the vanities will be 36” I have read 18” to 20” is a standard what would be recommended for a 36” vanity? I will be building the vanities… gona ditch all the copper up to about 5-6 feet.

What is best height for drain? Vanity will be 36”tall
 

Tuttles Revenge

In the Trades
Messages
4,183
Reaction score
1,444
Points
113
When I determine my stub out heights for the waste and water. I start with my finished dimensions. In your case, a vanity top height of 36" above the finished floor. Then start measuring down beginning with the type of counter top; solid surface or laminate, sink style; top mount or under mount and overall depth; varies from 7-10" deep to the bottom where the drain connects, then drain style; lever pop up or clicker style.

This is the cut sheet/ spec sheet that I always refer to when figuring my layouts. The dimensions they show are typically set up for a sink using a lever pop up style drain, so it would work for a clicker style as well.

A lot of the installations we're doing have all exposed open cabinetry, so every detail matters and things need to be very compact. But in a closed vanity the tolerances can be larger to accommodate a larger range of installations.

I also install my water lines above the waste, and will determine if the faucet has built in supply tubes so that the angle stops are reachable without extension tubes.
undermount sink spec.PNG
 

Mark Kessler

Member
Messages
34
Reaction score
0
Points
6
Location
Vermont
Wow, thanks for the great info! I have done a quick layout of what I am planning, the drawings are to scale but not super detailed as far as pipe fittings ect, just don’t have time to make it pretty. The studs and the joists are shown how they currently are with the exception of the sistered joist under the wall with the plumbing

1. Currently the drain stub out would be offset about 1”-1/2”. -2” is it better to have it centered on the vanity? Looking at it now suppose it would be… maybe cut the stud in the vanity area and put a horizontal one in above and below to create a “box” in that area if that makes any sense…The vanities i am building haven’t been designed yet but there will be 2 drawers and a shelf so kinda freestanding piece of furniture kinda looking… the drawer boxes will be “C” shaped (will be a pain since they will be dovetailed) to allow for the drain\trap.

2. As far as the existing copper vent, my roof was redone about 5 yrs ago, is it possible to just pull the copper up form the roof and replace with pvc without damaging the boot, or would it be better to just leave the copper going through the boot and cut below on the inside wall like I originally planned and transition to pvc

3. Anything stand out as not correct? Note that i will need to notch the stud and joist at an angle to get the drain to pass below the floor, currently there is one joist and shown is an added joist that I will sister to the other. The wall is not supporting and below there is a wall supporting the joist in that spot so i think i am good, if there is an alternative way let me know, i just don’t see it. Note there is a wall at at right angle to the one shown on both sides

Also the floor will be removed to the joist, it is currently 1/2” with 1/2” on top - am replacing with 3/4” t&g glued to the joists with 1/2” on top. The floor will be tile with heat, either ditra heat or strata heat

thanks for any comments!


FC70C619-F02F-49B7-A1DC-E19D05EEC133.jpg

B5E9601A-6B75-45D7-B8BB-218BCFBF515D.jpg
E208BF56-03DA-4194-9FAE-02FBBD3EC5DC.jpg
 
Last edited:

Tuttles Revenge

In the Trades
Messages
4,183
Reaction score
1,444
Points
113
1. Currently the drain stub out would be offset about 1”-1/2”. -2” is it better to have it centered on the vanity? Looking at it now suppose it would be… maybe cut the stud in the vanity area and put a horizontal one in above and below to create a “box” in that area if that makes any sense…The vanities i am building haven’t been designed yet but there will be 2 drawers and a shelf so kinda freestanding piece of furniture kinda looking… the drawer boxes will be “C” shaped (will be a pain since they will be dovetailed) to allow for the drain\trap.

Yep, we deal with those all the time. Its really important to get that drain dialed in so that you don't have to modify the drawers.
2. As far as the existing copper vent, my roof was redone about 5 yrs ago, is it possible to just pull the copper up form the roof and replace with pvc without damaging the boot, or would it be better to just leave the copper going through the boot and cut below on the inside wall like I originally planned and transition to pvc

Leave the vent as is

3. Anything stand out as not correct? Note that i will need to notch the stud and joist at an angle to get the drain to pass below the floor, currently there is one joist and shown is an added joist that I will sister to the other. The wall is not supporting and below there is a wall supporting the joist in that spot so i think i am good, if there is an alternative way let me know, i just don’t see it. Note there is a wall at at right angle to the one shown on both sides

Seems legit. If its not a bearing wall and the sister replaces it I don't see an issue. I might even suggest traveling horizontal to both sinks and going vertical to each rather than drilling all the studs. The plumbing looks like a correct layout as long as you use the proper fittings in the proper way. Vents need to connect together 6" above the flood level of the sinks they're serving which sometimes gets in the way of recessed medicine cabinets.
 

wwhitney

In the Trades
Messages
6,559
Reaction score
1,843
Points
113
Location
Berkeley, CA
So I should do the two lav’s drain and traps in 2”
Just wanted to comment that your marked up photo with pink 2" and green 1-1/2" pipes shows a 2" drain feeding into an existing 1-1/2" drain, which is not allowed.

If you use 2" for the cobmbined lav drain, then you need to extend that 2" all the way to a drain of equal size. But as Vermont uses the IPC, you can serve two lavatories with a 1-1/2" drain if you prefer.

Cheers, Wayne
 

Mark Kessler

Member
Messages
34
Reaction score
0
Points
6
Location
Vermont
Yep, we deal with those all the time. Its really important to get that drain dialed in so that you don't have to modify the drawers.

I will modify the 2x4’s so it can be centered, not a lot of work to do…

Leave the vent as is

Perfect

Seems legit. If its not a bearing wall and the sister replaces it I don't see an issue. I might even suggest traveling horizontal to both sinks and going vertical to each rather than drilling all the studs. The plumbing looks like a correct layout as long as you use the proper fittings in the proper way. Vents need to connect together 6" above the flood level of the sinks they're serving which sometimes gets in the way of recessed medicine cabinets.

Thanks, good idea on running the drain vertical to each one from the joist bay might just do that, although the weakest part is on the left half of the joist…

So the venting lay out is correct whether I leave it as is or as you suggest, assuming the line is 6” above flood, in my case 42”.

as far as proper fittings, will post that plan soon to confirm i am using the correct fittings.
 

Mark Kessler

Member
Messages
34
Reaction score
0
Points
6
Location
Vermont
Just wanted to comment that your marked up photo with pink 2" and green 1-1/2" pipes shows a 2" drain feeding into an existing 1-1/2" drain, which is not allowed.

If you use 2" for the cobmbined lav drain, then you need to extend that 2" all the way to a drain of equal size. But as Vermont uses the IPC, you can serve two lavatories with a 1-1/2" drain if you prefer.

Cheers, Wayne

Humm, guess I misunderstood Terry’s comment above, in any case it was all 1-1/2” before and worked so I suppose that will work , just figured if there was a benefit I would do it. Don’t really want to change the 1-1/2 downstream, it’s in a really difficult spot to get to.. unless it was absolutely necessary for that line to be 2”.
 

Mark Kessler

Member
Messages
34
Reaction score
0
Points
6
Location
Vermont
So here is a new problem I found, massive notch in the joist for the toilet flange,

Could a fix for this be an offset toilet flange, fill in the short piece of joist then add another as far as I can go to the left?
I did some searching, is there an issue with sealing these offset flanges or was that with an older type or maybe and “oval” type?

Was thinking of using the sioux chief offset
https://www.siouxchief.com/products/drainage/residential/closet-flanges/offset-flange/fullflush
 

Attachments

  • EE8B5401-2D90-4E53-98E0-68D6A857AF74.jpeg
    EE8B5401-2D90-4E53-98E0-68D6A857AF74.jpeg
    105.8 KB · Views: 134

wwhitney

In the Trades
Messages
6,559
Reaction score
1,843
Points
113
Location
Berkeley, CA
Another issue is the use of the san-tee horizontally, that should be a combo. And if the cleanout is not accessible, it's not very useful, I believe it can be omitted there.

No chance you want to move the closet flange down the picture 2"? If it's currently set for a 12" "rough-in" (actually a finish measurement so 12-1/2" if the wall finish will be 1/2" thick), then you could use a 14" rough in WC.

The proper fix for sistering the joist would be to cut back the copper water lines temporarily so you can install a full size joist of maximum length possible, ideally from bearing to bearing. An easier fix if the bottom third of the joist is sound would be to sister it with a 2x4 or 2x6 to repair the top portion, of sufficient length to allow attaching it with "enough" structural screws to uncut joist on either side of the notch. Calculating what "enough" is really requires an engineer, though.

Cheers, Wayne
 

Mark Kessler

Member
Messages
34
Reaction score
0
Points
6
Location
Vermont
Another issue is the use of the san-tee horizontally, that should be a combo. And if the cleanout is not accessible, it's not very useful, I believe it can be omitted there.

No chance you want to move the closet flange down the picture 2"? If it's currently set for a 12" "rough-in" (actually a finish measurement so 12-1/2" if the wall finish will be 1/2" thick), then you could use a 14" rough in WC.

The proper fix for sistering the joist would be to cut back the copper water lines temporarily so you can install a full size joist of maximum length possible, ideally from bearing to bearing. An easier fix if the bottom third of the joist is sound would be to sister it with a 2x4 or 2x6 to repair the top portion, of sufficient length to allow attaching it with "enough" structural screws to uncut joist on either side of the notch. Calculating what "enough" is really requires an engineer, though.

Cheers, Wayne


Thanks, as far as the clean out…it has been pretty obvious by all the plumbing and electrical I have seen in this demo that they used what ever they had on hand…

so a combo is a basically a long sweep correct? I don’t think i want to move it to be a 14” rough in, is there any issue with using an offset? Also would i use a closet bend to transition to vertical?

closet_flange_offset.jpg
 

wwhitney

In the Trades
Messages
6,559
Reaction score
1,843
Points
113
Location
Berkeley, CA
A combo is effectively just a wye plus a street 45, but molded as one piece. But if the inaccessible, unneeded (to my understanding) cleanout is eliminated, then you'd just need a LT 90 to duplicate the existing geometry.

As to the offset flange, I have no experience. My first question would be how the performance of an offset flange plus quarter bend compares to a 45 degree flange plus a 45 degree elbow. [I don't know.]

One thing you can do with either option, if I'm judging the clearances correctly, is turn the horizontal outlet by 45 degrees clockwise from above. That means you'd use a horizontal 45 instead of a horizontal LT 90. If you don't do that, the joist bay might be a little tight with the LT90, and you might need to make it a street fitting. Or in the case of a 45 flange and 45 elbow, it might not fit at all.

Cheers, Wayne
 

Tuttles Revenge

In the Trades
Messages
4,183
Reaction score
1,444
Points
113
There is no access to that "cleanout" and if its not picking up another fixture upstream, then there is no need for a branch fitting at all.

Instead, offset with a 45
is turn the horizontal outlet by 45 degrees clockwise
x2
or Long Sweep 90 if the angle causes the joist to be further compromised And instead of an "offset" flange, Use a 45° flange which are legal.

closet-flange-45.jpg
 
Last edited by a moderator:

wwhitney

In the Trades
Messages
6,559
Reaction score
1,843
Points
113
Location
Berkeley, CA
And instead of an "offset" flange, Use a 45° flange which are legal.
So is your experience that a 45 flange plus a 45 will perform better (clog less) than an offset flange plus a closet bend? That was my intuition, but I don't have any actual experience.

Cheers, Wayne
 
Top
Hey, wait a minute.

This is awkward, but...

It looks like you're using an ad blocker. We get it, but (1) terrylove.com can't live without ads, and (2) ad blockers can cause issues with videos and comments. If you'd like to support the site, please allow ads.

If any particular ad is your REASON for blocking ads, please let us know. We might be able to do something about it. Thanks.
I've Disabled AdBlock    No Thanks