Convert copper pipes from tub/shower to shower?

Users who are viewing this thread

ShowerDude

Showers
Messages
710
Reaction score
66
Points
28
Location
Minnesota
my changes would be many! since youve chosen your materials and path already...

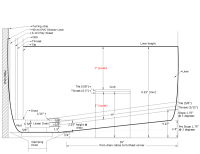
id start with a Noble pan liner and noblesealant150 for the drain connection. I would also look for a smaller zurn type flange....


it can work be focused on your execution......

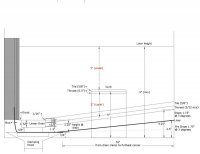
a bonded concrete curb and mudbed is in order!
 

ShowerDude

Showers
Messages
710
Reaction score
66
Points
28
Location
Minnesota
shingle lap your poly over pan liner then furr ou
Yes, I looked into that one. In my case since this is a bathtub to shower conversion, the drain location is fixed. The attractive thing about that drain (as I understand it)

With the Sioux chief you are in fact further as the drain is larger (so it results in less of a "bend" in the liner which was one of your concerns).

NO !


Are you aSking me how to build a shower and what concerns to have with the methods, or telling me !!!

make sure whatever drain and placement, that you flood test and verify proper drainage after you pull the plug......before your mudbed goes in .... then we will disccuss your plans in reverse! theres a lot to the puzzle that will reveal itself........what i would do is different so you should follow the mfg specs as best you can.

good luck keep us posted!
 

Arnav

Member
Messages
150
Reaction score
10
Points
18
Location
Florida
"then we will disccuss your plans in reverse! theres a lot to the puzzle that will reveal itself"
I am not sure exactly what you meant.


I have 3 showers to do. The first one will be a traditional "mud pan" shower. I may curse it (or I may not), but a mud pan is bucket list item (surely every DIY'er need to try it at least once?). The second shower may be a topical membrane (since those do look pretty neat). The third shower will be whichever method I liked best... :)

Thank you. I'll take lots of pictures for your inquisitive eyes.
 

Jadnashua

Retired Defense Industry Engineer xxx
Messages
32,770
Reaction score
1,190
Points
113
Location
New England
Mudbed materials are cheap enough that you can afford to do a mockup to hone your skills and experiment. Now, getting rid of it might get expensive depending on what you have to move it and what your local disposal costs are.
 

Arnav

Member
Messages
150
Reaction score
10
Points
18
Location
Florida
My thoughts exactly. Disposal for me is free. I just have to bring it out to the curb. In the (almost) worst case scenario I just have to start over. With the exception of:

The drain. Taking it out or moving it will require some jack hammering and will be major PITA. That is really my biggest concern/fear. I wish there was a way around not entombing it in cement but I don't think there is. Also, too bad you cannot build the walls first.. :)
 

JohnfrWhipple

BATHROOM DESIGN & BUILD
Messages
3,225
Reaction score
102
Points
48
Location
North Vancouver, BC

Arnav

Member
Messages
150
Reaction score
10
Points
18
Location
Florida
Sure, that's what I did with the Infinity pic above. There is even a faster way (for me) to do what you describe in your post. Simply include your image link in your post within these tags:
[IMGx] <link to your image>[/IMGx]

You will have to remove the x from the above tags (which I had to include so that the forum software doesn't see it as an image...)

:)

But, that assumes that the pics are hosted elsewhere. If you can't or don't want to post the pics elsewhere on the interwebs first, you will have to post them as attachments....
 

JohnfrWhipple

BATHROOM DESIGN & BUILD
Messages
3,225
Reaction score
102
Points
48
Location
North Vancouver, BC
Do you really want a drain with a flat bottom? Kind of silly if you ask me.

The ACO drain has a bend. This allows only a little bit of water to stay behind after a shower. This evaporates with each day. I would think the flat bottom version you show above would take 1-2 days to evaporate.

I have not seen one in use so do not know for sure. If that's the infinity drain you show that might be an old detail. I think the new channel base is not like that anymore. More like the ACO I think these days but un sure.
 

Arnav

Member
Messages
150
Reaction score
10
Points
18
Location
Florida
I can't vouch for their system as I have never used it before (or any drain for that matter). I can only recite for better or worst what they say in their manual:

Note:
Site Sizable models are designed with
a finished neutral internal pitch. With proper
ventilation of waste line plumbing, the fluid
of the charged channel will find any point of
exit by force of gravity. Negative pressure
below the drain level will create a vacuum
to aid in the siphoning action through the
drain outlet. Based on Manning’s Equation
the designed depth of the channel has been
optimized for the specified flow capacity.
 

Arnav

Member
Messages
150
Reaction score
10
Points
18
Location
Florida
So I have to tell you a funny story. I went to HD last night to get a bunch of stuff.

Me: Excuse me, where are the damn corners?
Employee: Excuse me?
Me: Where are the damn corners?
Employee: Sir?
Me: Dam corners! D-A-M I am not cursing you... really!

Me: Where are the mortar hose?
Employe: huh?
Me: forget it, where are the garden hose?
Employee: ok, that is easy, they are right here (walking to a different aisle showing me garden hoses)
Me: Not garden hose. A garden hoe! H-O-E...

I knew my accent is going to haunt me one day... :)
 

JohnfrWhipple

BATHROOM DESIGN & BUILD
Messages
3,225
Reaction score
102
Points
48
Location
North Vancouver, BC
LOL - One day this year I called 20 suppliers. Not one carries them. Twice I was told that the reason why they do not have them is because no one orders them.

I get them direct from OS&B and Noble Company and stock both here in Vancouver. Noble Company Ships direct in the US for $5.00. Might as well order a positive weep hole protector well your at it. And their Chloray membrane.

Email Nelson: He will get the ball rolling for you.
 

Arnav

Member
Messages
150
Reaction score
10
Points
18
Location
Florida
Homedepot carries them (link). This is where I got mine last night.

I really like that weep protector that you showed me. I was actually looking for pebbles last night and couldn't get myself to buy any. Just doesn't look scientific enough... :)

There seems to be many Goof Proof distributors by me. I will give them a call in a bit. Hopefully they have it in stock or can probably order it for me. I will let you know my findings. If all else fail I will call Noble.

Thx!
 

Arnav

Member
Messages
150
Reaction score
10
Points
18
Location
Florida
You were asking me about the layers so here goes. If any figures strikes you as odd, I am sure you would let me know....

I am using 3/8" rise for ever foot to be within the range allowed by the code (1/4" per foot < slope < 1/2"/foot)

Primary Drain height of the floor: 3/4" (reason: best practice)

Height of slope at the drain: 1.5" (reason: best practice)

Height of drain off the floor: 3" reason: 3/4" (clamping drain off the floor) + 1.5" (height of slope @ drain) + ~1/8" (thinset) + 5/8" (tiles)

Height of pre-slope @ wall: 2.5" reason: 55" (distance from clamp to furthest corner) / 12 " per foot * 0.375" rise per foot + 0.75 (height of drain of floor) = 2.5"

Height of slope @ wall: 4.25" reason: 56.5" (distance from linear drain to furthest corner) / 12 " per foot * 0.375" rise per foot + 2.5 (height of pre-slope) = 5.25"

Height of curb: 5" reason: 3" (height of drain) + 2" (code!) = 5" height of Tiles and any thinset higher then 0.5" will be extra height over what the code requires.

Height of liner at studs/blocking box: 9" or higher. Reason: 5" (height of curb) + 5/8" (tiles) + 3" (code) = 9"

Here is a diagram that pulls it altogether for your viewing pleasure (the PDF will be the best quality - zoom in).
 

Attachments

  • layers2.pdf
    22.2 KB · Views: 473
  • layers_1_1.jpg
    layers_1_1.jpg
    42.7 KB · Views: 966
Last edited:

JohnfrWhipple

BATHROOM DESIGN & BUILD
Messages
3,225
Reaction score
102
Points
48
Location
North Vancouver, BC


That's almost perfect. Not quite.

I see no weep hole protector.
No topical waterproofing on the walls
Liner to low and not upturning the back wall or front wall very well
Many times mortar bed is 2" reinforced with 16 gauge galvanized mesh.
Tile is often 5/8" with thin-set not by itself. Most tile is 3/8"
You have under cut your wall's bottom plate. Not good.
Who said 2" is code for curb. Some ya who on another forum?
 

Arnav

Member
Messages
150
Reaction score
10
Points
18
Location
Florida
That's almost perfect. Not quite.

I see no weep hole protector.
No topical waterproofing on the walls
Liner to low and not upturning the back wall or front wall very well
Many times mortar bed is 2" reinforced with 16 gauge galvanized mesh.
Tile is often 5/8" with thin-set not by itself. Most tile is 3/8"
You have under cut your wall's bottom plate. Not good.
Who said 2" is code for curb. Some ya who on another forum?

Thank you so much for taking the time to review this. It is much appreciated.

"I see no weep hole protector."
Added (updated diagram attached). If I am correct, it doesn't add any height to the drain. The linear drain just plug through it to the primary drain.

Liner to low and not upturning the back wall or front wall very well

Corrected. I pulled it up to the previous liner line on the wall....

No topical waterproofing on the walls"

Corrected. I listed the 6mil Poly I was planning to use.

Many times mortar bed is 2" reinforced with 16 gauge galvanized mesh.
ok, I will look into that. I read 1.5" is the minimum suggested by ANSI but I don't know the criteria for making it thicker with reinforcement.

Tile is often 5/8" with thin-set not by itself. Most tile is 3/8"
I measured and my tile is really 5/8" (measured both with a measuring tape and a digital claiper). It is 18x18 marble.

You have under cut your wall's bottom plate. Not good.

You mean the diagram shows the primary drain is under the bottom / sole plate? If so, I corrected it...

Who said 2" is code for curb. Some ya who on another forum?
It really is FL code:

SECTION P2709
SHOWER RECEPTORS
P2709.1 Construction.
Shower receptors shall have a finished
curb threshold not less than 1 inch (25.4 mm) below the sides
and back of the receptor. The curb shall be not less than 2 inches
(51 mm) and not more than 9 inches (229 mm) in depth when
measured from the top of the curb to the top of the drain.
 

Attachments

  • layers.0.3.pdf
    29.3 KB · Views: 555
  • layers.0.3_1.png
    layers.0.3_1.png
    59.2 KB · Views: 1,166

Jadnashua

Retired Defense Industry Engineer xxx
Messages
32,770
Reaction score
1,190
Points
113
Location
New England
Unless you are using a medium bed mortar you should NEVER have a layer of thinset 1/2" thick after the tile is installed. That does NOT mean that you can't use a 1/2" notch, but you probably still shouldn't (on a 1/2x1/2" square notch, that would give you 1/4", which is the max for typical thinsets once the tile is set, if done properly). Industry standards and all of the testing for thinset call for no more than 1/4" (and 3/16" is better) thickness after the tile is set. Some medium bed mortars can handle up to nearly 1", but trying to use thinset greater than 1/4", and you risk it shrinking and cracking and producing a poor bond. Ignore this at your own peril!

The height of the curb, in most codes, is above the height of the drain, not the setting bed at the perimeter. And, most codes do have a minimum. It can get a little messier if you're trying to do a barrier free, and then, it is best to talk to the inspector first. The ADA guidelines and codes can differ, and common sense can prevail.
 

JohnfrWhipple

BATHROOM DESIGN & BUILD
Messages
3,225
Reaction score
102
Points
48
Location
North Vancouver, BC
index.php


Getting closer....

Your clamping drain does not show the top collar. The membrane does not hook out like that and then up. Thin-set is typically closer to 1/8"-1/4" max.

No weep hole shown.

Have you checked out Noble Company's details on the everyday shower pan? Why not do that.

What is the pre-slope over? Concrete or wood? If wood is the opening around the drain supported?
 

Jadnashua

Retired Defense Industry Engineer xxx
Messages
32,770
Reaction score
1,190
Points
113
Location
New England
There can be no FASTENERS (i.e., holes) below 3" above the curb in the liner, but in order to do that, your liner must be HIGHER than 3" above the curb, or you'll have nothing to fasten with those screws, nails, or whatever. An extra inch or more is usually required to make that happen and be safe.
 

Arnav

Member
Messages
150
Reaction score
10
Points
18
Location
Florida
So I've been busy at it... I have a bunch of pics to upload tomorrow, but first I'll reply to these posts...

Unless you are using a medium bed mortar you should NEVER have a layer of thinset 1/2" thick after the tile is installed.
Are you referring to the 1/2" thinset I specified at the curb? If so, it was a typo! Opps, It should have said mortar. I corrected it (and expended it to list liner + mortar/lath + thinset + tile).

The height of the curb, in most codes, is above the height of the drain, not the setting bed at the perimeter. And, most codes do have a minimum.
Agreed. That is exactly what I have done. Did I give a different impression? I simply added 2" to the height of the drain. Any figures relative to the floor, were simply so that I know how high to build the curve...
 

Arnav

Member
Messages
150
Reaction score
10
Points
18
Location
Florida
There can be no FASTENERS (i.e., holes) below 3" above the curb in the liner, but in order to do that, your liner must be HIGHER than 3" above the curb, or you'll have nothing to fasten with those screws, nails, or whatever. An extra inch or more is usually required to make that happen and be safe.
I didn't realize the 3" was not counting the nails/screws, etc'. Luckily I set the blocking box's wood 0.75" above what the liner suppose to be at (i.e. 3.75" above the curb). So I do have an extra, not 1" like you said but hopefully 3/4" will do. If not, I can still make the blocking box higher. I just happen to use a 2x6 and a 2x4 and they both 1/2" off the floor. Interestingly enough, While FL building code says the liner should extend 3" above the threshold, it says it can be perforated as long as it is 1" above the curb... :)

P2709.3 Installation. Lining materials shall be pitched
one-fourth unit vertical in 12 units horizontal (2-percent slope)
to weep holes in the subdrain by means of a smooth, solidly
formed subbase, shall be properly recessed and fastened to approved
backing so as not to occupy the space required for the
wall covering, and shall not be nailed or perforated at any point
less than 1 inch (25.4 mm) above the finished threshold.
 
Top
Hey, wait a minute.

This is awkward, but...

It looks like you're using an ad blocker. We get it, but (1) terrylove.com can't live without ads, and (2) ad blockers can cause issues with videos and comments. If you'd like to support the site, please allow ads.

If any particular ad is your REASON for blocking ads, please let us know. We might be able to do something about it. Thanks.
I've Disabled AdBlock    No Thanks