Circulator-Mixing Valve Orientation

Users who are viewing this thread

Cold Feet

New Member
Messages
8
Reaction score
0
Points
1
Location
Pittsburgh
Thanks in advance for any help with this issue everyone.

I recently installed a new WM Aqua-Balance 120C combi boiler in my 2-story 1911 craftsman. I have CI rads on the first and second floors that were running on one zone previously. As part of this project I zoned the floors separately using Taco 007 circulators and added radiant under my first floor to help heat the hardwoods.

My plan was to combine the radiant and the 1st floor rads on one zone. I installed the system and quickly found that I had very little flow in my radiant floor system. After flushing the system to remove air, pulling apart the radiant manifold to ensure the valves were working I think I've diagnosted the problem. I believe my issue lies in the orientation of my circulator pump to my radiant mixing valve. After reviewing info on this site and other internet forums I now know that the circulator should pull from the mixing valve not push into it as my system currently does.

So now on to my question. I have 2 options (maybe more) on how to fix this as outlined in the attached images.

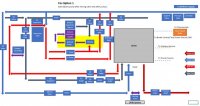
Option 1 leaves the 007 powering the 1st floor rads and the radiant mixing valve but I then install another 007 after the mixing valve to pull flow through and then into the radiant manifold. My concern is that with circulators on both sides, the inbound flow may choke the mixing valve, not allowing cooler water to mix and achieve the right temp balance. Is this accurate?

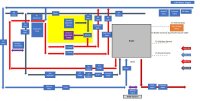
Option 2 involves cutting in a new T to the main loop, installing the mixing valve after the exp. tank and then following it up with a 007 circulator and the radiant manifold. I think this is the more "correct" setup but it also is more involved so I'm wondering what the forum thinks of these options.

Is option 1 going to work and work well? Or should I skip the easy route and plumb this by-the-book despite it being a bit more work?

Thanks in advance for your help and expertise. And sorry for the basic drawings, spreadsheets are the best that I have.
Attached:
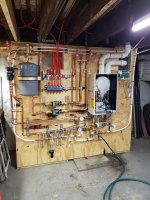
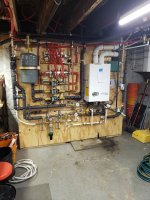
Picture of the current setup
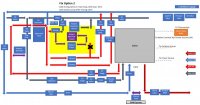
Drawing of the current setup
Drawing of option 1
Drawing of option 2
 

Attachments

  • 20190816_065944.jpg
    20190816_065944.jpg
    121.8 KB · Views: 292
  • Boiler Drawing - Option 2.jpg
    Boiler Drawing - Option 2.jpg
    60.7 KB · Views: 288
  • Boiler Drawing - Option 1.jpg
    Boiler Drawing - Option 1.jpg
    60.2 KB · Views: 277
  • Boiler Drawing - Current.jpg
    Boiler Drawing - Current.jpg
    54.2 KB · Views: 268

Dana

In the trades
Messages
7,889
Reaction score
509
Points
113
Location
01609
Why are you mixing the floor water temp down? Putting the radiant floors in series with the rads (on the return side, if it needs to be lower temperature) and dialing down the output to a reasonably low temp may be simpler.

Ideally you would have already done a room by room Manual-J and compared the ratio of load to radiator equivalent direct radiation (EDR) for each room to determine the minimum temperatures that work. That boiler has a 10:1 turn down so even though it's probably ridiculously oversized for your design heat load, the minimum firing rate is probably still a fraction of the load, and with the thermal mass of the water volume in the rads it's probably not going to short-cycle on you at low temperatures.

What type of heat exchanger do you have on the radiant? (Staple up? Suspended tube? Sheet metal heat spreaders? Extruded heat spreaders? )

Getting down to basics, run a fuel-use based whole-house heat load calc using last winter's gas bills, and measure up your total radiator EDR', zone by zone, which will allow us to at least ball-park the water temp requirements.
 

Cold Feet

New Member
Messages
8
Reaction score
0
Points
1
Location
Pittsburgh
Why are you mixing the floor water temp down? Putting the radiant floors in series with the rads (on the return side, if it needs to be lower temperature) and dialing down the output to a reasonably low temp may be simpler.

Ideally you would have already done a room by room Manual-J and compared the ratio of load to radiator equivalent direct radiation (EDR) for each room to determine the minimum temperatures that work. That boiler has a 10:1 turn down so even though it's probably ridiculously oversized for your design heat load, the minimum firing rate is probably still a fraction of the load, and with the thermal mass of the water volume in the rads it's probably not going to short-cycle on you at low temperatures.

What type of heat exchanger do you have on the radiant? (Staple up? Suspended tube? Sheet metal heat spreaders? Extruded heat spreaders? )

Getting down to basics, run a fuel-use based whole-house heat load calc using last winter's gas bills, and measure up your total radiator EDR', zone by zone, which will allow us to at least ball-park the water temp requirements.

Dana,
Thanks for the response on this.
You bring up a good point about the temps. I currently have the boiler mx set to 145' as I'm still testing the settings. I've read quite a bit about running mod-cons at lower temps compared to my former CI version that ran up to 170-180' but I've not done the calculation to determine the right temps per zone. I see in your note a reference to this calc and I'll work on that not.

I did my best to calculate the whole-house heat loss-gain and BTU output of my current house and rads. I ran the calcs a number of times and they typcially came out to BTUH load of 85-90k. My former CI boiler was a 250k unit that short-cycled constantly. I opted for the AB120 vs. the AB80 as we plan on doing a 1200 sqft addition in the spring and I figured the 120k would mod down for the current load needed and scale up for the new addition next year. Also, just curious, what makes you think the unit is "rediculously oversized?" Not trying to be confrontational just trying to figure out if additional info could help clear this up.

In the first picture you can see the HX I'm using on the radiant. I have 1/2 O2 Pex piping (800ft on 4 loops) running in sheet metal heat spreaders.

Again, thanks for taking the time to provide feedback. I'll work on the heat load calc you reference and circle back soon.
 

Cold Feet

New Member
Messages
8
Reaction score
0
Points
1
Location
Pittsburgh
Why are you mixing the floor water temp down? Putting the radiant floors in series with the rads (on the return side, if it needs to be lower temperature) and dialing down the output to a reasonably low temp may be simpler.

Ideally you would have already done a room by room Manual-J and compared the ratio of load to radiator equivalent direct radiation (EDR) for each room to determine the minimum temperatures that work. That boiler has a 10:1 turn down so even though it's probably ridiculously oversized for your design heat load, the minimum firing rate is probably still a fraction of the load, and with the thermal mass of the water volume in the rads it's probably not going to short-cycle on you at low temperatures.

What type of heat exchanger do you have on the radiant? (Staple up? Suspended tube? Sheet metal heat spreaders? Extruded heat spreaders? )

Getting down to basics, run a fuel-use based whole-house heat load calc using last winter's gas bills, and measure up your total radiator EDR', zone by zone, which will allow us to at least ball-park the water temp requirements.
Dana,
I ran the whole-house head load calc that you referenced from the above link. The data is shown below and it apparently shows the heating load in the 46k range.

January 2019
Meter Reading Date 1/28/19
12/27/18
327 Therms
Boiler Input Rating 250,000
Boiler Output Rating 209,000
Efficiency 83.60%
Delivered to the bldg 273 Therms
heating 99% dry bulb temperature 7
Natural gas: 1,000 BTU/cu. ft.
Terms to BTUs 27,337,200 MMBTU
Sum of HHD 65' 1134.6
BTU/Degree Day 24,094
BTU/Degree Hour 1,004
Sum of HHD 60' 969.6
BTU/Degree Day 28,194
BTU/Degree Hour 1,175
BTU/Hr - 65' 45,176
BTU/Hr - 60' 46,991

I find this off as I ran a few heat gain loss calcs using the sqft, ceiling heights, wall, door, and window construction and R-values, along with the current rads output values and consistantly came up with adjusted heat-loss values in the 88-92k range. I'm certainly no expert on all of this and welcome any other feedback, suggestions, etc.
 

Dana

In the trades
Messages
7,889
Reaction score
509
Points
113
Location
01609
Dana,
I ran the whole-house head load calc that you referenced from the above link. The data is shown below and it apparently shows the heating load in the 46k range.

January 2019

[snip]

I find this off as I ran a few heat gain loss calcs using the sqft, ceiling heights, wall, door, and window construction and R-values, along with the current rads output values and consistantly came up with adjusted heat-loss values in the 88-92k range. I'm certainly no expert on all of this and welcome any other feedback, suggestions, etc.

Bear in mind that a fuel use heat load calculation is a direct measurement, whereas I=B=R or Manual-J load calculations are estimates. The size of the radiation has no bearing on the actual heat load, and the original designers typically oversized them by ~1.5-2x from their best-estimation methods back in the day. (For the record, how many square feet EDR of radiator do you have for the whole house? That would be a good starting point for estimating the water temp requirements to heat the house solely with the pre-existing rads.)

A 120K boiler for a 46K load is more than 2x oversizing, which is pretty ridiculous, but not the ludicrous oversizing of the short-cycling 250K boiler. A 1200' addition built to current code-minimums isn't likely to add more than other 15K to the load (probably less), unless it's an over-glazed 1200' sun-room or something. The 46K load can probably be reduced by 10K or more by insulating and air sealing the basement, if that hasn't already been done.

If you're like most people, you probably used conservative rather than aggressive assumptions about air tightness/R-values/ U-factors when doing your load calculations rather than (as demanded by the instructions in Manual-J) taking every conceivable factor into account that would lower the calculated load. When using conservative assumptions throughout (even with professional load calculation tools) it's common to overshoot by 2x. Even aggressive per-the-manual Manual-J's overshoot reality by more than 10%, often more than 15%.

As a sanity check, heat load of ~46K @ +7F outside, 68F inside would be be about right for a reasonably tight ~2200-2400' house with clear-glass storm windows over wood sash single panes, some cellulose or fiberglass in 2x4 walls, and 6-8" of fluff in the attic, and NO foundation insulation, or a 2800-3000' similarly insulated house with an air tight R10 or better on the basement walls, foundation sill & band joist. (If the basement walls aren't insulated they usually represent more than 15% of the total fuel use & heat load, and are usually worth insulating on both a comfort and fuel efficiency basis, even if you never intend to make it finished living space.)

With the thermal mass of high volume rads every where there's very low risk of short-cycling the boiler at even arbitrarily low water temps, so start by just lowering the outdoor reset curve until it's not keeping up overnight in some room/zone or another. If you don't have the outdoor sensor installed, it's well worth installing it so that this feature can be used. Start on page 64 of the manual to study up on how to adjust the reset curves. Take big, bold reductions if 10F or more, then when some room or zone isn't keeping up, raise it by 5F and give it a day to stabilize. If it's still not keeping up overnight, start raising it a degree or so at a time until it just barely keeps up, running very long calls for heat before the thermostat(s) are satisfied. Do NOT use deep overnight setback strategies, since that will force one to use higher water temps to achieve reasonable ramp times when recovering from setback, temps high enough to take out of the condensing zone much of the time.
 
Last edited:

Cold Feet

New Member
Messages
8
Reaction score
0
Points
1
Location
Pittsburgh
Dana,
Thanks again for taking the time to help me out.
I'll get feedback on all your questions/thoughts in the next few days. My wife had our daughter on Monday so I've obviously been quite distracted since then.

Quick notes:
1911 craftsman with cedar shingle siding.
The house has 3 stories above ground. The 3rd story is heated by electric baseboards and closed off from the 2nd story most of the winter.
2x6 walls with NO insulation
2nd floor has original windows with storms, the old version that are not very sound.
1st floor has original 100 year old single lane windows. I hat how inefficient they are but replacing them would cost $20k+ just for the first floor) and detract from the homes architectural value.

The basement is stone rubble, about 18" thick. The band joist has been insulated with spray foam but the walls have not been insulated.

I do have an outdoor sensor, mounted on the North wall about 16' above ground level.

I'll review the manual and your other questions in the coming days.

Thanks again!
 

Dana

In the trades
Messages
7,889
Reaction score
509
Points
113
Location
01609
Dana,
Thanks again for taking the time to help me out.
I'll get feedback on all your questions/thoughts in the next few days. My wife had our daughter on Monday so I've obviously been quite distracted since then.

Quick notes:
1911 craftsman with cedar shingle siding.
The house has 3 stories above ground. The 3rd story is heated by electric baseboards and closed off from the 2nd story most of the winter.
2x6 walls with NO insulation

A 1911 Craftsman does not have 2x6 walls. It's most likely rough sawn full dimension 2.0" x 4.0" 2 x 4s. With 3/4" ship-lap sheathing and cedar shingles, with 3/4"lath & plaster on the interior you're looking at a roughly U0.20 for the walls, compared to ~U0.08 if the cavities are blown full of cellulose (highly recommended).

How many square feet is being served by the boiler?

2nd floor has original windows with storms, the old version that are not very sound.
1st floor has original 100 year old single lane windows. I hat how inefficient they are but replacing them would cost $20k+ just for the first floor) and detract from the homes architectural value.

Retrofitting tight l0w-E storm windows over wood-sash single panes takes the window performance from about U 1.0 down to about U0.30- U0.34 (about the same as a current code-minimum vinyl replacement window) at fraction of the cost. As a DIY it can be under $120/window, maybe $250/window if paying a pro to install them. The low-E Larson storm windows sold through box stores are pretty good and will tighten up the air leakage considerably, but Harvey Tru-Channels with the low-E glass are the tightest in the biz. I'm not sure if you can get Harvey's in Pittsburgh- the nearest showroom to you would either be in Allentown or King of Prussia.

Tightening up the windows with new storms may be higher priority than insulating the walls, but both are pretty important for both comfort and efficiency.

The basement is stone rubble, about 18" thick. The band joist has been insulated with spray foam but the walls have not been insulated.

I do have an outdoor sensor, mounted on the North wall about 16' above ground level.

I'll review the manual and your other questions in the coming days.

Thanks again!

An 18" rubble foundation may leak a lot of air if the mortar hasn't been touched up recently, but is good for about U0.35 on the above-grade section if it's pretty tight. Sealing and insulating the band joist was a good start. A shot of 2" of HFO blown closed cell foam (R14) would bring it pretty much up to current code, but that would be a lower priority than insulating the wall cavities.

For reference, my house is only 12 years younger than yours, with 2400' of fully conditioned space + 1600' of insulated but not directly heated basement. When I first moved into the place someone had already installed triple-track storm windows (not low-E) which are still there. The full dimension 2x4 walls had no insulation, and only parts of the air-leaky kneewalled finished space upstairs had been insulated. The heat load then was about 50,000 BTU/hr @ +5F (the local 99% outside design temp, comparable to Pittsburgh's +7F.)

With ongoing air sealing and insulation efforts that included packing the walls with cellulose, using some open cell polyurethane in the attic spaces behind the kneewalls upstairs for both air sealing & insulation, and insulating the poured concrete foundation walls with 3" of reclaimed roofing polyiso (~R17) the heat load has dropped by almost 1/3, to about 35,000 BTU/hr (~40K if I fully heated the basement, which now stays in the mid-60s F year round). The wintertime indoor air is no longer bone-dry, there are no more drafts, and it's a whole lot more comfortable all around.

It's probably not in the budget to take it that far any time soon, but these two projects Nate Adams took on in Cleveland on houses of similar vintage are worth taking a look at. (The project photographs links have lots of detail.) Adams uses a lot more closed cell foam than I'm comfortable with from an environmental damage point of view- there are other (and greener) ways to air seal and insulate most of the house, but from a practical point of view it's usually the best option for rubble foundations.

None of this has anything to do with fine tuning or modifying your heating system, but any measures taken to improve the thermal performance of the house will increase comfort while reducing the system's water temperature requirements.

To get a handle on what to do with the heating system start by re-measuring all your radiators, which would help zero in on the design condition water temperature requirements, a necessary first step for dialing in the outdoor reset curve. If the output of your rads at 170F AWT (180F out, 160F return) is the previously estimated ~90K, you probably have enough radiator to meet the ~45K design load at an AWT of 130F, (135F out, 125F return) which would be fine to run in a under-the-subfloor radiant system without mixing it down to some lower temperature.
 

Cold Feet

New Member
Messages
8
Reaction score
0
Points
1
Location
Pittsburgh
A 1911 Craftsman does not have 2x6 walls. It's most likely rough sawn full dimension 2.0" x 4.0" 2 x 4s. With 3/4" ship-lap sheathing and cedar shingles, with 3/4"lath & plaster on the interior you're looking at a roughly U0.20 for the walls, compared to ~U0.08 if the cavities are blown full of cellulose (highly recommended).

How many square feet is being served by the boiler?


Retrofitting tight l0w-E storm windows over wood-sash single panes takes the window performance from about U 1.0 down to about U0.30- U0.34 (about the same as a current code-minimum vinyl replacement window) at fraction of the cost. As a DIY it can be under $120/window, maybe $250/window if paying a pro to install them. The low-E Larson storm windows sold through box stores are pretty good and will tighten up the air leakage considerably, but Harvey Tru-Channels with the low-E glass are the tightest in the biz. I'm not sure if you can get Harvey's in Pittsburgh- the nearest showroom to you would either be in Allentown or King of Prussia.

Tightening up the windows with new storms may be higher priority than insulating the walls, but both are pretty important for both comfort and efficiency.


An 18" rubble foundation may leak a lot of air if the mortar hasn't been touched up recently, but is good for about U0.35 on the above-grade section if it's pretty tight. Sealing and insulating the band joist was a good start. A shot of 2" of HFO blown closed cell foam (R14) would bring it pretty much up to current code, but that would be a lower priority than insulating the wall cavities.

For reference, my house is only 12 years younger than yours, with 2400' of fully conditioned space + 1600' of insulated but not directly heated basement. When I first moved into the place someone had already installed triple-track storm windows (not low-E) which are still there. The full dimension 2x4 walls had no insulation, and only parts of the air-leaky kneewalled finished space upstairs had been insulated. The heat load then was about 50,000 BTU/hr @ +5F (the local 99% outside design temp, comparable to Pittsburgh's +7F.)

With ongoing air sealing and insulation efforts that included packing the walls with cellulose, using some open cell polyurethane in the attic spaces behind the kneewalls upstairs for both air sealing & insulation, and insulating the poured concrete foundation walls with 3" of reclaimed roofing polyiso (~R17) the heat load has dropped by almost 1/3, to about 35,000 BTU/hr (~40K if I fully heated the basement, which now stays in the mid-60s F year round). The wintertime indoor air is no longer bone-dry, there are no more drafts, and it's a whole lot more comfortable all around.

It's probably not in the budget to take it that far any time soon, but these two projects Nate Adams took on in Cleveland on houses of similar vintage are worth taking a look at. (The project photographs links have lots of detail.) Adams uses a lot more closed cell foam than I'm comfortable with from an environmental damage point of view- there are other (and greener) ways to air seal and insulate most of the house, but from a practical point of view it's usually the best option for rubble foundations.

None of this has anything to do with fine tuning or modifying your heating system, but any measures taken to improve the thermal performance of the house will increase comfort while reducing the system's water temperature requirements.

To get a handle on what to do with the heating system start by re-measuring all your radiators, which would help zero in on the design condition water temperature requirements, a necessary first step for dialing in the outdoor reset curve. If the output of your rads at 170F AWT (180F out, 160F return) is the previously estimated ~90K, you probably have enough radiator to meet the ~45K design load at an AWT of 130F, (135F out, 125F return) which would be fine to run in a under-the-subfloor radiant system without mixing it down to some lower temperature.

Dana,
Sorry again for the delayed response.

The total SQFT being served by the boiler is about 2700 SQFT.

You are correct about the true 2x4 walls as I had to tap through for some electrical conduit this past summer. There was no insulation in the wall cavity and we are planning on looking in to blown-in cellulose in the future but are worried about the installation creating damage to the cedar shingle exterior or the plaster interior.

I really like the idea of reasonably priced storms on our 1st floor windows. I'll look into your recommendations after the new year and see if it is possible to have them installed without detracting from the current window's aesthetics.

I've got 10 CI radiators throughout the 1st and 2nd floor totalling 580 total sqft. I've calculated the output at 88k BTU (48k 1st floor, 38k 2nd floor). I can provide the radiator sizes, # of sections, etc. if that would be helpful.

I adjusted the OTC curve down to #5 (pg. 63 in the manual) despite my house being on the less efficient side. The past few days have been very cold for November (highs in the 20-30s) and the boiler has run in the 135' output range depending on time of day.

Question for you. If we determine that the entire system can be run at a point low enough to avoid cooling the radiant loop do you see any merit in plumbing in the mixing valve that I current have in my system? My thought is that by plumbing it in now I would have options in the future if I ever needed to increase the total system output without having to replumb that loop.

Thanks again for all your help Dana!
-Travis
 

Dana

In the trades
Messages
7,889
Reaction score
509
Points
113
Location
01609
At an AWT of 130F (135F out, 125F return) the rads would be putting out about 70 BTU/hr per square foot EDR, and the boiler should be delivering about 90-91% efficiency if running in it's low-fire range.

580' EDR of radiator x 70 BTU/hr= 40,600 BTU/hr

A reasonably tight but uninsulated 2700' house that still has some single-panes would typically have a heat load of ~50-55,000 BTU/hr @ 0F outside, but probably not as high as 65,000 unless it has HUGE air leakage. A load of 50,000 BTU/hr with 580' EDR of radiator is a ratio of ~85 BTU/hr per foot EDR, which it will deliver at an AWT of ~135F:
53h99dlw1f2h.png


Looking at Figure 87 on p.65 of the manual when running on curve 5 it should be delivering 135F-out when it's in the high 20s or low 30s outside. But curve #3 would deliver 135F out at about 0F outside, which is pretty close to where I think the heat load is with the house in it's current condition. Try dropping it down to curve #3 to see if it keeps up overnight (it might, but might not). If it doesn't keep up, bump it back to #5 until the house gets back up to temp, then drop down to #4 to see how it does overnight.

But whether it's going to take curve 4 or curve 3, either would be fine to run in most staple-up (even plated) radiant systems without mixing it down. Most PEX is rated for 180-200F max, and you won't be needing anywhere near those temperatures on your system unless you're keeping it 85-90F indoors to keep your tropical orchid collection happy.

Given the relatively modest water temperature requirements even BEFORE improving the insulation & air sealing on the house I don't see much point in mixing down the temperature for the floors. The only floors that can't take 150-180F water would be concrete (which could crack from the thermal stresses.)

You still haven't stated what type of radiant you're working with- is it a plated staple-up?

Cellulose is not going to damage the plaster, unless the tacks on the lath are so rusty it that it buckles and cracks under the pressure while it's being installed. Most insulation contractors can make that call, and will back off on the density to be able to blow at lower pressures if it looks marginal. I had zero issues with the horse-hair plaster walls in my house installing ~3-3.2lbs density cellulose.

Your house probably has rosin-paper or tar paper between the shingles and plank or ship-lap sheathing, which is enough to keep cellulose from getting into the tiny air space between the shingles & sheathing. When a house is insulated the average wintertime temperature of the sheathing drops compared to the uninsulated version of the house, which means it can potentially take up more moisture, but cellulose (unlike fiberglass or rock wool) shares the moisture burden with the sheathing, since it can take up and store a substantial amount of moisture without damage or loss of function. As long as bulk water issues are reasonably well controlled neither the cellulose nor the sheathing will exceed safe moisture limits. Most arts & crafts bungalow type houses have deep roof overhangs, and very limited direct wetting of the walls. I may be worth popping a few shingles to see if any window flashing was installed when the house was built. Even if there is NO flashing, storm windows will limit the amount of bulk-water getting as far in as the sheathing, it's still pretty safe in all but the most wind-driven rainy coastal regions.

Your most moisture susceptible points are the first floor windows, since some may be 2 stories or more below a roof gable overhang, getting a bit more direct wetting. If one opted to not insulate the stud bays below those windows for now, insulating the rest of the house would still yield a substantial reduction in heat load, and a correspondingly lower water temperature requirement for the system. The most comfortable and efficient way to run the system is at the lowest possible water temperature that still keeps the rooms up to temp. To the uninitiated it may seem like it's "struggling" to keep up if it takes an hour to satisfy the thermostat, but in fact those very long calls for heat keep the mean radiant temperatures in the room much more stable- at any given temperature it's more comfortable when you can close your eyes and tell where the radiators by feeling the radiated heat on your face than having the rads satisfy the thermostat quickly, followed by the long slow chill.
 

Cold Feet

New Member
Messages
8
Reaction score
0
Points
1
Location
Pittsburgh
At an AWT of 130F (135F out, 125F return) the rads would be putting out about 70 BTU/hr per square foot EDR, and the boiler should be delivering about 90-91% efficiency if running in it's low-fire range.

580' EDR of radiator x 70 BTU/hr= 40,600 BTU/hr

A reasonably tight but uninsulated 2700' house that still has some single-panes would typically have a heat load of ~50-55,000 BTU/hr @ 0F outside, but probably not as high as 65,000 unless it has HUGE air leakage. A load of 50,000 BTU/hr with 580' EDR of radiator is a ratio of ~85 BTU/hr per foot EDR, which it will deliver at an AWT of ~135F:
53h99dlw1f2h.png


Looking at Figure 87 on p.65 of the manual when running on curve 5 it should be delivering 135F-out when it's in the high 20s or low 30s outside. But curve #3 would deliver 135F out at about 0F outside, which is pretty close to where I think the heat load is with the house in it's current condition. Try dropping it down to curve #3 to see if it keeps up overnight (it might, but might not). If it doesn't keep up, bump it back to #5 until the house gets back up to temp, then drop down to #4 to see how it does overnight.

But whether it's going to take curve 4 or curve 3, either would be fine to run in most staple-up (even plated) radiant systems without mixing it down. Most PEX is rated for 180-200F max, and you won't be needing anywhere near those temperatures on your system unless you're keeping it 85-90F indoors to keep your tropical orchid collection happy.

Given the relatively modest water temperature requirements even BEFORE improving the insulation & air sealing on the house I don't see much point in mixing down the temperature for the floors. The only floors that can't take 150-180F water would be concrete (which could crack from the thermal stresses.)

You still haven't stated what type of radiant you're working with- is it a plated staple-up?

Cellulose is not going to damage the plaster, unless the tacks on the lath are so rusty it that it buckles and cracks under the pressure while it's being installed. Most insulation contractors can make that call, and will back off on the density to be able to blow at lower pressures if it looks marginal. I had zero issues with the horse-hair plaster walls in my house installing ~3-3.2lbs density cellulose.

Your house probably has rosin-paper or tar paper between the shingles and plank or ship-lap sheathing, which is enough to keep cellulose from getting into the tiny air space between the shingles & sheathing. When a house is insulated the average wintertime temperature of the sheathing drops compared to the uninsulated version of the house, which means it can potentially take up more moisture, but cellulose (unlike fiberglass or rock wool) shares the moisture burden with the sheathing, since it can take up and store a substantial amount of moisture without damage or loss of function. As long as bulk water issues are reasonably well controlled neither the cellulose nor the sheathing will exceed safe moisture limits. Most arts & crafts bungalow type houses have deep roof overhangs, and very limited direct wetting of the walls. I may be worth popping a few shingles to see if any window flashing was installed when the house was built. Even if there is NO flashing, storm windows will limit the amount of bulk-water getting as far in as the sheathing, it's still pretty safe in all but the most wind-driven rainy coastal regions.

Your most moisture susceptible points are the first floor windows, since some may be 2 stories or more below a roof gable overhang, getting a bit more direct wetting. If one opted to not insulate the stud bays below those windows for now, insulating the rest of the house would still yield a substantial reduction in heat load, and a correspondingly lower water temperature requirement for the system. The most comfortable and efficient way to run the system is at the lowest possible water temperature that still keeps the rooms up to temp. To the uninitiated it may seem like it's "struggling" to keep up if it takes an hour to satisfy the thermostat, but in fact those very long calls for heat keep the mean radiant temperatures in the room much more stable- at any given temperature it's more comfortable when you can close your eyes and tell where the radiators by feeling the radiated heat on your face than having the rads satisfy the thermostat quickly, followed by the long slow chill.

Dana, as always I truly appreciate your time and insights.
I replumbed the system over the weekend and finally have my radiant working on the first floor. [see pictures] Since I already had the equipment and needed the additional circulator to overcome the radiant head I opted to plumb it per Option 2 in my original post. I figure that if the system works well on lower temps I can always remove the mixing valve from the equation.


I will test the idea of using curve 3 or 4 over the holiday weekend and report back on what happens.

Apologies if I failed to update you on the type of radiant I am using. I am running about 800' of 1/2" barrier pex in 4 similar length loops. I plan to add a fifth loop next year once we renovate our kitchen. The pex are help up using 2' and 4' aluminum heat transfer plates. They are tight to the subfloor with caulking (to help eliminate squeeks) and 3/8" staples. I think you can see them in some of the original pictures.

I have not yet insulated under the radiant as I wanted to fully run the system for a number of weeks to ensure I have no pin hole leaks and to determine the feel of the floor without the insulation. I'm finding conflicting opinions on the best way to insulate in the joist bays so I'd welcome your thoughts. For reference, my basement is and unfinished workshop. I plan to plumb in 1-2 radiators to help keep it mild but I'm not planning to thoroughly heat it all winter. The average temp in the basement is 50-65' year-round.

I really appreciate all the thoughts on the cellulose and air sealing. I plan to start getting quotes in early-January with a goal of getting some of the improvements done in the spring.

Thanks again for all your time and expertise Dana!
 

Attachments

  • 20191122_183055.jpg
    20191122_183055.jpg
    118.4 KB · Views: 279

Dana

In the trades
Messages
7,889
Reaction score
509
Points
113
Location
01609
It looks like sheet metal type plates rather than extrusions, which is fine.

What's not fine is that there is the lack of insulation on the underside. Right now a large fraction of the heat is being radiated and convected into the basement. Even so I'll bet you can already feel the difference in bare feet, eh?

Those who advocate using radiant barrier and an air space under plated up radiant in lieu of fiber insulation are out to lunch. The emissivity of the bright aluminum heat spreader plate is quite low, and leaving an air space is leaving a thermal bypass path for convective losses. Fiber insulation at least somewhat air retardent and will block/slow those convective losses, and have much higher performance than the ~R1-R2 you'd be getting out of the air films. Radiant barrier only provides benefit when the emitting surface has high emissivity (such as bare wood, not bare aluminum), and in an unplated staple-up (or suspended tube) solution would also serve to minimize temperature striping on the floor above.

If the basement is actively heated "contractor roll" R11s or R13s snugged right up to the PEX and plates is called for to better isolate the zones. If the basement is NOT actively heated go with R19s snugged right up, no air-gaps. If you're going to let the basement run as cool as 50F, go for the R19s. But if you insulate the foundation walls to current code minimums and air seal the basement from the outdoors it will probably never drop below 65F, in which case R13 would be more appropriate.

Spending the basement zone radiator money on air sealing & insulating the foundation walls is probably a better investment from both a comfort and energy use point of view.
 

Cold Feet

New Member
Messages
8
Reaction score
0
Points
1
Location
Pittsburgh
Thanks for the info Dana. I plan to go with R13 batts snugged up to the underside of the subfloor. I hope to get this done in the coming weeks.
I was only able to get the faced batts from the local big box. Given that the basement is semi-conditioned how would you recommend I install the batts? Facing up to the subfloor? Facing down to the basement side? Or remove the facing completely?
 

Dana

In the trades
Messages
7,889
Reaction score
509
Points
113
Location
01609
Thanks for the info Dana. I plan to go with R13 batts snugged up to the underside of the subfloor. I hope to get this done in the coming weeks.
I was only able to get the faced batts from the local big box. Given that the basement is semi-conditioned how would you recommend I install the batts? Facing up to the subfloor? Facing down to the basement side? Or remove the facing completely?

The facers should be pointing at the basement- when you look up you should see the facers, not fiberglass. Even though a kraft facer can't be made fully air tight (it'll leak a bit of air around the edges), it's still WAY better than no air barrier on the batts at all, which for mid-density R13s allows a fair amount of air convection (though still more air retardent than R11s, which are barely denser than an air filter.)

Technically a paper batt facer exposed to the basement is code violation due to the flame spread characteristics. To fully meet code there should be a timed thermal barrier ( a half inch gypsum board ceiling works), but if there aren't any flame sources in the room the risks are at least somewhat lower. Whether you install a ceiling or not is up to you, but I though you should know that some code people (and insurers) could flag it.

R15 rock wool or fiberglass is dense enough to not lose much performance to convection or drafts even without an air barrier. Exposed high density fiberglass still runs some risk of airborne glass fragment aerosols in the basement air- rock wool doesn't, so if leaving the insulation exposed, rock wool is the safer bet.
 

Cold Feet

New Member
Messages
8
Reaction score
0
Points
1
Location
Pittsburgh
The facers should be pointing at the basement- when you look up you should see the facers, not fiberglass. Even though a kraft facer can't be made fully air tight (it'll leak a bit of air around the edges), it's still WAY better than no air barrier on the batts at all, which for mid-density R13s allows a fair amount of air convection (though still more air retardent than R11s, which are barely denser than an air filter.)

Technically a paper batt facer exposed to the basement is code violation due to the flame spread characteristics. To fully meet code there should be a timed thermal barrier ( a half inch gypsum board ceiling works), but if there aren't any flame sources in the room the risks are at least somewhat lower. Whether you install a ceiling or not is up to you, but I though you should know that some code people (and insurers) could flag it.

R15 rock wool or fiberglass is dense enough to not lose much performance to convection or drafts even without an air barrier. Exposed high density fiberglass still runs some risk of airborne glass fragment aerosols in the basement air- rock wool doesn't, so if leaving the insulation exposed, rock wool is the safer bet.
Dana,
I don't plan to ever cover the basement ceiling with gypsum so what insulation type and air barrier do you suggest? I definitely don't want to create an environment with airborn particles so if some combination of rock wool and plastic sheeting, etc. Is recommended let me know.
Basically if this was your setup [basement workshop, under exposed floor joists with radiant tubing] how would you insulate for efficiency and air health?
Thanks in advance for your time!
 

Dana

In the trades
Messages
7,889
Reaction score
509
Points
113
Location
01609
Basically if this was your setup [basement workshop, under exposed floor joists with radiant tubing] how would you insulate for efficiency and air health?

What I did in the unfinished basement game room below my radiant floor zone was unfaced R19 batts held up by perforated aluminized fabric type radiant barrier. But that was basically because I had a roll of the RB kicking around left over from some other project. not for the ever so slight performance boost from the aluminum. It's pretty rugged, and flexible but not stretchy which is a good thing. Unlike sheet plastic or housewrap has a reasonable fire rating (it has to, give that it is normally installed in open attics). A 4' x 125' roll (500 square feet) costs about $65-$70 at the box stores (usually Reflectix brand), slightly cheaper at online vendors (but watch out for the shipping charges). If you mark and cut it carefully into thirds (16" wide) with a fine-toothed sawzall blade there is just enough extra width to be able to side-staple it into 16" o.c. stud bays, snugged right up to the bottom of the batts.

The perforations are tiny- just big enough allow for reasonable drying rates, but aren't so big that it creates an airborne fiberglass shard issue- there's nothing driving air through those tiny holes, and even at a fairly significant pressure difference not much air gets through. For insulating at the roof in unfinished attics with soffit to ridge venting, installing this type of radiant barrier on the underside of the rafter bays is enough keep batts in place between the rafters and allows a drying path to/from the attic space into the roof vent channels without creating a big air leak or undercutting the performance of the batts.

Un-perforated versions would also work fine in for your situation.
 
Top
Hey, wait a minute.

This is awkward, but...

It looks like you're using an ad blocker. We get it, but (1) terrylove.com can't live without ads, and (2) ad blockers can cause issues with videos and comments. If you'd like to support the site, please allow ads.

If any particular ad is your REASON for blocking ads, please let us know. We might be able to do something about it. Thanks.
I've Disabled AdBlock    No Thanks