Can I secure my shower base to wall with screws?

Users who are viewing this thread

IrishSwede

New Member
Messages
26
Reaction score
0
Points
1
Location
Olympia, WA
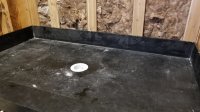
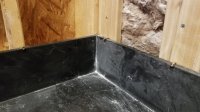
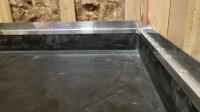
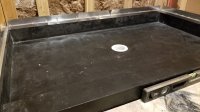
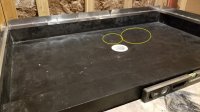
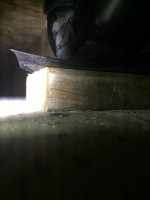
Here is my situation. We purchased a tileable shower base, installed it following the directions (have done a couple before without issue). We have no flexing, however when weight is removed their is a slight "teeter" between back left corner and front right.

I spoke with the manufacturer who suggested I could add the weight back then pre-drill and use some metal truss head screws to secure the pan to the studs. My concern is 2 of 3 walls are exterior walls and if they move it's going to crack my base. The base is 1/2" think mix of PVC/Fiberglass so it does not have any flex.

The guy I spoke with doesn't fill me with confidence, so hoping I could see what you fellas think?

PS - Removing the base is not an option. I could add trim screws on top to stop it from raising?
 

Jadnashua

Retired Defense Industry Engineer xxx
Messages
32,770
Reaction score
1,190
Points
113
Location
New England
I think what you're seeing is actually the base flexing. This can have long-term reliability issues for the tile and grout on the pan. If the floor is not nearly perfect along with the base, it can move. Keep in mind, the cement based materials holding the tile in place along with the grout, are not very flexible. What many people do with that type of base is use some mortar underneath it to both level it (if required) and to ensure it can't move through flex or rocking.

Not sure what you can do about it after the fact.

Screwing it to the walls may stop the motion, but it will constantly be in tension, which may or may not be good for long-term bonds of the thinset and grout. You can't really clamp it to the cement board, any slight movement would then likely start to squeak, and that could drive you crazy.

The people over at www.johnbridge.com deal nearly 100% with tiling things, and there are more tiling pros that may have some useful suggestions than here.
 

IrishSwede

New Member
Messages
26
Reaction score
0
Points
1
Location
Olympia, WA
I did the mortar bed correctly (3/8 tapering to 1/4) and the center of the pan has absolutely no flexing. The issue is some of the mortar got on the outside perimeter and hardened so it has a level center but off level corner. I put a screw on the stud flush against the pan and removed the weight and when it is held there is no teeter or flexing.

I just do not know if I should listen to the questionable tech support guy, who I felt I was teaching about his product, and screw my base to the studs while it is weighed down. Alternatively I could place and secure the cement boards on the lip of the pan (directly on the flashing)?
 

Jadnashua

Retired Defense Industry Engineer xxx
Messages
32,770
Reaction score
1,190
Points
113
Location
New England
First off, cbus are not all created equal. There are two classes:
- 'normal' cement boards
- fiber-cement boards
Their allowable use in a shower varies based on the type of board. You CANNOT put a fiber-cement board in contact with the lip of a shower base...it must be terminated above it. You can embed a 'real' cement board. Neither one is particularly strong, but a fiber-cement one is less likely to crack. Both of them will bend over time if installed under pressure/tension. Both should have a moisture barrier installed behind them and lapped over the tiling flange. FWIW, HardieBacker is a fiber-cement board, so it should not be sitting on the lip of the base. The fibers in HardieBacker are cellulose (wood fiber). It can handle getting wetted, but it cannot handle long-term contact with moisture when in contact with a base where it could wick into the board. CBU boards are not waterproof, but not generally damaged by being wetted when used according to their installation instructions. Neither tile nor grout is considered waterproofing, either.
 

IrishSwede

New Member
Messages
26
Reaction score
0
Points
1
Location
Olympia, WA
Unfortunately I have hardie board 1/2". I will try placing a 2x4 between my joist and adding a ton of exterior screws around the perimeter to see if that will hold up against the base pushing up. Then I will set the board on that which will provide it the 1/8" it needs. I also plan on using redgrad waterproofing membrane.

Would treating the cement board with the redgard allow me to put it on to the base?

Thank you for sticking with me on this, I also created a post at the link you provided.
 

IrishSwede

New Member
Messages
26
Reaction score
0
Points
1
Location
Olympia, WA
There is a slight flex once it is only held down by screws. The tech said not to worry about it as the weight of the tile and epoxy should stop it, but I am worried it may crack my grout?
 

Attachments

  • 20190119_142259.jpg
    20190119_142259.jpg
    77.5 KB · Views: 456
  • 20190119_142231.jpg
    20190119_142231.jpg
    73.7 KB · Views: 461

IrishSwede

New Member
Messages
26
Reaction score
0
Points
1
Location
Olympia, WA
Sorry for all the posts, not meaning to bug you all.

So this is what we ended up doing, it fixed the teeter completely and made it even more secure to the floor. However there is still a "soft" spot between the drain and wall.

Will it be ok with a tiny amount of flexing? Should I use epoxy grout? It is not flexing near as bad as our 'Builder' installed unit, nor our last tile redi, but it does flex....kinda hating life at the moment...

Any advice is greatly appreciated, a contractor friend had suggested screwing the base to the floor...but that seems counter-intuitive? After he saw it he said it is 50/50 if we see any issues. We Will be using epoxy to adhere the mosaic to the floor. I am only worried about the grout cracking.

Also the trim screws will sit the boards up just under 1/4", what sealant should I use. If memory serves silicone is only good up to 3/8".
 

Attachments

  • 20190119_163107.jpg
    20190119_163107.jpg
    56.9 KB · Views: 411
  • 20190119_163134.jpg
    20190119_163134.jpg
    63.6 KB · Views: 636

Jadnashua

Retired Defense Industry Engineer xxx
Messages
32,770
Reaction score
1,190
Points
113
Location
New England
If you're going to use RedGard, you could get some of their tape and use that to bridge the gap to seal it to the pan. Follow Custom Building Products instructions when using the fabric tape...if I remember correctly, you treat it sort of like drywall tape by putting a coat of Redgard, placing the tape, then another coat on top of it, embedding the tape in the waterproofing. Use it in the corners to strengthen the corners as well since you'll have enough left over. You need to use the RedGard at least up to the height of the showerhead for a correct installation.

Using RedGard over HardieBacker requires three coats...the first one is a thinned mix of RedGard and water...otherwise, the Hardie will literally suck all of the moisture out of the stuff, making the brush drag and making a mess...the stuff won't flow well, either. The next two coats would go on normally, and the primer coat will prevent the board from sucking up that moisture, and go on much easier.
 

IrishSwede

New Member
Messages
26
Reaction score
0
Points
1
Location
Olympia, WA
Thank you so much for your help here and the other forum, really have helped me.

How much would you recommend I thin it, just add a tiny water before rolling it? Also not sure if you saw in the other thread, but do you believe (logic/experience) that adding a skim coat beforehand would add any stability? The flex is about 1/16 in the left spot and 1/8 in the right circle.
 

Attachments

  • 20190119_163134.jpg
    20190119_163134.jpg
    65.5 KB · Views: 376

Jadnashua

Retired Defense Industry Engineer xxx
Messages
32,770
Reaction score
1,190
Points
113
Location
New England
The RedGard instructions tell you the proportions for the primer coat (I think it was 50:50, but check), from what I remember.

Epoxy or not, movement is never a good idea with tile.
 

IrishSwede

New Member
Messages
26
Reaction score
0
Points
1
Location
Olympia, WA
Thank you so much Jim

Another option is having my wife (have now part ways with the contractor) cut open the roof below, drilling through the OSB and spraying foam between the pan ribs and floor. I do not know if this would work? Is there a foam that will not expand too much and hold up, as in not compress? Should I add weight beforehand?
 

IrishSwede

New Member
Messages
26
Reaction score
0
Points
1
Location
Olympia, WA
I am just brainstorming, but I took a picture of this before the plumber installed...is there any chance his brace under the drain trap could be causing the issue? As in pushing up against the pipe? I do not know, I would expect it to push up on both side of the pan then and not just the one?

Tile Redi shot down the foam idea...again said a max 1/8" deflection is perfectly within their range of acceptance...
 

Attachments

  • IMG_9338.JPG
    IMG_9338.JPG
    41.7 KB · Views: 376

Reach4

Well-Known Member
Messages
38,880
Reaction score
4,433
Points
113
Location
IL
How good is your access under there? I would be thinking of trying to shove plastic bags of freshly-mixed mortar into the space. Then as you put the base back into position, the mortar should have enough give to let the base get where it needs to be, but will harden to make little perfect-height supports.
 
Last edited:

Jadnashua

Retired Defense Industry Engineer xxx
Messages
32,770
Reaction score
1,190
Points
113
Location
New England
Doubt that the support he put under the p-trap is the source of your problem. Given the 1/16-1/8" small gap, you need something that can flow and harden...I doubt you'd get mortar in there. You also want something that won't shrink, but that thin a layer of mortar, if you could get it in there, shouldn't. If it were deeper, it might shrink and crack, but it would have to be lots thicker. But, you won't get it to flow in there.

Ever seen a seashell or bug or flower encapsulated in clear plastic? The stuff is pretty fluid, but hardens. A small hole above your cavity, and you might be able to inject something like that to fill the hole. A hobby shop would likely have some along with a disposable plastic syringe. You might be able to do that from below, too, if you taped over the hole quick enough...just make sure you don't drill through the pan as well!

Thinking outside the box here...no history as to reliability in the long run.
 
Top
Hey, wait a minute.

This is awkward, but...

It looks like you're using an ad blocker. We get it, but (1) terrylove.com can't live without ads, and (2) ad blockers can cause issues with videos and comments. If you'd like to support the site, please allow ads.

If any particular ad is your REASON for blocking ads, please let us know. We might be able to do something about it. Thanks.
I've Disabled AdBlock    No Thanks