Broken Closet Flange

Users who are viewing this thread

CarlH

Member
Messages
179
Reaction score
1
Points
16
Location
Northern VA
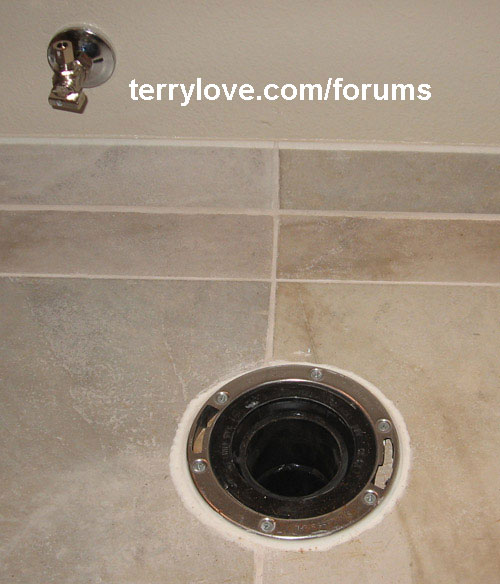
I pulled a toilet today as a part of my bathroom renovation and discovered that the flange had cracked around both slots for the closet bolts. It is the open slots in the picture on the left and right sides.

closetflange.jpg

I have a couple of question regarding this flange.

The most important question is, what do you recommend I do to fix this flange? The tile and underlayment will be removed before new tile will be installed, which can provide some access to the underside of the Flange.

The flange is a bit uneven. The center line puts the flange at 1/2" high, the left side at 3/8" and the right side at 5/8". This seems OK to me. Now here is the problem. I had a AS Cadet PA in this location and after I noticed the cracked flange I placed the bowl back on the flange to check the situation. The bowl rocks on the flange. I did a quick check of the bottom of the bowl and there does not seem to be 1/2" difference between the outside lip of the base and the recess all the way around the horn. Is this typical for this bowl, a defect, or is the flange too high?
 

hj

Master Plumber
Messages
33,603
Reaction score
1,042
Points
113
Location
Cave Creek, Arizona
Website
www.terrylove.com
Your picture does not come through so I don't know what kind of flange you have, although it is probably a plastic one. If so, remove it and replace it with a "good" one, which would mean one which was NOT all plastic.
 

Terry

The Plumbing Wizard
Staff member
Messages
29,942
Reaction score
3,459
Points
113
Location
Bothell, Washington
Website
terrylove.com
Since you are redoing the floor, don't patch it, replace it.
You have cracks in the plastic now that are only going to get bigger.
Below is a Sioux Chief flange with a stainless steel ring.
I used a space under the flange to raise it to tile height.

flange_02.jpg
 
Last edited:

CarlH

Member
Messages
179
Reaction score
1
Points
16
Location
Northern VA
I've seen some mention of removing a flange from the pipe keeping the pipe intact. That seems to be a labor intensive headache that I can avoid. I have sufficient access from below to cut through the pipe and just add the necessary pieces to install a new flange.

flange_to_stack.jpg

Just cut the pipe and add the new fittings?

I suppose I should wait to replace this until the new floor is installed before installing the new flange, right? If I break/cut off the ring around the old flange I can at least get the tiling substrate and a spacer installed where the ring of the new flange will go.
 

CarlH

Member
Messages
179
Reaction score
1
Points
16
Location
Northern VA
Thanks for the info HJ and Terry. I'll tackle this once the floor is in. As to the competence of the tile setter, we'll see how I do once I'm done. ;)
 

hj

Master Plumber
Messages
33,603
Reaction score
1,042
Points
113
Location
Cave Creek, Arizona
Website
www.terrylove.com
If the tile setter, (you?), is incompetent, then install the pipe and slide the flange over it without gluing it. Then the tile person, can move it as necessary to install the tile, but should slide it back down to make sure it fits.
 

CarlH

Member
Messages
179
Reaction score
1
Points
16
Location
Northern VA
I left the old flange in place while I installed the tile and now I am ready to replace the flange. I want to make sure that I know how things measure up prior to cutting off the old flange. I noticed that the female coupler will seat the pipe to a depth of 1 1/2" while the flange will seat to a depth of 2 1/4". Should I expect to seat the pipe to the full depth that the flange will accept or do I cut the pipe a bit short to allow for some room to adjust the height of the flange? I assume that I would cut the pipe something like 1/2" short of the full depth of the flange, but want to be sure I do this right since these pieces are not friendly to dry fitting.
 

Jadnashua

Retired Defense Industry Engineer xxx
Messages
32,770
Reaction score
1,190
Points
113
Location
New England
Flanges are designed to sit on top of the finished floor. It must be fastened through the floor, with no gaps underneath the edges. Since the tile isn't underneath the edges (or any finished floor as designed), hopefully, there is something you can drill through to anchor it properly in place. Once you add the pvc cement, it literally melts the outer layer of the plastic on both pieces, and you should be able to slide the pipe to the bottom of the socket, so if things are cut square and are plumb, you don't want it 1/2" short...almost exact on the short side is best. Once the solvent evaporates, it is literally welded together. Also, keep in mind that because the socket is tapered, you need to hold the thing in place for a bit, or it will push itself apart part way, ruining your careful measurments. Probably best if you have pre-drilled the pilot holes, and install at least a couple of screws immediately after glueup, then it won't happen. 30-seconds may be too long to leave it sitting by itself...keep some pressure on it until set.
 

CarlH

Member
Messages
179
Reaction score
1
Points
16
Location
Northern VA
Part of my concern is that the riser is not plumb. The current flange has almost a 1/4" difference in height from one side to the other.
 

NHmaster3015

Master Plumber
Messages
833
Reaction score
2
Points
0
Location
The granite state
If it's way off plumb, cut the riser and when you re-install a new riser and flange use a banded rubber coupling to join the two. The coupling will give it some flex.
 

CarlH

Member
Messages
179
Reaction score
1
Points
16
Location
Northern VA
It is 1/2" over 12" out of plumb. I'd rather not use a banded rubber coupler here if I can avoid it. Even though it is this far out of plumb, do you think I can stick with all PVC here?

flange_to_stack.jpg
 

Jadnashua

Retired Defense Industry Engineer xxx
Messages
32,770
Reaction score
1,190
Points
113
Location
New England
A no-hub connection is perfectly fine and approved. It is probably the easiest way to overcome the slightly out of plumb. This connector is thin neoprene rubber with a metal reinforcement sleeve over it, attached with hose clamps at each end. The metal band keeps the pipes aligned, end to end, but you can still get a little offset in it. Don't confuse this with a rubber coupling designed for underground use...it has no reinforcement band, and shouldn't be used inside.
 

CarlH

Member
Messages
179
Reaction score
1
Points
16
Location
Northern VA
I picked up a Mission banded rubber coupler and it says it is for CI. I did a little checking and it seems that other makers spec. the same coupler for CI and PVC. The coupler I have is the proper coupler, correct?
 

Jadnashua

Retired Defense Industry Engineer xxx
Messages
32,770
Reaction score
1,190
Points
113
Location
New England
Most, not all, CI is the same OD as pvc. It becomes much more problematic if you are trying to connect copper to cast or pvc...there, the OD of the pipes is quite different, and you must get the proper one. It should be quick to see...slide it over the end of the pvc - it should be moderately tight so there are no gaps from being larger in diameter.
 

CarlH

Member
Messages
179
Reaction score
1
Points
16
Location
Northern VA
Thanks for all the advise. I replaced the flange and went with the banded rubber coupler on the riser and that helped me get the new flange almost level.
 
Top
Hey, wait a minute.

This is awkward, but...

It looks like you're using an ad blocker. We get it, but (1) terrylove.com can't live without ads, and (2) ad blockers can cause issues with videos and comments. If you'd like to support the site, please allow ads.

If any particular ad is your REASON for blocking ads, please let us know. We might be able to do something about it. Thanks.
I've Disabled AdBlock    No Thanks